![[jms1]](../images/jms1-150x200.png)
Me, 2023-11-14
jms1.info
This site is a collection of random documents that I've written over the past 20+ years. Many of them are technical, but some will be related to non-technical things that I happen to be interested in. I'm trying to keep them organized by topic, as you can see in the index to the left.
One of the reasons I'm putting them here is so that I know where to find them. I've found that I can't hold every little detail about everything in my brain anymore, so if I write things down, I'll be able to go back and refresh my own memory when I need to.
Another reason is that people have asked me about a lot of these topics, so having them on a web page lets me give a quick answer and include a link where they can read more information, rather than having to spend a bunch of time answering the same questions over and over again.
And if other people find the information on this site useful, then ... I'm glad I could help.
Notes
Some pages may not be complete.
The first part of how I add pages to this site is to just copy an existing Markdown file. A lot of the original files I'm copying here will contain very basic bare-bones information, enough for me to understand (usually), but possibly not useful to others. (Part of why I'm adding them here is to add the more human-friendly explanations, both for others, and for myself a year from now when I've forgotten all this.)
When I do this, my intention is to go back and add more detailed information to those pages, but I don't always remember to do it - especially if I'm in a hurry.
If you find one of these "bare bones" pages and need more information, feel free to let me know.
Some of the links on the left may not exist.
These are pages I'm planning to write, but haven't done so yet.
There's not a whole lot of content here.
This is starting to not be the case anymore, but as I mentioned above, I've been writing down and keeping random notes for over 20 years. I started the current version of this site in 2024-06, it's going to take a while for me to find, organize, prioritize, and write the pages here. Plus I'm doing this in my spare time, I have a full-time job which keeps me pretty busy and, most days, makes me not want to even look at a computer when work is done.
My Other Sites
These are some other public web sites that I've written over the years.
-
jms1.netis my original "home page". It started off containing "everything", but over time I found that certain topics were taking enough space to justify moving them to their own sites. -
qmail.jms1.netis my web site about Qmail. When I started using qmail I took several other patches and combined them into a single patch, and I put the patch on thejms1.netsite. People started using my combined patch and asking questions about it, so I moved all of the qmail-related content to its own web site.I was making my living as an independent contractor at the time, and unfortunately, since returning to the world of full-time employment, I haven't had time to maintain the site (or the combined patch). If you're building a mail server I still recommend qmail, but I don't really recommend my own combined patch anymore, because it is so far out of date.
-
kg4zow.usis my site about Amateur Radio (aka "ham radio"). I'm not as active on the air as I used to be, partly because I moved to a smaller city which doesn't have as many ham radio operators around, and partly because I don't have the time. -
remarkable.jms1.infois a site I started for information about the reMarkable tablets. It's a Linux-based e-ink tablet with a textured screen that I find really nice to write on. One of the things I really like about it is that it allows SSH-as-root out of the box. I've been writing my own programs to work with them without using reMarkable's cloud service. -
jekyll.jms1.infowas my first attempt at writing this site. As the name suggests, I was using Jekyll to manage the content, but in 2024-06 I decided to re-do the entire site using mdbook, since I'm a lot more familiar with it (I use it to maintain half a dozen internal web sites for$DAYJOB), and because it's a lot easier to install, configure, and update on a new workstation. Plus, it makes more sense to me to organize the pages by subject rather than by date.
Contact
The best way to reach me is to email jms1@jms1.net. If your message bounces (my server does some pretty aggressive spam-blocking), change net to me - that will also reach me, but it works through Apple's servers. Note that I don't always check personal email every day, so if you email me and I don't respond, please be patient.
If you need an immediate response for some reason, or if you've found a problem with the information on this site, you can use Keybase chat. My username there is jms1.
About this site
I'm writing this site as a collection of Markdown files, converting them to static HTML files using mdbook with some customizations, tracking the changes using git, and hosting the finished site using Keybase Sites.
Clockwork Pi uConsole
The Clockwork Pi uConsole is a handheld Linux computer, made by Clockwork Pi.
Useful Links
- Clockwork Pi - manufacturer of the uConsole
- HackerGadgets - maker of several popular expansion kits for the uConsole
- Clockwork Pi forums - discusson forum for users of the uConsole and other Clockwork Pi hardware
- uConsole World - blog site with articles and tutorials about the uConsole
Hardware
The uConsole is sold as a kit, which includes ...
- a metal frame, that the parts mount into
- a 5-inch 1280x720 display
- a keyboard with a directional pad and "gaming" buttons (A/B/X/Y/Select/Start)
- a trackball with L/R mouse buttons
- a pair of small internal speakers
- a set of circuit boards to connect the various components together
- metal front and back covers
- an external wifi antenna, meant to be attached to the outside of the case
No soldering is required. All parts are secured to the frame using M4 hex-head screws, and the kit comes with a 2.5mm hex driver (aka "allen wrench"), which is the only tool needed to assemble the unit.
The main board has a single USB-A port (USB 2.0), a USB-C port (for power input only), a Micro-HDMI port, and a 3.5mm headphone jack. There is room inside the unit for an expansion board, which may have its own external connectors on the other side of the unit.
The kit can can be ordered with one of several "core" boards containing an ARM- or RISC-based CPU board, or with no "core" (for people who may already have a Raspberry Pi Compute Module 4/5). I ordered mine with a Raspberry Pi Compute Module 4 core.
It can also be ordered with a 4G Cellular/GPS expansion board, with its own antenna meant to be attached to the outside of the case.
Open Source
The design is all open-source. The uConsole repo on Github contains schematics for the circuit boards, source code for the keyboard firmware, and information about how they built the kernel with the correct modules for the uConsole hardware.
Their web site sorta says that the design files for the frame and front/back covers should be there as well, but I don't see them in this repo (or in any of their repos) as of 2025-12-31.
Batteries
Batteries are NOT included with the kit. This is due to safety regulations around shipping lithium batteries.
The uConsole is powered by a pair of 18650 rechargable Li-ion batteries, with charging circuitry included on the main board. The battery holder within the unit can hold either flat-top or button-top batteries.
⇒ The Batteries page has more details, including notes about which batteries to order and which ones to avoid.
Power Supply
A power supply is NOT included with the kit. This is probably because different parts of the world use different power connectors and voltages. It uses a standard 5V USB-C connector.
Most USB-C chargers for mobile phones or tablets should be usable with the uConsole, however you need to be careful when using "high power" adapters designed for laptops.
⇒ The Power Supply page has more details.
Cases
Coming soon.
Below is a quick list of what I plan to include on the page when I write it.
- USA Gear case
- has very little room for accessories (designed for a camera display?)
- semi-rigid, not solid
- Pelican 1200
- has more room
- SOLID
- other colours available (black, tan, orange, yellow)
- more expensive
- has a lifetime warranty
Power
Indicators
The uConsole comes with a translucent white rubber button for power. The button is translucent because there are two LEDs on either side of the button itself, which can be seen through the button:
-
A green LED, which indicates that the uConsole's power is on.
-
A yellow LED, which indicates that the uConsole is charging the internal batteries.

Power Supply
The uConsole requires a 5V 2A power supply with a USB-C connector. The power supply can be used to charge the batteries, and can also be used to power the unit when batteries are not installed.
A power supply is NOT included with the kit. Most USB-C chargers for mobile phones or tablets should be usable with the uConsole, however ...
The uConsole does not perform USB-PD power negotiation. It expects the USB-C port to receive 5V power, and can draw up to 3A. The highest I've seen it draw is 1.8A, or 5W). Chargers which only supply 5V, or which correctly implement the USB-PD power negotiation process, should work with the uConsole.
What this means is, any USB power supply which only supplies 5V, or any newer power supply which can supply more but correctly implements USB-PD, should be usable with the uConsole. Be aware that some power supplies may not negotiate USB-PD correctly and can damage the uConsole, as this forum post illustrates.
-
This power supply (I think from an old iPad) only outputs 5V, up to 2.4 A. My uConsole works just fine with it.

-
This power supply (from a newer iPad Pro) is the one I carry in the box with my uConsole. It can output 5V or 9V, up to 3A. It is marked as supporting USB-PD.

-
This power supply came with a Raspberry Pi 5 kit. It isn't explicitly marked as supporting USB-PD, however the list of voltage levels is identical to the list of voltage levels supported by USB-PD. A quick test shows that it doesn't try to supply more than 5V to the uConsole, and the uConsole was able to charge the battery while plugged into it.

Batteries
The uConsole is powered by a pair of 18650 rechargable Li-ion batteries. The battery holder within the unit can hold either flat-top or button-top batteries. The main board has the necessary circuitry to charge the batteries, so you don't have to remove them in order to recharge them.
The batteries are connected in parallel, which means that it will run with only a single battery installed. It also means that if you need to replace the batteries, you could theoretically swap them out one at a time while the system is running, however this is not recommended.
Batteries are NOT included with the kit. This is due to safety regulations around shipping lithium batteries.
You probably won't find these batteries in a normal retail store. I've seen them at a dedicated battery store, and apparently most "vape" shops sell them as well (apparently vape pens use them?) They can also be ordered from suppliers like Amazon or AliExpress, however you need to be careful not to order "fake" batteries which don't have the capacity they claim.
⚠️ Battery Capacity
The physical and electrical characteristics of Li-ion batteries limit the capacity of a 18650 cell to about 3600 mAh, with the "normal" capacity being 2500-3000 mAh. If you see batteries advertised with higher capacities (such as 5000 or 9900 mAh), be aware that the seller is probably lying about the capacity, and their claims should not be trusted.
I admit, I fell for this. In 2025-01 I bought some batteries which were advertised as having 5000 mAh capacity, for a different device (an Arpeggio mini-synth, if you're curious). The batteries do work, however it was the first time I had ever used 18650 cells so I didn't realize that only two hours of run-time wasn't normal.
I have since ordered a set of higher quality batteries (links below), with a charger that has a capacity tester function. The new batteries all test between 2890 and 2960 mAh, while the old ones that I tested only had 1380 and 1400 mAh. I have thrown the old batteries out.
Calibration
When the batteries in the uConsole are changed, you may need to calibrate the power controller so it knows the maximum capacity of the new batteries and can calculate the right percentage to show in the on-screen battery indicator.
This is covered on the Battery Calibration page.
Links
Batteries
-
Amazon - Authentic Samsung30Q, 3.7V Flat Top Real 3000mAh 18650 Battery Rechargeable 30Q (4 Pack)
While reading about peoples' experiences with "fake" batteries, I found several web sites which recommended buying only genuine Panasonic or Samsung batteries. These are advertised as "Authentic Samsung", so I'm hoping they will last longer than two hours.
These arrived on 2026-01-06. The word "Samsung" doesn't appear anywhere on the batteries or packaging, but so far they seem to be a lot better than the previous "fake" batteries I was using.
The first thing I did was put them on a charger. Unlike the previous "fake" batteries I was using (which went from empty to "full" in less than two hours), I had to charge them for over four hours before the charger considered them "full", and the uConsole immediately recognized them as 100% full, rather than showing a seemingly random number between 25% and 70%.
Charger
-
This unit can charge up to four 18650 batteries at once, and can also charge normal AAA/AA/C batteries.
It also has a capacity test function which charges the battery to full, discharges it to empty, then charges it back to full again, measuring how much power the battery "takes" when charging from emtpy back to full.
Power Testers
These are little gadgets that plug in between the charging cable and the uConsole, to show how much power the uConsole is drawing.
-
This connects between the charging cable and the uConsole. The display cycles between volts, amps, and watts every few seconds. If you have a laptop or other device which draws more power, this one says it can measure up to 240W (i.e. 5A at 48V).
-
This also connects between the charging cable and the uConsole. The product description says that it shows volts, amps, and watts, however I've only ever seen it show watts. It also shows a "PD" indicator when the connection was negotiated using USB-PD (seen while charging an iPad). This one says it can measure up to 100W (5A at 20V).
Other
Related links (mostly Clockwork Pi Forum posts) I used while writing this page, not in any particular order.
- uConsole: How Does Charging Work?
- Battery level indicator?
- uConsole battery calibration issue (not useful by itself, but has pointers to other posts)
- uConsole not consistently charging and intermittent shutdowns
- 10'000 mAh Battery
- Axp228: properly report energy/power readings 👍 yatli wrote and describes updated axp228 driver
/sys/class/power_supply/axp20x-battery/calibrate- write 1: initiate battery full capacity calibration
- read 0: calibration disabled
- read 32: calibration enabled but not active
- read 48: calibration in progress
Battery Calibration
When you put a new set of batteries into the uConsole, the power controller needs to "learn" the capacity of the new batteries. This process is known as "calibration". Until you calibrate the power controller, it won't know the real capacity of your batteries, and may report 65% when they're empty, or (as mine were when I started writing this page) 34% when they've been charging overnight and are presumably full.
I've seen several web pages, mostly on the Clockwork Pi forums, which tell how to do this. Every set of directions is either a copy of the same three sentences, or a reference to those three sentences.
It seems to me that some details are missing, so I'm writing this page to try and provide directions which are (1) more complete, and (2) more detailed. A big part of this is because I'm currently trying to do the calibration process and seeing some really weird results.
My Experience So Far
A year ago I bought a set of 18650 batteries with a stated capacity of 5000 mAh, to use with a different device. I didn't notice anything wrong with them at the time, but I also had never used 18650's before so I didn't really have a good idea of what to expect.
Using the batteries I had ordered a year ago ...
-
I left the uConsole plugged in and running overnight, with a tester between the cable and the uConsole to show how much power was being transferred. When I started, the power cable was supplying 9W, presumably to run the system and charge the batteries.
-
In the morning it showed the battery level at 68%, and the power cable was supplying 4W.
-
I ran the command to start the calibration process, unplugged the power cable, and ran a command to "exercise" the CPU (computing SHA256 checksums of 1GB blocks of data from
/dev/urandom). -
About 2h30m later, the system died.
-
I plugged the power cable back in to charge the batteries. The tester on the power cable showed that it was supplying 9W.
-
After about two hours this dropped from 7W to 3W, then over the next half hour it gradually drifted down to zero. This tells me that the power controller stopped charging the batteries, presumably because the batteries were full.
-
When I powered the system back on, the power controller reported the batteries were only 43% full ... and with the power cable connected and supplying 4W, the reported battery level drifted DOWN to 25% over half an hour, and is now sitting at a steady 25%.
-
I then unplugged the cable and let the uConsole run from just the batteries. It died in about 1h45m.
Fake Batteries
While researching this page, I came across several pages which explained that, with the battery chemistries being used today, 18650 batteries cannot hold more than about 3600 mAh each. This means that the batteries I was using, did not have the capacity they claimed to have. Two of these pages also recommended buying genuine Panasonic or Samsung batteries.
Back on Amazon, I found a listing for "Authentic Samsung" batteries. I took the chance and ordered these, along with a charger with a capacity tester.
- Authentic Samsung30Q, 3.7V Flat Top Real 3000mAh 18650 Battery Rechargeable 30Q (4 Pack)
- IMREN 18650 Capacity Tester,18650 Battery Charger with Discharge & Testing Function, 21700 Battery Charger with LCD Screen Display Capacity Suit for 18650 21700 20700 1.2V Ni-MH/Ni-CD LiFePO4 Battery
The capacity tester showed all four of the new batteries having 2890-2960 mAh each, and two of the older batteries I had been using, having 1380 and 1400 mAh (I stopped testing and threw all six of them out, not worth wasting the time to prove that junk is junk).
I've been using the new batteries for about a week, they last over four hours in the uConsole.
Procedure
To calibrate the power controller for a new set of batteries ...
-
If you have a power tester (see below), plug it in between the power cable and the uConsole so you can monitor how much power the is being consumed, rather than having to rely only on the incorrect information from the uConsole's charging circuitry. (After all, the whole point of calibrating the power controller is to be able to trust the information it provides.)
-
If the uConsole is configured with any "auto shutdown" or "battery saver" featires, disable them. We're going to be deliberately running the batteries down to empty, which means we want the machine to not shut down by itself.
-
Plug in the charging cable and wait until the batteries are full.
If you're using a power tester, make sure it's showing how much power (watts) the uConsole is consuming. If it's showing volts and amps, you can multiply the values to get watts (i.e. 1.8A at 5V => 9W).
You can watch the state of the battery using
upower, which is normally included with the Raspberry Pi images.-
Run
upower -eto list all power-related devices. The devices will have names that look like/org/freedesktop/Upower/devices/..., the internal battery controller will have a name containingapx20x_battery. -
Run
upower -i DEVICEto see the properties of that device.
BAT=$( upower -e | grep 'apx20x_battery' )
watch -n5 "upower -i $BAT | egrep '(state|percentage):'"
You can leave the
watchcommand running in a terminal window while performing the steps below, this will run the command over and over every five seconds so you can watch the numbers as they change.When the batteries were full, or at least when I thought the batteries were full, I noticed the following:
- In the
watch ... upower -ioutput, thestatevalue started changing betweencharginganddischarging. - On the power meter, the usage dropped from 9W to 2W.
-
-
Tell the power controller to start the calibration process. In a terminal window ...
echo 1 | sudo tee /sys/class/power_supply/axp20x-battery/calibrate -
Unplug the power cable, so the uConsole is running on batteries.
-
Let the unit run until the battery dies. This can take a while.
If you'd rather not wait so long, you can do things on the system to increase it's power consumption. On my uConsole, I ran the following command in a terminal window to keep the CPU busy:
while true ; do dd status=none bs=1G count=1 if=/dev/urandom | sha256sum ; done | cat -nThis command makes the kernel generate 1 GB of random numbers (reading from
/dev/urandomgenerates random bytes), calculates the SHA256 checksum of those numbers, and prints the result, over and over until the system dies. (Thecat -nat the end puts a count in front of each checksum, in case you're curious how many GB of random data have been processed.) -
When the uConsole dies, plug the power cable in, but do not power it on.
-
Wait until the batteries are full. If you're using a power tester on the wire, you'll see the power consumption drop to zero when this happens. If not, all I can suggest is to let the unit charge overnight.
-
When you power the unit on, it should have an accurate picture of the batteries' true capacity, and the percentages should be accurate.
Software
Coming soon.
Below is a quick list of what I plan to include on the page when I write it.
- Clockwork Pi "factory" images
- outdated, buggy
- Rex images - what I'm using
- Debian release names (bookworm/trixie)
- what the "lite" release is
- uConsole-Image-Builder images - tried one, had issues (screen rotation etc.)
- how to write an image to a card
- Keyboard firmware
- 4G extension card firmware
git
This section contains pages dealing with the git source code control system.
Fix a Commit before Creating a New Branch
2024-06-20 jms1
Our official workflow at $DAYJOB is to commit all work to a ticket-specific feature branch, and then create a pull request to get it merged into the primary branch. This allows people other than yourself to review your work before it gets merged into the main code.
I'm not perfect, sometimes I forget to create a new branch first, and accidentally create commits directly on the primary branch. Usually I realize this before pushing anything, which means I can fix it on the local machine first.
Quick Explanation
What we're going to do is this:
-
Create the new branch, pointing to the last of the new commits.
-
Move the
mainbranch to point to what it was pointing at before we started creating commits.
Starting Condition
In this examples below, we're going to assume that the recent commits in the repo look like this:
$ git tree1 -a
* 67f8356 (HEAD -> main, origin/main) 2024-06-20 jms1(G) ABC-123 typo
* 8a837d6 2024-06-20 jms1(G) ABC-123 new feature
*   1d3158c 2024-06-13 jms1(G) Merge branch 'ABC-101-previous-feature'
|\
| * d60b020 (origin/ABC-101-previous-feature) 2024-06-12 jms1(G) ABC-101 previous feature
|/
* 3accd26 2024-05-29 jms1(G) ABC-93 old feature
ℹ️
git tree1This is one of my standard git aliases.
In this case, I created two commits, 8a837d6 then 67f8356, then realized I should have created a feature branch for it first.
Create the new branch
Part of what you need to accomplish is creating a new branch, pointing to what should be the HEAD of that branch. Luckily, the current HEAD is already pointing to that commit, so if we just create the new branch here, we'll be good.
$ git branch ABC-123-new-feature
Looking at the repo after this, you can see that the new "ABC-123-new-feature" branch exists and is pointing to the correct commit.
$ git tree1 -a
* 67f8356 (HEAD -> main, origin/main, ABC-123-new-feature) 2024-06-20 jms1(G) ABC-123 typo
* 8a837d6 2024-06-20 jms1(G) ABC-123 new feature
*   1d3158c 2024-06-13 jms1(G) Merge branch 'ABC-101-previous-feature'
|\
| * d60b020 (origin/ABC-101-previous-feature) 2024-06-12 jms1(G) ABC-101 previous feature
|/
* 3accd26 2024-05-29 jms1(G) ABC-93 old feature
Move the main branch
This will "move" the head of the main branch to point to the commit that it had before we started working.
Identify the commit where the branch should point
First, identify the commit that it should be pointing to.
In this example, it should be pointing to commit 1d3158c. You can refer to the commit using its hash, or using any other branch or tag name which points to that commit. In many cases, origin/main will be usable.
Check out the main branch
$ git checkout main
At this point the repo will look like this:
$ git tree1 -a 67f8356
* 67f8356 (HEAD -> main, origin/main, ABC-123-new-feature) 2024-06-20 jms1(G) ABC-123 typo
* 8a837d6 2024-06-20 jms1(G) ABC-123 new feature
*   1d3158c 2024-06-13 jms1(G) Merge branch 'ABC-101-previous-feature'
|\
| * d60b020 (origin/ABC-101-previous-feature) 2024-06-12 jms1(G) ABC-101 previous feature
|/
* 3accd26 2024-05-29 jms1(G) ABC-93 old feature
In this particular example we were already on the main branch, so in this case this wasn't really necessary. However, you should get in the habit of using git checkout first, since that controls which branch git reset will be modifying.
Move the main branch
The git reset command changes what the current branch points to.
$ git reset --hard 1d3158c
At this point the repo will look like this:
$ git tree1 -a 67f8356
* 67f8356 (origin/main, ABC-123-new-feature) 2024-06-20 jms1(G) ABC-123 typo
* 8a837d6 2024-06-20 jms1(G) ABC-123 new feature
*   1d3158c (HEAD -> main) 2024-06-13 jms1(G) Merge branch 'ABC-101-previous-feature'
|\
| * d60b020 (origin/ABC-101-previous-feature) 2024-06-12 jms1(G) ABC-101 previous feature
|/
* 3accd26 2024-05-29 jms1(G) ABC-93 old feature
As you can see ...
-
The
mainbranch now points to the commit that it would have pointed to if we had created the new branch before creating any commits. -
The new
ABC-123-new-featurebranch points to the most recent commit in the work you've already done.
Keep working
At this point, the problem is fixed. You can continue working as if you had created the branch before starting, including pushing the new branch to a remote and creating a pull request.
Changelog
2024-06-20 jms1
- Created page (from notes when I actually made this mistake)
Multiple Remote URLs
When you clone a git repo to your machine, it creates a "remote" called origin, pointing to wherever you cloned the repo from. This allows you to use commands like git fetch and git pull to download updates from the same source, and git push to upload changes back to that source.
In some cases, you may want a repo to have multiple "remotes". There could be any number of reasons for this, I do it in order to maintain backup copies of my own repos in case the repo's "primary" server is unavailable.
There are a few ways to handle this.
Multiple Remotes
Repo directories can have multiple "remotes". As a (contrived) example ...
$ git remote -v
foks    foks://(redacted)/jms1.info (fetch)
foks    foks://(redacted)/jms1.info (push)
github  git@github.com:kg4zow/jms1.info (fetch)
github  git@github.com:kg4zow/jms1.info (push)
With this kind of configuration, you can pull or push commits from either remote, as needed. I've done this with repos in the past, usually as part of a migration from one git hosting service to another.
For example, to copy the repo from FOKS to Github, I could do something like this:
git fetch -p foks
git push --all github
git push --tags github
One problem with doing this is, you have to keep track of which remotes have which commits, and be sure to use the correct remote names with your commands.
Setting this up
Assuming you've cloned a repo from a remote called origin ...
-
If you're creating a new repo on a remote host (such as Github), be sure to create an empty repo. If it offers you any options to set up a README or LICENSE file, don't use them. These options work by starting an empty repo and adding a commit which adds those files. Pushing an existing repo into a non-empty repo is ... not imposisble, but it's not simple (you have to "merge" the two).
-
On your local machine, use
git remote addto create a new remote.git rmeote add github git@github.com:kg4zow/jms1.info -
Many services (like Github) will set a repo's "primary" branch to the first branch pushed into the repo. In order to avoid later issues, your first push should contain only the branch that you consider to be "primary".
I normally use
mainas the primary branch name in my repos.git checkout main git push github main -
Push the other branches, and any tags.
git push --all github
git push --tags github
At this point, the new github remote contains every commit, branch, and tag that the .git/ directory on your workstation knows about.
Multiple URLS in the Same Remote
Another option is to add multiple "push" URLs to the same remote.
With this configuration, every time you push commits to that remote, it will push them to all of the URLs, one after the other.
I do this with most of my personal repos, in order to have "backup copies" of my repos in case their "primary servers" are not available.
Setting this up
As an example, this is how I set up the repo holding the jms1.info site's source code. (These are the actual commands I typed on my workstation when I added Github as a second URL for this repo on 2025-10-17.)
-
Create the Github repo.
gh repo create --public kg4zow/jms1.info -
Clone the existing FOKS repo to a new directory.
cd ~/git/ git clone foks://(redacted)/jms1.info jms1.info -
Add the Github URL to the existing remote.
cd ~/git/jms1.info/ git remote set-url --add origin git@github.com:kg4zow/jms1.info -
Push the contents to Github.
git push main
git push --all
git push --tags
Note that these commands don't require a "remote" name, because the repo (the directory on my workstation) only has one remote, called
origin.Also note that these
git pushcommands did try to push commits to FOKS. However, nothing was actually pushed because the FOKS server already had the commits and tags I was pushing.
From this point forward, whenever I make changes and push commits, the git push command pushes those changes to both locations, one after the other.
My Configuration
I've been using git for over ten years. Over that time I've found a collection of configuration options that seem to work well for me. I normally configure all of my workstations with these options.
These options includes a collection of "aliases" which really make my life easier.
Configuration Options
Identity
These options set the default name, email, and PGP key used for commits. The values of the options are different on personal and work machines.
-
Personal machines
git config --global user.name "John Simpson" git config --global user.email "jms1@jms1.net" git config --global user.signingkey "0xE3F7F5F76640299C5507FBAA49B9FD3BB4422EBB" -
For
$DAYJOBmachinesgit config --global user.name "John Simpson" git config --global user.email "jms1@domain.xyz" git config --global user.signingkey "0x1234C0FFEEC0FFEEC0FFEEC0FFEEC0FFEEC0FFEE"
Note that I also have aliases for cases where I might need to sign a commit using my personal "identity", on a $DAYJOB workstation. Because my PGP and SSH keys are stored on Yubikeys, I can just plug the "other" Yubikey into the machine and use the correct alias.
These aliases are documented below.
For all machines
I use these configuration options on every machine.
git config --global core.editor "nano"
git config --global core.excludesfile "$HOME/.gitignore_global"
git config --global credential.helper "cache --timeout=300"
git config --global init.defaultBranch "main"
git config --global clone.defaultBranch main
git config --global log.showSignature true
git config --global push.default "simple"
git config --global pull.rebase false
git config --global gpg.ssh.allowedSignersFile "$HOME/.config/git/allowed_signers"
All of my commits and tags are signed. This is a requirement at $DAYJOB, and a good idea in general.
git config --global commit.gpgsign true
git config --global tag.gpgSign true
Commit message template
This sets up a text file which is used as a template when git uses a text editor to create or edit a commit message.
In particular, I generally use the 50/72 format format when writing commit messages. As you can see below, having the ^ marks at 50 and 72 characters makes it easier for me to stay within the limits.
-
To configure the file:
git config --global commit.template "$HOME/.stCommitMsg" -
The contents of the file:
$ cat ~/.stCommitMsg


#                                             50 ^                  72 ^
# First line: start with ticket number(s), limit to 50 characters
# BLANK LINE
# Additional lines: limit to 72 characters
$ git config --global commit.template "$HOME/.stCommitMsg"
Note that empty lines and lines starting with # are not included in the actual commit message.
Aliases
Aliases allow you to "make up your own git commands". For example, if you were to do this ...
git config --global alias.showfiles "show --name-only"
... then git showfiles would be the same as git show --name-only.
My Usual Aliases
These are the aliases I've built up over the years. Some of these I use dozens of times every day.
git config --global alias.log1 "log --oneline --no-show-signature --abbrev=8 '--pretty=tformat:%C(auto)%h%d %C(brightcyan)%as %C(brightgreen)%al(%G?)%C(reset) %s'"
git config --global alias.tree "log --graph --decorate"
git config --global alias.tree1 "log --date-order --decorate --graph --no-show-signature '--pretty=tformat:%C(auto)%h%d %C(brightcyan)%as %C(brightgreen)%al(%G?)%C(reset) %s'"
git config --global alias.tagdates "log --tags --simplify-by-decoration --pretty=\"format:%ai %d\" --no-show-signature"
git config --global alias.taghashes "log --tags --simplify-by-decoration --pretty=\"format:%H %d\" --no-show-signature"
git config --global alias.id "describe --always --tags --long --abbrev=8 --dirty"
git config --global alias.top "rev-parse --show-toplevel"
Changes for older git versions
Some colours and tags were added between git 2.16.5 and 2.37.0.
%as(commit date YYYY-MM-DD) ->%adwith--date=shortoption%al(author email local part) ->%an(author name)
For older versions without these newer colour codes, I use these aliases instead.
git config --global alias.log1 "log --oneline --no-show-signature --abbrev=8 --date=short '--pretty=tformat:%C(auto)%h%d %C(cyan)%ad %C(green)%an(%G?)%C(reset) %s'"
git config --global alias.tree1 "log --date-order --decorate --graph --no-show-signature --date=short '--pretty=tformat:%C(auto)%h%d %C(cyan)%ad %C(green)%an(%G?)%C(reset) %s'"
Sign commits using specific keys
These aliases allow me to sign commits using my personal PGP key on the work machine, or vice-versa, by physically plugging the correct Yubikey into the machine. By themselves they won't be very useful to anybody else, but they could be useful as examples if you need to use different keys for different repos.
git config --global alias.commitp "commit --gpg-sign=E3F7F5F76640299C5507FBAA49B9FD3BB4422EBB --author='John Simpson <jms1@jms1.net>'"
git config --global alias.commitw "commit --gpg-sign=1234C0FFEEC0FFEEC0FFEEC0FFEEC0FFEEC0FFEE --author='John Simpson <jms1@domain.xyz>'"
Notes
Random notes relating to git
Commits signed with SSH keys
There used to be a brief explanation here, I've moved this to its own page.
⇒ Signing commits with SSH keys
Configuration scope
The git config command operates on different files, depending on which options you give it.
| Option | File | Scope |
|---|---|---|
--local (or none) | REPO_ROOT/.git/config | the current repo |
--global | $HOME/.gitconfig | the current user |
--system | /usr/local/etc/gitconfig | all users on the system |
--worktree | WORKTREE_ROOT/.git/config.worktreeor REPO_ROOT/.git/config | the current "worktree" or --local if no worktree is active |
--file ___ | specified | depends on the file |
Changelog
2025-04-30 jms1
- Fixed a typo
- Removed info about git commits signed by SSH keys, since there's now a dedicated page for that
2024-06-20 jms1
- Created this page (from pre-existing notes)
Signing commits with SSH keys
Newer versions of git support the ability to sign commits using an SSH key.
Specifically ...
- Git v2.34 or higher
- OpenSSH 8.0 or higher
🛑 Don't Do This
I personally think that using SSH keys to sign commits is a bad idea.
The main reason I say this is because SSH keys are not linked to specific identities. An SSH key pair is JUST a pair of numbers - there's nothing about an SSH key which says "I belong to John Simpson". If I don't tell you which SSH key I actually use, you have no way to know whether a given key belongs to me or not.
Git allows users to set their own name and email address when creating commits. This means that anybody can create a commit which claims to be made by any name and email address. Somebody could use your name and email address on a commit, and sign the commit using an SSH key that they created on their own. It wouldn't be the correct key (i.e. the key that you normally use), but it would be signed, and the commit would have your name and address as the author ... so if somebody was looking at the commit but not verifying the signature, there's a good chance this would be enough to fool them.
If a command like git show is looking at a commit which was signed using an SSH key, all it can really tell for sure is which SSH key signed it. It doesn't know who that key actually belongs to, unless you tell it which keys belong to which people. (I explain how to do this below.)
This is why you need to verify the signatures on commits - to be sure that the person who the commit says is the author, actually is the author.
Verifying commits signed by SSH keys involves some extra configuration which isn't required for commits signed by PGP keys.
Another reason for not using SSH keys to sign commits is that, if the secret key is compromised, there is no way to revoke the key. If your secret key escapes, YOU have to hunt down every person who has a copy of your public key and tell them to stop using it.
Again, I personally don't use SSH keys to sign commits, but I do feel like people should be allowed to make their own decisions. As long as you understand the risks, if you want to do it, more power to you.
Overview
There are two basic operations involved with signed commits, no matter what key type is used: signing commits, and verifying signatures.
Git needs to be configured for both of these.
Signing Commits
There are a few things to configure in order to make git sign your commits.
Sign one commit
Creating a signed commit is done by adding the -S (uppercase) or --gpg-sign option to your git commit command line, like so:
git commit -S -m 'commit message'
Note that only that one commit will be signed.
Tell git to sign commits by default
You can also configure git to sign commits by default, using this command:
git config --global commit.gpgsign true
After doing this, every git commit command will create a signed commit, without your having to include the -S option in the command.
ℹ️ Create an un-signed commit
If you do this and need to occasionally not sign a commit, you can add the
--no-gpg-signoption to thegit commitcommand, and that one commit will be created without a signature.
Documentation for the commit.gpgsign option
Tell git to use an SSH key when signing commits
Git normally uses a PGP key to sign commits. Setting this config option tells it to use an SSH key instead.
git config --global gpg.format ssh
Documentation for the gpg.format option
Tell git which SSH key to use
We can do this in one of two ways:
-
Use the filename to the public key file:
git config --global user.signingKey $HOME/.ssh/id_rsa.pub -
Include the public key itself in git's configuration:
git config --global user.signingKey 'key::ssh-ed25519 AAAA... comment'
Documentation for the user.signingKey option
Verifying Commits
Before git will be able to verify commits, it first needs to be told which SSH keys belong to which people. We do this by creating an "allowed signers" file, which is a simple text file containing email addresses and SSH public keys.
Create an Allowed Signers file
The file can be created wherever you like, as long as it's readable by the git command itself. The example below will use $HOME/.git_allowed_signers as the filename, but you can use whatever filename you like.
Each line in the file should contain ...
- One or more email addresses. If multiple email addresses use the same key, the addresses should be separated by commas.
- An SSH public key, optionally including the same coments you normally see after the key itself.
For example ...
jms1@example.com ssh-ed25519 AAAAC3NzxxxxxxxxxxxxxxxxxxxxxxxxxRK4m 2025-04-29 fake key
Documentation for the Allowed Signers file format is in the ssh-keygen(1) man page. If your system isn't set up to view man pages, this web page has a copy, however OpenSSH 8.0 was the first version to use an Allowed Signers file and I'm not sure what version of OpenSSH this web page was taken from.
ℹ️ Trust the man pages
You should always trust the documentation in your system's man pages over anything you find online. This is because the man pages are installed with the software itself, so they're guaranteed to be the same versions.
This is especially true of programs like OpenSSH, where new options are being added with every new version.
Tell git where to find the Allowed Signers file
This is just another git config command.
git config --global gpg.ssh.allowedSignersFile $HOME/.git_allowed_signers
Documentation for the gpg.ssh.allowedSignersFile option
Tell git to always show signatures
This is optional. I do it as part of the git configuration on all of my machines.
This will make every git log or git show command use the --show-signature option by default, so you won't have to remember to include it in every command.
git config --global log.showSignature true
Messages
You may run into the following messages when working with SSH-signed commits.
Good "git" signature
Good "git" signature for user@example.com with RSA key SHA256:SHA256:oSAqmDr7/LKI+STyBrT79IcFmbyt3h1P1niXdg0I+94
✅ This is good. It means that the commit was signed by an SSH key which is in your Allowed Signers file.
This message is actually telling you three things:
-
Good "git" signaturetells you that the commit's contents and message haven't been modified since the signature was created. -
for user@example.comtells you whose SSH key signed the message. -
with RSA key ...gives you the fingerprint of the key which signed the commit.
No principal matched.
Good "git" signature with RSA key SHA256:oSAqmDr7/LKI+STyBrT79IcFmbyt3h1P1niXdg0I+94
No principal matched.
❓ This means that the commit was signed by an SSH key that isn't recognized (i.e. isn't in your Allowed Signers file).
This mesage is actually telling you three things:
-
Good "git" signaturetells you that the commit's contents and message haven't been modified since the signature was created. -
with RSA key ...gives you the fingerprint of the key which signed the commit. -
No principal matchedmeans that it can't tell you who signed the commit.
If you're able to contact the commit's author and get a copy of their SSH public key, you can get its fingerprint using ssh-keygen -l, like so:
$ ssh-keygen -l -f their_id_rsa.pub
4096 SHA256:oSAqmDr7/LKI+STyBrT79IcFmbyt3h1P1niXdg0I+94 user@example.com (RSA)
As you can see, the fingerprint printed by this command matches the fingerprint shown by the git show or git log command, so you can be sure that this commit was signed by that person.
gpg.ssh.allowedSignersFile needs to be configured and exist
❓ If you work with repos containing commits signed by SSH keys, and git is showing signatures, you may see this message when looking at commits that were signed by SSH keys:
error: gpg.ssh.allowedSignersFile needs to be configured and exist for ssh signature verification
The message means exactly what it says: either you haven't configured the gpg.ssh.allowedSignersFile option, or the file that it points to doesn't exist.
If you don't want to see this message, there are a few options:
-
Use the
--no-show-signatureoption in your command.git show --no-show-signature a1b2c3d4This option will override the
log.showSignatureconfig option. -
You can configure git to use an Allowed Signers file, but leave the file empty.
> $HOME/.git_allowed_signers
git config --global gpg.ssh.allowedSignersFile $HOME/.git_allowed_signers
Note that the first command starts with
>. This will create the file if it doesn't already exist, and empty the file if it does.ℹ️ Shell Output Redirect Operator
This is the same
>operator that you would use to send the output of a command to a text file. In this case we're not running a command, so we're sending nothing to the file. -
You can configure git to use
/dev/nullas the Allowed Signers file.git config --global gpg.ssh.allowedSignersFile /dev/nullThis is just like setting up an Allowed Signers file and leaving it empty, except that you don't have to create the file at all. The
/dev/nullfile always exists on macOS and Linux systems, and if anything (includinggit) tries to read data from it, it will act like any other empty file.
Changelog
2025-04-30 jms1
- Created page
Keybase
Keybase is a system which provides end-to-end encrypted services, including ...
- Text chat, between groups of specific people, and within "teams".
- Cloud file storage, with the files accessible to yourself, a specific set of people, or a team.
- Git repositories, accessible to yourself or to a team.
- Encrypting, decrypting, signing, and verifying encrypted messages which can be sent by some other method (such as email, or a "corporate approved and monitored" chat system).
Keybase also provides a way to prove your identity on some other service, and to allow others to find you based on those identities. These services include Github, Reddit, and Hackernews. You can also "prove" that you own specific DNS domains and web sites.
You can also attach PGP keys to your Keybase account. This was actually Keybase's original application, as a way to find other peoples' PGP keys when all you knew them as, was a username on a site like Reddit.
For example, if you only know somebody as "kg4zow on Github", if a Keybase user has proven that they own that Github user (hint: I did), you can use Keybase to chat or share files with them, secure in the knowledge that the person you are communicating with on Keybase is the same person as "kg4zow on Github".
KBFS: Cloud File Storage
KBFS, or Keybase Filesystem, is a cloud file storage system. Keybase provides 250 GB of encrypted cloud storage for each user, as well as 100 GB for each team. This storage can be accessed by any Keybase client which is registered as a device on a user's account.
Each user also has a public directory available, whose contents can be viewed by any other Keybase user. For example, if you're logged into Keybase you can look in /keybase/public/jms1/ to see the files that I'm sharing with the world.
FUSE and Redirector
For Linux, macOS, and ms-windows systems, Keybase provides a way to "mount" KBFS so it appears as part of the machine's filesystem. The details are different for each operating system, but Linux and macOS both use a FUSE (Filesystem in USErspace) module to translate "file accesses" to the appropriate API calls needed to upload and download encrypted blocks from Keybase's cloud servers.
It's possible for multiple people to be logged into a computer at the same time, so Keybase needs to ensure that different users on the same machine can't see each others' Keybase files. The mechanics of how this happens are different for each operating sytem.
I don't want to go into a lot of technical detail, so the short version is this:
-
Each user on a computer has their own "view" of KBFS, mounted in a different directory.
-
KBFS uses a thing called a "redirector", which redirects file accesses to the user-specific mount directory for whatever user is accessing it.
-
On Linux, the redirector is mounted as
/keybase. -
On macOS, the redirector is mounted as
/Volumes/Keybase. Some systems may also have/keybaseas a symbolic link pointing to/Volumes/Keybase.
-
The idea is, all users on the system can use paths starting with /keybase/, and they will see their own "version" of KBFS, containing the files that they have access to.
Because of this, the normal way to write the names of files stored in KBFS is using paths starting with /keybase/.
ms-windows
You will note that I didn't mention ms-windows at all. This is because I haven't used ms-windows since the days of "windows 7", and I don't remember the details of how KBFS works on windows.
I have a vague memory of there being a third-party program which needs to be installed - a quick web search tells me that what I'm thinking of is probably Dokan. I don't remember if this is distributed with the Keybase installer, or if you have to download and install it yourself.
KBFS Directories
KBFS has three high-level categories of directories: public, private, and team. Under these categories, folders "exist" whose name tell who have access to them.
Public
-
/keybase/public/alice/is readable by anybody, but only writable by Alice. -
/keybase/public/alice,bob/is readable by anybody, but only Alice and Bob are able to write to it. (This is not something you see a whole lot, but it works if you have a need for it.)
Private
-
/keybase/private/alice/is only accessible by Alice (or technically, by devices on Alice's account). -
/keybase/private/alice,bob/is accessible to both Alice and Bob. -
/keybase/private/alice,bob#charlie,david/is accessible to Alice, Bob, Charlie, and David.- Alice and Bob (before the
#) are able to read and write files. - Charlie and David (after the
#) are able to read the files but not write them.
As you can see, it's possible to create private folders where different people have different access. However, once that folder exists, the list of who has what access can never change. If you need to remove somebody's access, or change them from read-only to read-write, your only option is to create an entirely new folder whose name is the new list of who has what access, and move the files from one to the other. The old one will still "exist", it'll just be empty.
Keybase added "Teams" as a way to deal with this problem. Users can be added or removed from a team, or have their roles changed, without needing to change any team or directory names.
- Alice and Bob (before the
Team
-
/keybase/team/xyzzy/is accessible by Keybase users who are members of thexyzzyteam. Each user's role within the team controls what access they have to the files in the team's folder. -
/keybase/team/xyzzy.dev/is accessible by Keybase users who are members of thexyzzy.devteam. This is a "sub-team" of thexyzzyteam. (Sub-teams are explained below.)
ℹ️ The user and team names shown above are all examples. I don't know if there are users or teams with those names.
Teams are explained in more detail below.
Space
I mentioned this above, but to make it more obvious ...
- Each user is given 250 GB of storage for free.
- Each team is given 100 GB of storage for free.
- There is currently no limit to the number of teams which can be created.
The one restriction is, teams cannot have the same name as a user. This means that, because I already have the username jms1, I could not also create a team called jms1.
Teams
"Teams" are groups of Keybase users. Users can be added to or removed from teams dynamically.
This is different than a "group of users" situation. A "group chat" between Alice, Bob, and Charlie will only ever contain those people. If you try to add a fourth person, it creates a new group chat between those four people. The original three-way chat will still exist, and the fourth person will never be able to access it.
-
When users are added to a team, they will have access to the team's chat history, shared files, and git repos.
-
When users are removed from a team, they will immediately no longer have access to the team's chat history, shared files, or git repos. (If they previously saved anything they will still have access to their own copies, but they won't be able to access
Roles
Users who are added to a team will be able to see the team's chat history, shared files, and git repositories, subject to their "role" within the team.
Available roles are:
-
reader= can participate in team chat rooms, has read-only access to the team's KBFS folders and git repositories. -
writer= same asreader, but has read-write access to the team's KBFS folders and git repositories. -
admin= same aswriter, but can add or remove team members and set their roles, up toadmin. Can also create or delete sub-teams "below" this team (so if somebody is anadminfor the teamxyzzy.dev, they could create anxyzzy.dev.iossub-team). -
owner= Can create or delete sub-teams anywhere below the top-level team, as well as add, remove, and set the role for any user in any sub-team.
Users who are an admin or owner of a team do not automatically have access to its sub-teams' chats or files. They do, however, have the ability to add themselves to the sub-team. This is referred to as "implied admin" permission. (Note that if they do this, the other team members will be able to see that the admin/owner is now a member of the team - there's no way they could give themselves access without it being visible.)
Team admins and owners can set a minimum role needed to write in the team's chat. This is normally set to reader, but can be set to writer or admin if there's a need to have people who can read the team chat but not be able to "speak" in it (i.e. an "announce-only" channel).
Sub-Teams
Teams can have "sub-teams". For example, the xyzzy top-level team might have sub-teams called xyzzy.dev, xyzzy.qa, and xyzzy.sales. Each sub-team has its own list of members, with their own roles for that team.
Keybase Sites
Keybase Sites provides simple web hosting for sites containing static files.
Keybase originally had a web site using the keybase.pub domain, where every user's /keybase/public/xxx/ directory could be viewed. This service was taken down in ... I want to say 2023-02?
They also have a service which can host static pages stored in almost any Keybase directory, using a custom domain name that you own. This is how I'm hosting the jms1.info site (where you're presumably reading this right now).
The documentation is a bit outdated. You can ignore anything that mentions the keybase.pub domain, but the "Custom domains" section still works exactly as described.
My Experience
I've been using keybase since 2017. I've had very few problems with it, and the problems I have had were mostly related to Apple making low-level changes to macOS, and Keybase/Zoom not using the beta versions to test the client before the new macOS is released to the public.
One thing I did find interesting ... when Apple first released computers with the "Apple Silicon" processors, I had an M1 MacBook Air. The Keybase app hadn't been updated to support it yet, and at the time nobody at Keybase had an M1 machine to try it with. One of the Keybase devs sent me what he thought should be a working client, and I was able to test it for them and send back some log files. Keybase released the first client which supported the M1 processor about a week later.
Your Keybase Account
Coming soon.
Keybase on macOS
Coming soon.
Before You Lose Access
Hopefully you're reading this page BEFORE disaster strikes.
I've seen a lot of cases where people create a Keybase account and then lose access to it, because they didn't read the documentation, or they were in a hurry and skipped over steps, or in a few cases, because they created their accounts long enough ago that some of the warnings that the current client shows, didn't exist at the time.
This page will explain a few things that you should do, while you have access to your account, so that if something goes wrong you won't lose access to everything stored in your account.
Background
Multiple Devices
🛑 MAKE SURE YOUR KEYBASE ACCOUNT HAS MULTIPLE DEVICES ON IT. 🛑
This is the most important thing on this entire page.
Keybase encrypts things (chat messages, files, git commits, etc.) using encryption keys which are specific to each device. These keys are stored on each device, and are never sent to any Keybase server.
If you lose the encryption keys for every device on your account, you will lose access to everything stored in the account. This includes ...
- Chat history
- Files stored in KBFS
- Git repositories
If these things are accessible by other people or teams, those other people will still have access, but you won't.
I know I said it above, but I'll say it again.
🛑 MAKE SURE YOUR KEYBASE ACCOUNT HAS MULTIPLE DEVICES ON IT. 🛑
Adding devices to your account
Keybase has clients for Linux, macOS, ms-windows, Android, and iOS. Their web site has directions for how to download and install the software, as well as how to add the device to your existing account.
If you don't physically have a second device that you can install Keybase on, you can create a "paper key".
In fact, even if you have a dozen devices with Keybase installed, you should create a paper key.
If you don't know what devices are on your account, check the "Devices" tab in your Keybase app, or visit https://keybase.io/___/devices (substitute your username where you see ___ in the URL).
Paper Keys
A paper key is a sequence of 13 words which encode a device encryption key. This key is attached to your Keybase account like a normal device key.
They are called "paper keys" because you're supposed to physically write them down on paper, and lock the paper up someplace safe.
Obviously "safe" means that other people shouldn't be able to access it, but you should also consider physical safety. If it's locked up at home, what happens if your house catches fire, or floods, or if an earthquake destroys it?
As an example, the paper keys for my own Keybase accounts are ...
- Written down on paper and stored in a fire safe at home. The paper itself has nothing on it but a collection of random words, so if somebody manages to break into the safe, they won't immediately know what the words are for - all they'll see is a collection of random words.
- In a text file, stored on an encrypted USB stick, also stored in the fire safe at home.
- On another encrypted USB stick, physically stored with a family member in a different part of the world.
This means if something happens to my house, up to and including permanent destruction, I can get the backup copies of the paperkeys from this family member. It might take a few days, but I wouldn't be permanently locked out of my accounts.
Resetting Your Account
The Keybase web site offers a way to "reset" your account. They do warn about this being a drastic action, but I don't feel like they make it "scary" enough.
🛑 Resetting your account starts a new account with the same username.
If you do this, you will permanently lose accesss to the content stored in the old account.
Even if you later find one of the old devices, it won't be able to log into your Keybase account anymore.
I explained above that if you lose the encryption keys for every device on your account, you lose access to everything stored in the account. When you reset your account, you are deleting the account entirely, and starting a new account with the same username. Other than the username, there is no connection between the old account and the new one.
You will also lose your memberships in any groups you may be part of. This also means that if your account was the only "owner" of any teams, those teams will now have no owner at all - which means they cannot be fully managed (and if there are also no users with the "admin" role, they cannot be managed at all).
The only time you should ever reset your account is if you are 110% sure that you will NEVER be able to regain access to the devices on the old account. If there is even a remote chance of regaining access to any of your old devices, I recommend starting a new account with a different username.
Lockdown Mode
It goes without saying that you should use a strong password for your Keybase account, and it should be a password that you aren't using for anything else.
BUT.
If somebody manages to get the password for your Keybase account, they could log into the web site as you and reset your account. Doing this wouldn't give them access to your stored information, but it would prevent YOU from being able to access it. (This is a form of "denial of service attack".)
🛑 There is no notification when an account is reset. If somebody manages to reset your account, you wouldn't know about it until you discover that you can't access your Keybase account anymore - and by then it would be too late to do anything about it.
This is not something that Keybase employees would be able to help you with. If your account is reset, whether you do it or an attacker does it, everything encrypted with the old account's device keys will be gone.
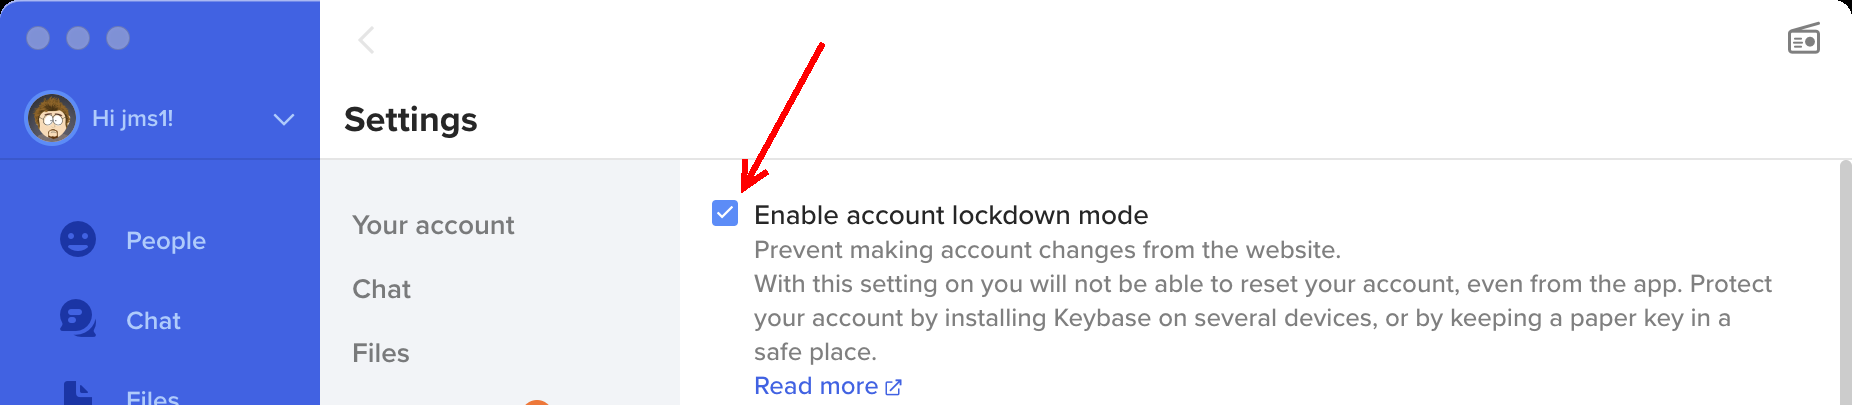
In the Keybase client, under Settings → Advanced, there is an "Enable account lockdown mode" setting. If this checkbox is turned on, Keybase will only allow the account to be reset or deleted from a logged-in Keybase device. If an attacker has your Keybase password and logs into the web site as you, the only things they could do would be to send invitations or change your notification settings.
Of course, if your account is in Lockdown Mode and you lose all of the devices, the account cannot be recovered or deleted. This means that you wouldn't be able to re-use the same username.
This makes it even more important that you not lose all of your devices, and that you have a paperkey.
⇒ This page has more details about Lockdown Mode.
ℹ️ All of my Keybase accounts have "Lockdown mode" turned on.
I'm okay with this, because I have paperkeys stored securely.
Checklist
-
Make sure your account has multiple devices attached to it.
-
Create a paperkey, write it down, and store it securely.
-
Check your devices every so often. (I check mine every few months.)
-
Check the list of devices. You can see this in the Keybase client, or by visiting
https://keybase.io/USERNAME/devices(substitute your own Keybase username forUSERNAME, obviously). Make sure that the devices you think are on the account, are actually there. Also make sure that your account doesn't have any devices which shouldn't be there. -
For phones, tablets, or computers that you may not use every day, make sure their software is up to date (especially the Keybase client itself), and that they are able to log into the account.
-
-
Enable "Lockdown Mode" on your account, but ONLY AFTER making sure you have multiple devices and a paperkey.
Lost Access
If you have lost all devices which are on your keybase account, and you don't have an active paperkey on the account (or if you've lost the paperkey) ... I'm sorry, but there is no way to recover any content stored in your account.
Resetting Your Account
There is a way to "reset" your account. This works by starting a new "signature chain" (or "sigchain") for the username. Doing this replaces the old sigchain, which means that any encryption keys currently attached to the account, will no longer be attached to the account.
ℹ️ Signature Chains
Each Keybase account has a chain of digital signatures. Each signature represents a statement by an existing device, authorizing a change to the list of encryption keys attached to the account. This happens when you add or remove devices, paperkeys, PGP keys, or identity proofs.
Signature chains are public. You can see any Keybase account's signature chain by visiting
https://keybase.io/USERNAME/sigchain. For example, this is the sigchain on my own Keybase account.
Resetting your account should only be considered as a final resort. If you do this, any content that was previously stored in your account will be permanently lost. This includes ...
-
Teams: You will be removed from any teams that you may be a member of.
-
If you were the only person with owner access to a team, resetting the account will leave the team without an owner. Other members who have admin access to the team will be able to add you back to the team as a member or as an admin, but there is no way for anybody to make you (or anybody else) an owner.
-
If you are the only person with owner or admin access to a team, resetting your account will leave that team without any way to manage members at all. Current members will remain members, but there won't be any way for anybody to add or remove members going forward.
-
Because of this, it's important to be sure that every team has multiple owners, even if the second owner is a "backup account" with a paperkey stored somewhere safe ... just like you should be doing with your primary account.
-
-
Files: You will no longer have access to any encrypted files, other than other users' public files.
-
Files under
/keybase/private/USERNAME/and/keybase/public/USERNAME/will be lost. -
Files under
/keybase/team/will still exist as part of that team, however your new account will not have access to them unless a team owner/admin adds you back to the team.
-
-
Git repositories: You will no longer have access to any encrypted git repos that your "old" account had.
-
Repos under
keybase://private/USERNAME/will be lost. -
Repos under
keybase://team/will still exist, but your "new" account won't have access to them unless a team owner/admin adds you back to the team.
Note that if you have an up-to-date clone of a Keybase repo on a computer somewhere, that could be used to create a new repo with the same commit history. However, computers need to be devices on your account in order to access Keybase git repos in the first place, so if you do have a cloned copy, chances are the computer involved is a device on your account, and you shouldn't need to reset the account.
-
-
Chat: You will no longer have access to any chat history.
-
For person-to-person (non-team) chats, the other people involved will still have access to the history, however the conversation will essentially be over. If you start a new conversation with them (or they try to chat with you) after you reset your account, it will be a new conversation.
-
For team chats, if your "new" account is added to the team again, you would regain access to the existing history.
-
If you reset your account and later find one of your devices or paperkeys, it will no longer be able to log into your account.
Essentially, the only time you should consider resetting your account is if you are 100% sure that you will never regain access to a device or paperkey which has access to the account. If there is any chance of finding one of these, you're better of creating a new Keybase account with a different username.
If your account is in Lockdown mode, the account cannot be reset except from an active device. And if you have an active device, you shouldn't need to reset the account in the first place.
I do this for my own Keybase accounts, but I also have paperkeys for each account which are physically written down and stored in safe places.
How to Reset Your Account
After reading everything above, if you're 100% sure you want to reset your account ...
- Visit keybase.io
- Use the "Login" link at the top right to log into your account. You will need the username and password.
- Near the top right of your profile will be a "gear" button.
In the Meantime
After reading everything above, it should be obvious that you need more than just one device on your account, so you will be able to regain access to your account in case you lose all of your devices.
Assuming you still have access to your Keybase account ...
- Read through the Before You Lose Access page.
- If possible, make sure there are multiple devices on your account.
- If you don't have more than one device, or if you want to be sure you have a way to regain access in case all of your devices are lost, make sure you have a paper key on your account.
Keybase Sites
Keybase Sites is a service built into Keybase which hosts web sites from KBFS directories. It can be used to host sites containing only static files - there is no provision for running any kind of server-side scripting.
I'm using it to host the jms1.info site you're reading right now.
Original write-up
https://jms1.pub/kbsites/ is the first set of information I wrote about Keybase Sites, and includes links to five different hostnames which illustrate how to host sites using five different kinds of sources:
/keybase/public/xxx//keybase/private/user#kbpbot/(private, withkbpbothaving read-only access)/keybase/team/xxx/(with thekbpbotuser as a team member with "reader" access)- git repo
keybase://team/xxx/repo, inmasterbranch (with thekbpbotuser as a team member with "reader" access) - git repo
keybase://team/xxx/repo, in some other branch (with thekbpbotuser as a team member with "reader" access)
jms1.info
Details about how I set up Keybase Sites for the jms1.info site. The site is hosted from a team directory with kbpbot as a team member with "reader" access.
Keybase Team
Create a Keybase team with the kbpbot user as a member with reader permissions. This can be either a top-level team, or a sub-team. (I'm using a sub-team.)
keybase team create jms1team.sites
keybase team add-member -s -u kbpbot -r reader jms1team.sites
Create a KBFS directory to hold the site's files. In my case, I'm using the same team to host multiple sites, so each site has its own directory within the team.
mkdir /keybase/team/jms1team.sites/jms1.info
Create a dummy index page so you can test that the site is working.
cat > /keybase/team/jms1team.sites/jms1.info/index.html <<EOF
<html>
<head>
<title>jms1.info</title>
</head>
<body>
<p>test 1 2 3</p>
</body>
</html>
EOF
DNS Records
I use djbdns to serve my DNS data. Below are the actual tinydns data lines from my DNS data, along with what I think are the equivalent records in BIND format.
-
For
jms1.info...+jms1.info:18.214.166.21:3600 '_keybase_pages.jms1.info:kbp=/keybase/team/jms1team.sites/jms1.info:3600jms1.info. 3600 IN A 18.214.166.21 _keybase_pages.jms1.info. 3600 IN TXT "kbp=/keybase/team/jms1team.sites/jms1.info"-
The record for
jms1.info.itself must be an A record, since the rules for CNAME records explicitly say that a resource record name which is a CNAME record, cannot also exist as any other kind of record. Since this record is the "root" of a domain, it must have an SOA record and one or more NS records, therefore it cannot also be a CNAME record.The IPv4 address,
18.214.166.21, is the IP thatkbp.keybaseapi.com.points to. This hasn't changed in a few years now, however if it does change in the future, I'll need to remember to update my own DNS records to match it. -
The TXT record for
_keybase_pages.jms1.info.is what tells Keybase Sites where to find the site's content. Because it points to a team folder, thekbpbotuser needs to have at least "reader" permissions in that team.
-
-
For
www.jms1.info(which does exist as a separate site, containing a meta-redirect tohttps://jms1.info/without thewww.in the hostname) ...Cwww.jms1.info:kbp.keybaseapi.com:3600 '_keybase_pages.www.jms1.info:kbp=/keybase/team/jms1team.sites/www.jms1.info:3600www.jms1.info. 3600 IN CNAME kbp.keybaseapi.com _keybase_pages.www.jms1.info. 3600 IN TXT "kbp=/keybase/team/jms1team.sites/www.jms1.info"-
The record for
www.jms1.info.is a CNAME record, pointing tokbp.keybaseapi.com. This makes thewww.jms1.infoname resolve to the same IP address(es) thatkbp.keybaseapi.compoints to, without having to worry about manually updating them ifkbp.keybaseapi.comever changes. -
The TXT record for
_keybase_pages.jms1.info.is what tells Keybase Sites where to find the site's content. Because it points to a team folder, thekbpbotuser needs to have at least "reader" permissions in that team.
-
Linux
I built my first Linux machine in 1992-11. Since then I've been using Linux on a regular basis, including almost every day since 1995-09 when I started working at my first ISP.
The pages in this section have to do with Linux, mostly system and network administration stuff.
CentOS 7 - Fix yum repos
2024-07-06
I have a fair number of scripts which run inside of containers. I do this for several reasons, including:
-
I can run things which require Linux, on my macOS workstations, using colima.
-
I can run scripts or programs which have complicated dependencies, without having to mess with installing those dependencies on every machine where I want to run the program. Everything is already installed within the container.
Many of these use the centos:7.9.2009 container (aka centos:7), because at the time I wrote them, I was using CentOS 7 on a day-to-day basis at work, both at work and personally. One of the reasons I do this at work is to build RPM packages for CentOS and RHEL systems, on my macOS machines.
CentOS 7 officially went end-of-life on 2024-06-30. At work they're paying for an extended-lifetime support contract with Red Hat, who provides us with access to a set of yum repos whose packages receive security and bug-fix updates for RHEL 7. These updated packages can only be used for RHEL 7 machines (not CentOS 7), and they can only be used for work-related machines for which the company pays a license. (It's not my money.)
We've spent the last few months replacing our CentOS 7 machines with RHEL 7 because of this. (And because somebody "higher up" heard a Red Hat employee say that convert2rhel leaves CentOS artifacts on the converted system, took that to mean it doesn't work, and ordered us not to use it, so we had to build all new VMs and migrate their programs and data by hand ... but that's a different discussion.)
vault.centos.org
CentOS has a server called vault.centos.org which contains copies of the CentOS yum repositories for retired CentOS versions, going back to CentOS 2.1.
When CentOS 7 went EOL, its packages were added to the vault as well, the mirrorlist.centos.org servers (which handled automatically redirecting yum clients to a working mirror) were powered off, and the hostname removed from DNS. And while the mirror.centos.org mirror servers are still running, they use different directory names and don't contain any RPMs.
This means that servers which are still using CentOS 7, as well as containers started from the centos:7.9.2009 container image, need to be re-configured to use vault.centos.org.
⚠️ This should be a temporary measure.
The RPM packages in
vault.centos.orgwill NEVER be updated, even for security fixes. This might be okay for containers which are never accessible from the outside world, however servers should be upgraded or migrated to a different OS which does receive security updates.
Update repo files
The sed commands updates the original /etc/yum.repos.d/Centos-*.repo files to use the vault.centos.org servers instead.
sed -i -e '/^mirrorlist/d;/^#baseurl=/{s,^#,,;s,/mirror,/vault,;}' /etc/yum.repos.d/CentOS*.repo
I've started adding this command to scripts which run inside of containers built from the centos:7.9.2009 image. And for custom container images which use centos:7.9.2009 as the starting point for custom containers, I've updated their Dockerfiles like so:
FROM    centos:7.9.2009
RUN     sed -i -e '/^mirrorlist/d;/^#baseurl=/{s,^#,,;s,/mirror,/vault,;}' /etc/yum.repos.d/CentOS*.repo
RUN     yum -y update && yum -y install xxx yyy zzz && yum clean all
...
Changelog
2024-07-06 jms1
- wrote this page from an Obsidian note which had just the
sedone-liner
Using colima to run x86 Containers on ARM
2024-07-29
I started off using Docker Desktop to run containers on my macOS workstation, both at work and for personal projects. For a while it was actually pretty cool.
However, Docker (the company) changed. They started collecting detailed usage information from the software, they wouldn't let you use the software without logging into a "Docker account" (which lets them correlate the usage information with a specific person), and then they changed their licensing and started demanding that commercial users to pay for it - with a ridiculously high pricetag at the time ($25/mo per user? really?)
So I started looking for alternatives, and a colleague pointed me to colima. This is an open source program which combines Lima (LInux MAchines, which runs Linux VMs on macOS) and a container runtime (Docker, Podman, or containerd). I've been using this at work, and for personal projects, for a few years now.
Rosetta 2
One of my home machines is a MacBook Air with an Apple M2 processor, and now that Apple no longer sells Intel machines, it looks like any future Apple machines I buy will also use "Apple Silicon" (aka "ARM") processors as well. Being a different processor architecture, it has a totally different instruction set, and therefore cannot run x86 code by itself.
When Apple switched from PowerPC to Intel processors, they also released a program called Rosetta, which allowed PowerPC executables to run on Intel-based machines. When they released the first M1 machine, they also released Rosetta 2, which translates x86_64 code into ARM code, either "on the fly" while a process is running, or "ahead of time" the first time you run a program.
Colima
Colima on macOS works by creating Linux VMs with Docker or Podman running in them, and passing any docker or podman commands to that VM.
It can use one of two methods to create these Linux VMs:
-
QEMU is an open-source software-based virtualization framework which has been around for 20+ years. This is the default technology used by KVM, which I've been using for many years to run Linux VMs on Linux hosts.
QEMU has the ability to create VMs running a wide range of CPU architectures, on a range of host operating systems and architectures. For the purposes of this page, this includes being able to run
x86_64(64-bit Intel) VMs on anaarch64(64-bit ARM, aka "Apple Silicon") host.Colima uses QEMU by default.
-
VZ is Apple's native virtualization framework in macOS 11 and later. The framework itself is built into macOS, but Apple doesn't offer any kind of user interface to manage VMs, just an API for other programs to use. If you're interested, there are programs out there to create VMs using VZ, such as UTM and VirtualBuddy.
Colima can use VZ under macOS 13 and later. On earlier macOS versions, colima will only use QEMU.
With colima on macOS, the container runtime is a process running within the Linux VM that colima creates. This means that the images you pull are actually stored within that VM, and the containers you run are running on that VM.
Note that colima can run multiple Linux VMs at the same time.
Creating Colima VMs
The colima start command will create a new Linux VM, if one doesn't already exist.
Each Linux VM is identified using a "profile" name. If you create a Linux VM without giving it a profile name, it will use the name default. If you have a profile called default, other colima commands will use it unless you include a --profile option in those commands.
For me, 99% of what I use containers for is to run x86_64 containers, so my default profile is an "x86_64 using VZ and Rosetta 2" VM.
The commands listed below only cover the options needed to set the virtualization runtime (QEMU or VM) and CPU architecture of the VM (aarch64 or x86_64). Other options, such as CPU count, RAM, and disk size, are not shown, but should be added to these commands if needed.
On an Intel Mac
-
Intel (
x86_64) VM using QEMUcolima start --profile qemu_x86_64 \ --cpu-type max-
The
--cpu-type maxoption tells QEMU to mirror the x86 CPU capabilities of the underlying host. Without this, the virtualized CPU won't be able to run AlmaLinux/RHEL 9. -
You can also use the
--arch x86_64option, but it isn't necessary since it will be the default on an Intel-based Mac.
-
-
Intel (
x86_64) VM using VZ (❓ not tested yet)colima start --profile vz_x86_64 \ --cpu-type max \ --vm-type vz \-
The
--cpu-type maxoption tells VZ to mirror the x86 CPU capabilities of the underlying host. Without this, the virtualized CPU won't be able to run AlmaLinux/RHEL 9. -
You can also use the
--arch x86_64option, but it isn't necessary since it will be the default on an Intel-based Mac.
-
-
ARM (
aarch64) VM using QEMU (❓ not tested yet)colima start --profile qemu_aarch64 \ --arch aarch64
On an ARM (Apple Silicon) Mac
-
ARM (
aarch64) VM using QEMUcolima start --profile qemu_aarch64- You can also use the
--arch aarch64option, but it isn't necessary since it will be the default on an Intel-based Mac.
- You can also use the
-
ARM (
aarch64) VM using VZcolima start --profile vz_aarch64 \ --vm-type vz- You can also use the
--arch aarch64option, but it isn't necessary since it will be the default on an Intel-based Mac.
- You can also use the
-
Intel (
x86_64) VM using QEMUcolima start --profile qemu_x86_64 \ --arch x86_64 --cpu-type max- The
--cpu-type maxoption tells QEMU to mirror the x86 CPU capabilities of the underlying host. Without this, the virtualized CPU won't be able to run AlmaLinux/RHEL 9.
- The
-
Intel (
x86_64) VM using VZ and Rosetta 2colima start --profile vzr_x86_64 \ --arch x86_64 --cpu-type max \ --vm-type vz --vz-rosetta- The
--cpu-type maxoption tells VZ to mirror the x86 CPU capabilities of the underlying host. Without this, the virtualized CPU won't be able to run AlmaLinux/RHEL 9.
- The
Working with Colima VMs
Colima VMs
The colima list command will show you some basic information about all of the colima VMs on the machine.
$ colima list
PROFILE         STATUS     ARCH       CPUS    MEMORY    DISK      RUNTIME    ADDRESS
default         Running    x86_64     4       4GiB      100GiB    docker
qemu_aarch64    Stopped    aarch64    2       2GiB      60GiB
qemu_x86_64     Stopped    x86_64     2       2GiB      60GiB
vz_aarch64      Running    aarch64    2       2GiB      60GiB     docker
The colima status command will show you which virtualization framework (i.e. QEMU or VZ) the VM is running under, along with the path to the unix socket used by docker or podman commands to talk to the container runtime.
$ colima status --profile vz_x86_64
INFO[0000] colima [profile=vz_x86_64] is running using macOS Virtualization.Framework
INFO[0000] arch: x86_64
INFO[0000] runtime: docker
INFO[0000] mountType: virtiofs
INFO[0000] socket: unix:///Users/jms1/.colima/vz_x86_64/docker.sock
The only way I've found to see more detailed information is to look lat the YAML file colima creates. You will find these as $HOME/.colima/PROFILE/colima.yaml.
SSH
The colima ssh command will SSH directly into the Linux VM that colima creates.
(jms1@M2Air15) 3 ~ $ colima ssh
jms1@colima:/Users/jms1/work$ uname -a
Linux colima 6.8.0-31-generic #31-Ubuntu SMP PREEMPT_DYNAMIC Sat Apr 20 00:40:06 UTC 2024 x86_64 x86_64 x86_64 GNU/Linux
jms1@colima:/Users/jms1/work$ exit
logout
If you're using a profile other than default, be sure to specify the profile name in the command.
(jms1@M2Air15) 4 ~ $ colima -p vz_aarch64 ssh
jms1@colima-vzaarch64:/Users/jms1/work$ uname -a
Linux colima-vzaarch64 6.8.0-31-generic #31-Ubuntu SMP PREEMPT_DYNAMIC Sat Apr 20 02:32:42 UTC 2024 aarch64 aarch64 aarch64 GNU/Linux
jms1@colima-vzaarch64:/Users/jms1/work$ exit
logout
I have SSH'd into colima VMs a few times out of curiosity, but the truth is I've never needed to do it. If you're going to do it, be careful not to change anything. Any settings you might need to change, should be changed by editing the VM's $HOME/.colima/PROFILE/colima.yaml file while the VM is stopped, or by deleting the VM and running the colima start command with different options. (I keep the command lines I use to create colima VMs in an Obsidian notebook.)
Using Docker with Specific Colima VMs
If you have multiple colima VMs, you need a way to tell docker commands which VM to talk to. Docker uses "contexts" for this.
At any time, Docker will be a "current" context that all docker commands will use. When colima creates a VM, it also creates a Docker context pointing to that VM (or technically, pointing to a unix socket which is connected to the unix socket where the container runtime within the VM is listening).
If you have multiple contexts and need to control which one a particular docker command uses, you need to "use" the correct context first.
List Contexts
The docker context ls command lists all contexts that the docker command (on the Mac) is aware of.
$ docker context ls
NAME                DESCRIPTION                               DOCKER ENDPOINT                                  ERROR
colima *            colima                                    unix:///Users/jms1/.colima/default/docker.sock
colima-vz_aarch64   colima [profile=vz_aarch64]               unix:///Users/jms1/.colima/vz_aarch64/docker.sock
default             Current DOCKER_HOST based configuration   unix:///var/run/docker.sock
One of the contexts will have a * after the context name. This is the "current" context, which other docker commands will use.
Using a Different Context
The docker context use command will set the context used by other docker commands.
As an example, starting with the following VMs and contexts ...
$ colima list
PROFILE       STATUS     ARCH       CPUS    MEMORY    DISK      RUNTIME    ADDRESS
default       Running    x86_64     4       4GiB      100GiB    docker
vz_aarch64    Running    aarch64    2       2GiB      60GiB     docker

$ docker context ls
NAME                  DESCRIPTION                               DOCKER ENDPOINT                                     ERROR
colima                colima                                    unix:///Users/jms1/.colima/default/docker.sock
colima-vz_aarch64 *   colima [profile=vz_aarch64]               unix:///Users/jms1/.colima/vz_aarch64/docker.sock
default               Current DOCKER_HOST based configuration   unix:///var/run/docker.sock

$ docker run -it --rm alpine:latest uname -m
aarch64
The docker context use command will change which context future docker commands will use.
$ docker context use colima
colima
Current context is now "colima"

$ docker run -it --rm alpine:latest uname -m
x86_64
Changelog
2024-07-29 jms1
- added info about
--cpu-type maxoption - other updates
2024-07-06 jms1
- copied from Obsidian notes
- wrote some human-readable descriptions, verified commands for other scenarios
Installing Debian 10 on a Macbook Pro
2021-01-09
I've always used the RedHat-flavoured versions of Linux, usually CentOS. However, Red Hat "acquired" CentOS and has decided to stop maintaining CentOS 8 and declare an early end-of-life for it, and is now offering "CentOS Stream". Instead of following Red Hat Enterprise, CentOS is now essentially a beta-test distro which feeds into RHEL, and anybody who uses CentOS is providing free QA services for Red Hat.
IBM purchased RedHat a few years back, so I can't say I'm totally surprised by this.
Anyway.
At work, the servers we deploy at client sites have been using CentOS 7 for many years, and we were about to start upgrading things from CentOS 7 to CentOS 8. However, with this news we've decided to move away from CentOS entirely.
At the same time, we're also in the process of re-architecting our software to run under Kubernetes, which doesn't really care what distro it's running on, so long as it has a Linux kernel. So moving from CentOS to Debian isn't necessarily a huge deal, except that it means re-writing the systems which build the underlying machines on which Docker and Kubernetes will be installed.
Which is pretty much my job.
Long story short, we've decided to use Debian 10 instead of CentOS.
Actually, other things have changed over time. For a while we were targeting Debian 11, then Debian 12, but the company was acquired, and then that company was acquired, and the new corporate overlords have decreed that we're going to use RHEL 9, and are not open to any kind of discussion about it. The company I started with is just one small part of one division of the current corporation - instead of having 170 employees, we now have 86,000 employees. At this point I'm just glad they remember my name when it comes time to issue paychecks.
This page contains a collection of random notes I made for myself while exploring Debian 10, using a spare 2013 MacBook Pro.
Notes about Debian 10
Moste of these notes also apply to Debian 11 and 12 as well.
Mac Boot Menu
On a Mac, when you hold down the Option key during the start-up chime, it shows a list of all bootable partitions or devices and lets you choose which one to boot from. Debian doesn't appear on this list, however it does boot correctly when you don't use the boot selector.
At some point I'll figure out why it's not showing up there, when I do I'll update this page.
Wifi Driver
This particular machine is going to be used as a server, at least for now, so it doesn't really need wifi support. However, I figure I'm going to need wifi support at some point, so I took a few minutes to figure out how to enable it, so I could include it here.
Broadcomm chipsets (and some others) require that an opaque binary "blob" be uploaded into the card in order to initialize it. These blobs are not open-source, so they cannot be distributed as part of Debian itself. Instead, the debian "contrib" repo contains a package called firmware-b43-installer which, as part of its post-install script, downloads a package full of binary blobs from (somewhere?) to the /lib/firmware/ directory.
Install firmware manually
Edit /etc/apt/sources.list. At the end of every deb and deb-src line which points to deb.debian.org, after main, add contrib.
deb http://deb.debian.org/debian/ buster main contrib
deb-src http://deb.debian.org/debian/ buster main contrib
Once this is done, install the package which downloads and installs the firmware files.
# apt install firmware-b43-installer
When the package finishes installing, you will see it download a file from an external web site, which contains a collection of firmware blobs. This file is expanded into the /lib/firmware/ directory.
Once the file has been downloaded and installed, reboot the machine.
# shutdown -r now
When it boots again, the kernel should load the firmware file, and the wifi interface should be created.
# ip link show
1: lo: <LOOPBACK,UP,LOWER_UP> mtu 65536 qdisc noqueue state UNKNOWN mode DEFAULT group default qlen 1000
    link/loopback 00:00:00:00:00:00 brd 00:00:00:00:00:00
2: enp1s0f0: <NO-CARRIER,BROADCAST,MULTICAST,UP> mtu 1500 qdisc mq state DOWN mode DEFAULT group default qlen 1000
    link/ether xx:xx:xx:xx:xx:xx brd ff:ff:ff:ff:ff:ff
3: wlp2s0b1: <BROADCAST,MULTICAST> mtu 1500 qdisc noop state DOWN mode DEFAULT group default qlen 1000
    link/ether xx:xx:xx:xx:xx:xx brd ff:ff:ff:ff:ff:ff
In this case, "wlp2s0b1" is the new wifi interface.
During the install
The Debian installer recognizes the Wifi chipset as one that it doesn't support without a firmware "blob" file, and provides a mechanism to supply the file on a USB stick (or a floppy, if the machine has one). This seems useful if you need wifi in order to complete the install.
Every time I've seen this, the machine has had a physical ethernet port, so I've never needed to do this. I have no idea what the requirements are, i.e. what filesystem the USB stick can or should use, whether the firmware blob file should be in the root of the stick or within a certain directory, and so forth. If I ever get curious and have the time I'll play around with that and update this page with my findings.
Interface names
Debian 10 has adopted this "Predictable Names" thing, where the network interfaces are given names which are supposed to never change, but which are very tedious for a human to remember or type.
It's not necessarily a bad concept, and on machines where the hardware may change from time to time (i.e. if you have network interfaces which connect via USB) it can make sense. But it doesn't really provide any value for a server, where the hardware never changes.
And I don't particularly care to un-learn almost thirty years' worth of muscle memory, and change from knowing that the ethernet interfaces are eth0, eth1, and so forth, to having to look up the interface names on every machine I touch.
I prefer to use the sensible "old school" names like eth0 and wlan0, so I did the following:
-
Edit
/etc/default/grub, addnet.ifnames=0to the kernel's command line.GRUB_CMDLINE_LINUX="net.ifnames=0" -
Run
update-grub -
Reboot.
Once it comes back, you will probably find that none of the interfaces have IP addresses, because their names don't match the names in the /etc/network/interfaces file. To fix this...
-
Run
ip link showand note the new names of each interface. -
Edit
/etc/network/interfacesand change any instance of the old interface names, to the corresponding new name. -
Restart the network.
TODO:
systemctl restart networkdoesn't work on Debian, need to figure out how to do this.
Timezone
One of the first questions that the Debian installer asks is, what part of the world you're in. Later on it asks what timezone you want the machine to use, however if you selected "United States" as a location, it will only show you the American time zones.
A LOT of people have been complaining about this for years, but apparently the people who maintain the Debian installer don't want to hear that some people build servers and want the systems' clocks to run on UTC.
During install
The only way to get UTC as an option during the install is to lie about your location.
-
Select (UK? Europe? "Etc"?) as location.
-
Then select UTC as the timezone.
Note that doing this may also configure other things on the system, like using the "en_GB" locale instead of "en_US", which may result in using an unexpected console font or keyboard mapping. (Seeing "£" when you're trying to type "#" is always fun.)
After install
The other option is to let the installer do what it wants to do, and then manually configure the timezone after the system is running.
List available time zones: (the list is rather long)
$ timedatectl list-timezones
...
America/New_York
...
Etc/UTC
...
Set the system to use a different time zone:
$ sudo timedatectl set-timezone Etc/UTC
Alternate method: (useful on older Debian machines which don't have a timedatectl command)
$ sudo ln -sf /usr/share/zoneinfo/Etc/UTC /etc/localtime
Changelog
2024-07-06 jms1
- updated intro text
2024-06-19 jms1
- moved page to new
jms1.infosite, updated header - minor content updates
2022-01-22 jms1
- added possible "last updated" field for each page, used this page to test
- minor tweaks in text
- fixed Changelog dates (should be 2021, not 2011)
2021-01-12 jms1
- updated info about how to set time zone
- better explanation of how
firmware-b43-installerworks - added other general info
- added to
jms1.infosite
2021-01-09 jms1
- initial version (not ready for public consumption yet)
x86_64 Microarchitecture Levels
2024-07-29
Newer versions of the x86_64 processors support instructions that did not exist in the older versions. These newer instructions can perform tasks that would previously have taken multiple instructions using only what was available in the original x86_64 baseline instruction set. These instructions are generally useful for "hardcore" math, graphics, or encryption operations.
If a program tries to run one of these new instructions on a CPU which doesn't support them, you'll get an "Illegal instruction" error and the program will crash.
The x86 CPUs have a set of "flags" which programs can query if they plan to use any of the newer instructions, so they can either fail gracefully (with a better error message), or use different code to do the same job using the older, slower instructions.
ℹ️ On a Linux machine, you can see these flags in the
/proc/cpuinfofile.$ grep ^flags /proc/cpuinfo flags : fpu vme de pse tsc msr pae mce cx8 apic sep mtrr pge mca cmov ...Each of these codes corresponds to a capability which may or may not exist on an x86 CPU.
Having to query for a whole list of instructions can be rather tedious, so Intel, AMD, Red Hat, and SUSE created a set of "levels" to encapsulate different sets of instructions that were added over time.
- Original suggestion on the llvm-dev mailing list
- Wikipedia has a good description of how the levels work and which CPU instructions are included in each level
- Medium article also explains it fairly clearly
- Red Hat blog post explains how and why Red Hat built RHEL 9 to require and use the
x86-64-v2capabilities
AlmaLinux (and RHEL) 9
I first ran into this when I tried to run AlmaLinux 9 in a Docker container, under colima on an Apple M2 machine. (I'm currently in the process of migrating my own servers from CentOS 7 to AlmaLinux 9.) AlmaLinux 9 and RHEL 9 require a minimum of x86-64-v2, and the virtual CPU created by QEMU (used by colima to run the x86_64 Linux VM where Docker is actually running) by default only supports x86-64 without any extensions.
At first, when I tried to start an AlmaLinux 9 (or UBI 9) container, I got this error:
$ docker run -it --rm almalinux:9.4
Fatal glibc error: CPU does not support x86-64-v2
This was the problem that made me dig into this issue. I found that adding --cpu-type max when creating the colima VM made the virtual CPU suport the same capabilities as the hardware CPU, which for the Apple M2 includes everything in the x86-64-v3 list.
Detect
If you need to detect which "level" a script is running on, here are a few suggestions:
awk script
⇒ Source
#!/usr/bin/awk -f

BEGIN {
    while (!/flags/) if (getline < "/proc/cpuinfo" != 1) exit 1
    if (/lm/&&/cmov/&&/cx8/&&/fpu/&&/fxsr/&&/mmx/&&/syscall/&&/sse2/) level = 1
    if (level == 1 && /cx16/&&/lahf/&&/popcnt/&&/sse4_1/&&/sse4_2/&&/ssse3/) level = 2
    if (level == 2 && /avx/&&/avx2/&&/bmi1/&&/bmi2/&&/f16c/&&/fma/&&/abm/&&/movbe/&&/xsave/) level = 3
    if (level == 3 && /avx512f/&&/avx512bw/&&/avx512cd/&&/avx512dq/&&/avx512vl/) level = 4
    if (level > 0) { print "CPU supports x86-64-v" level; exit level + 1 }
    exit 1
}
bash script
⇒ Source
Too long to incude here, but it looks like it's doing the same thing as the awk script above.
Changelog
2024-07-29 jms1
- initial version
macOS
This section includes pages which talk about macOS itself, or about thing which only happen on macOS systems.
Backing up a Time Machine Image
2026-04-29 Wed
I recently ran into a situation where the internal spinning disk in one of my older Mac Minis was dying. This made the machine crash, or just "freeze up", at random intervals. Sometimes it would work for a few days, other times it would work for a few minutes. Over time, the "time between failures" got shorter and shorter, until it finally reached the point where it would consistently crash in less than an hour.
The machine did have a Time Machine backup on an external disk, less than a week old. Nothing had been added or changed on the machine itself that needed to be backed up, so that backup already contained all of the files I needed to save. I was able to physically plug that disk into a newer machine (an M2 Mac Studio) and see the backed-up files, and running Disk Utility's "First Aid" function on the disk didn't report any errors, so the backup was good.
The machine itself (an older Intel Mac Mini) seemed to be okay, the problem was the spinning disk itself. So my plan was to replace the disk with a SATA SSD. However, I didn't want to lose the files,
I wanted to make a DMG disk image, containing the system's full contents, either from the system itself, or from the most recent Time Machine backup.
Things I Tried
-
On the dying machine, use Disk Utility to make an image of the machine, to a different external disk.
This idea didn't work very well because the machine kept crashing part-way through the process.
Given the problems I ran into below, I'm not sure if it would have worked any better if I had done it a few months ago, when the hard drive was still capable of running for several hours before crashing.
-
On the newer machine, use Disk Utility to make an image of the folder from the Time Machine backup disk.
This didn't work. When I tried, about 45 seconds into the operation it stopped and told me "Operation cancelled", without any explanation of why it stopped.
I tried running "First Aid" on the Time Machine disk, it didn't find any errors, so ... no idea.
-
On the newer machine, using
hdiutilto manually make a disk image from the folder on the Time Machine backup disk.In theory, this command should have worked:
sudo hdiutil create \
    -srcfolder  /Volumes/TMDisk/2026-04-09-153426.previous \
    -type       UDZO \
    -layout     NONE \
    -fs         HFS+ \
    -volname    "Old System HD" \
    "$HOME/Desktop/Old System HD"
This also disn't work. I tried this several times, with different options, after fixing a few oddities with the files in the backup image - files with
0000permissions, directories whosexpermission had been removed, files with strange "flags", etc. I also tried usingsudowith thehdiutilcommand, which did help, but eventually I ran into an error message that didn't explain what the problem was, and about which I couldn't find any useful information on the internet. -
On the newer machine, using Carbon Copy Cloner to back up the folder on the Time Machine backup disk, to a DMG file. (I figured if anybody knew how to do this, the guys who wrote CCC would.)
As soon as I pointed CCC to the Time Machine disk as a source, it popped up a dialog saying that it couldn't (and wouldn't even try to) back up Time Machine images, because Apple didn't support it. This is explained in more detail on this page on their support site.
What Finally Worked
I ended up having to make the backup by hand, and I had to use rsync to copy the files, rather than any Apple utility.
At a high level, the process is this:
- Create a temporary read-write disk image.
- Use
rsyncto copy the files from the Time Machine image, into the temporary disk image. - Convert the temporary read-write image into a read-only disk image. This image can be compressed and/or encrypted if you like.
This process depends on having enough disk space for two full copies of the data being backed up. The free space doesn't necessarily have to be on the same disk, however if you're going to use two disks (one for the temporary image and one for the final read-only image), the disks containing those locations each need to have enough free space for a full copy of the data being backed up.
Create the Temporary Disk Image
-
Plug in the Time Machine disk, and wait for the disk's icon to appear on the desktop.
- If the disk is encrypted, you may need to enter its password.
- If macOS asks about using the disk as a Time Machine backup disk, say no.
-
Find the
/Volumes/xxxdirectory for the Time Machine disk, and save it to a variable.$ ls -l /Volumes/ total 0 drwxrwxr-x@ 19 root wheel 192 Apr 27 10:59 Extra Disk lrwxr-xr-x 1 root wheel 1 Apr 27 10:59 NewSystem Internal HD -> / drwxrwxr-x@ 6 root wheel 192 Apr 29 10:32 OldSystem TMIn this example ...
NewSystem Internal HDis the internal disk of the system we're running on.OldSystem TMis the external Time Machine disk.Extra Diskis an extra external disk with enough free space to hold a temporary copy of the data being backed up.
TM_DISK="/Volumes/OldSystem TM"Saving this to a variable will allow you to copy-and-paste the commands below, rather than having to manually type the disk names and worry about quoting.
-
Save the name of the disk image you want to create, to a variable.
IMG="OldSystem HD" -
Calculate a few other variables.
DST="$HOME/Desktop/$IMG"
SRC="$( echo "$TM_DISK"/2* | tail -1 )"
USED="$( sudo du -sk "$SRC" | awk '{print $1}' )"
SIZE_KB="$(( USED + 65536 ))"
These are:
DSTis the filename for the final read-only image. This can include.dmgat the end, but if you don't include it, the command which creates the final image will add it automatically.SRCis the Time Machine directory you'll be backing up. Depending on which OS/X or macOS version was used, there may be multiple "dated" directories on the disk. This command returns the name of the most recent directory.USEDcontains how much disk space is being used by the backup image, in KiB (units of 1024 bytes). We need this so we can create the temporary image with enough space to hold the files.SIZE_KBis the actual size of the temporary disk image we'll be creating. This is the total disk space being used, plus 64 MiB (which is needed to hold the filesystem's data structures).
-
cdinto the directory where you want to create the temporary disk image.cd "/Volumes/Extra Disk"Note that I had to use quotes because the disk name has a space in it.
-
Create and mount the temporary disk image.
hdiutil create \
    -attach     \
    -size       "${SIZE_KB}k" \
    -type       UDRW \
    -layout     NONE \
    -fs         HFS+ \
    -volname    "$IMG" \
    "$IMG work"
This created
OldSystem HD work.dmg, which is the temporary disk image. It also mounted that image as/Volumes/OldSystem HD Work. -
Save the "mount point" of the work disk to a variable.
MPT="/Volumes/OldSystem HD Work"
At this point, the temporary disk image is ready to have files copied into it.
Copy the Files
-
Copy the files from the Time Machine backup, into the temporary disk.
sudo rsync -av "$SRC/" "$MPT/" -
Make sure any data which is buffered for the temporary disk image, is written to the image.
sync -
Eject the temporary disk.
hdiutil eject "$MPT"
At this point, OldSystem HD Work.dmg is finished. It is a read-write image, which means if you were to double-click the DMG file to mount it, you would be able to add, change, or remove files.
Convert the Image
This step will convert the temporary image to a read-only image.
The basic command is this:
hdiutil convert \
    -format UDRO \
    -o      "$DST.dmg" \
    "$IMG work.dmg"
Depending on your needs, you may want to modify this command.
-
To make a compressed read-only image, change
UDROtoUDZO.This will result in a disk image which is somewhat smaller - how much smaller will depend on the files within the image. For the backup which made me need this process, the original Time Machine backup was about 245G, and the compress backup was 224G.
-
To make an encrypted read-only image, add
-encryption AES-256to the command.If you do this, the command will prompt you for a passphrase for the encryption. (There is no option at this point to store the passphrase in your Keyring. If you need to do this, you'll be able to do it below. Just don't forget the passphrase between now and then.) 🤔
In my case, the actual command I ended up running (for a compressed and encrypted image) was ...
hdiutil convert \
    -format     UDZO \
    -encryption AES-256 \
    -o          "$DST.dmg" \
    "$IMG work.dmg"
Testing
At this point the final image should be done. You should test it:
-
Double-click the DMG file to mount it.
If the image is encrypted, you will be asked for the passphrase.
If you wanted to save the passphrase in your Keyring, this dialog will have a checkbox to let you do that.
-
Make sure the mounted image is read-only.
If you're looking at it in a Finder window, you should see this in the status bar:

Obviously, you should not be able to add, remove, or change any files.
-
Eject the mounted disk.
Cleanup
Once you've tested the final disk image, you can ...
- Delete the temporary disk image.
- Re-format the external Time Machine disk.
- Re-format the machine that the Time Machine backup was taken from (or in my case, replace its hard drive with an SSD).
If You're Curious
I replaced the now-dead 500 GB spinning disk with a 512 GB SATA SSD that I had laying around, and used Apple's Internet Recovery mechanism to install the latest macOS.
Short version: I powered the machine on, and while the chime was playing, I pressed ⌥⌘R and held it down until the "spinning globe" graphic appeared. This starts the Internet Recovery process and installs the latest macOS version which is compatible with the hardware.
The machine is back to a "working" state again, in that it hasn't crashed in over a week.
My next step is going to be installing Linux on it. 😎
macOS - SSH Post-Quantum Encryption
2025-12-05
This page explains how I dealt with an issue with having multiple versions of OpenSSH on my macOS workstations.
Background
I use Homebrew to install software that macOS doesn't come with, and also to install newer versions of software that macOS does come with. My "work" workstation (a 2018 Mac Mini with an Intel processor) is currently running macOS 15.7.2, which came with OpenSSH v9.9, but I actually use OpenSSH 10.2 from Homebrew.
I control which version is used by controlling the order in which directories appear in my PATH. As long as Homebrew's bin directory comes before the standard /usr/bin directory, programs installed by Homebrew will "override" programs installed by macOS.
ℹ️ PATH Order for Homebrew
My actual shell profile is a bit more complex than this, but you can do this by adding the following to the END of your
.bashrcfor (or its equivalent, depending on what shell you're using) ...PATH="$( brew --prefix )/bin:$PATH"
The Problem
When I use ssh to connect to a server whose sshd is from an older version of OpenSSH, the ssh command prints this warning:
** WARNING: connection is not using a post-quantum key exchange algorithm.
** This session may be vulnerable to "store now, decrypt later" attacks.
** The server may need to be upgraded. See https://openssh.com/pq.html
This is distracting, and in the case of a script which runs an ssh command and processes the output, it can cause problems. The obvious (and more secure) solution would be upgrade sshd on every server I connect to, however 98% of them are running RHEL 7 or RHEL 9, and Red Hat doesn't have OpenSSH packages which support the PQ algorithms yet.
According to the page listed in the warning, I can disable the warning by adding WarnWeakCrypto no to my .ssh/config file to disable this warning. I did this, and the warning no longer appears.
BUT.
When programs are started by launchd or Finder, my .bashrc file isn't used, so I have no way to modify the PATH that the program inherits. This means that if those programs run ssh, they end up running /usr/bin/ssh, which is the older version that comes with macOS. If this older version doesn't recognize the WarnWeakCrypto option, it causes an error.
The Solution
There is an IgnoreUnknown directive, which is recognized by older OpenSSH versions. This tells it to ignore specific unknown option names if they appear in the config.
So, to work around the problem for now, I have done the following in my $HOME/.ssh/config file:
-
At/near top of file (this is actually the first line of my
configfile)IgnoreUnknown WarnWeakCrypto -
In the appropriate
Hostblock(s)Host *.example.com WarnWeakCrypto no
Other Information
OpenSSH's page explaining the warning
Timeline
- OpenSSH 9.0 (2022-04)
- added
sntrup761x25519-sha512as a host key exchange algorithm
- added
- OpenSSH 9.9 (2024-09)
- added
mlkem768x25519-sha256as a host key exchange algorithm
- added
- OpenSSH 10.0 (2025-04)
- made
mlkem768x25519-sha256the default host key exchange algorithm
- made
- OpenSSH 10.1 (2025-10)
- added the warning when connecting to a server which doesn't offer a PQ host key exchange algorithm
- Also added the
WarnWeakCryptooption to disable this warning
mdbook
I'm using mdbook to maintain several sites, including this one.
Creating a "book" with mdbook
2022-03-08
I was in the process of writing a document at work last week, and realized that the Markdown file I was working on already had over 10,000 lines, and it was only about 60% done writing it. When I created a PDF to preview it, the PDF file had about 40 pages so far. I realized that I was "writing a book", and that the document was too long for some people.
I've seen a lot of multi-page "documentation" web sites that all followed a common pattern, with a navigation bar on the left having a set of links to all of the pages making up the documentation. Many of these were hosted with sites like readthedocs.org or GitBook, however I needed a stand-alone tool which produced stand-alone files, because some of the information I'm documenting is proprietary and cannot be hosted outside the company.
I found a couple of programs which automate making these kinds of sites, and mdbook caught my eye. It's written in Rust, and is used by the Rust developers to generate their own documentation.
I tried it out, and found it to be very easy to use - the hardest part for me was figuring out where to logically break that original Markdown file into separate pages. mdbook produced a set of static web pages that made the documentation a LOT easier for readers to navigate.
So now I'm using it at work, and I decided to convert my chicken-scratch notes about how to install it and set up a new book, into a document that I can refer to myself whenever I need to write a book, and which other people may find useful.
Install mdbook
The mdbook documentation explains several different ways to install the software. My personal and work machines both run macOS with Homebrew, so for me the process was very simple:
brew install mdbook
Create a new book
The mdbook init command creates a basic skeleton of the files it needs to build a "book". You can run it in an empty directory and it will create its files there.
mkdir .../xyzzy
cd .../xyzzy
mdbook init --ignore git --title 'Things and Stuff'
It recognizes the following options:
-
--title 'Things and Stuff'= specify a title for the book. If not specified, the command will interactively ask for a title. -
--ignore git= Create a.gitignorefile. If not specified, the command will ask whether or not you want one. -
--theme= Create atheme/directory with the files that make up the default theme. This is not normally needed unless you're planning to modify the theme.
This creates the following files:
.gitigore
book/
book.toml
src/
src/SUMMARY.md
src/chapter_1.md
-
book.tomlconfigures the properties of the overall book itself, including any additional processing steps needed while building the book. -
src/SUMMARY.mdcontains the "structure" of the book, and is used to build the navigation bar on the left side of every page. The initial contents of the file reference a "Chapter 1". -
src/chapter_1.mdis a sample file. Deleting this file (and removing the reference to it fromSUMMARY.md) are usually the first things I do when setting up a new book.
Create a git repo
I use git to track almost everything I work on. When I create a book, I like having the initial commit in the repo contain the exact files generated by "mdbook init".
cd .../xyzzy
git init -b main
At this point the repo has no commits, but you can run git status and see what files are ready to be committed.
$ git status
On branch main

No commits yet

Untracked files:
  (use "git add <file>..." to include in what will be committed)
    .gitignore
    book.toml
    src/

nothing added to commit but untracked files present (use "git add" to track)
No surprises, so use what we have as the initial commit.
$ git add .
$ git status
On branch main

No commits yet

Changes to be committed:
  (use "git rm --cached <file>..." to unstage)
    new file:   .gitignore
    new file:   book.toml
    new file:   src/SUMMARY.md
    new file:   src/chapter_1.md

$ git commit -m 'Initial commit'
I also create an initial tag in each repo, pointing to the very first commit.
$ git tag -sm 'Tagging the initial commit' initial
Set up remote
IF the repo is going to be stored on a remote server, such as Github, Bitbucket, or Keybase...
-
In that remote server's web interface, create an empty repo and get its URL.
-
Keybase doesn't have a web interface, so use the command line to create the repo.
keybase git create xyzzy -
On the local machine, add a "remote" pointing to the upstream repo's URL.
git remote add origin git@github.com:username/xyzzygit remote add origin keybase://private/username/xyzzy -
Push the initial commit and tag.
git push -u origin main
git push --tags
If the repo doesn't have a remote, you'll need to be a lot more careful about not accidentally deleting the book or its .git/ directory.
Update .gitignore
The .gitignore file created by mdbook init contains the line book, so that git will ignore the book/ directory in the root of the repo. This is fine, but it also makes git ignore other files and directories whose names may be "book". This should be changed so it only ignores the book directory in the root of the repo.
You should also add the names of any other files that git should ignore. I normally use something like this...
/book/
.DS_Store
._*
*~
*.bak
Commit and push the change.
git add .gitignore
git commit -m 'Updated .gitignore with the usual list'
git push
Template
For most of what I do at work, readers need to know which version of a "book" they're looking at. mdbook doesn't have a way to include any kind of version number, but it turns out to not be overly complicated to add this information.
I normally use a "template" to start new "books". This template already includes the modifications to add git information (commit hash and possibly tags) to the pages. It also includes some other cosmetic tweaks I like to have in the documentation I write. This is all documented here:
Working with mdbook
Removing "Chapter 1"
Some people may want to use the src/chapter_1.md file, but I never do.
-
Edit
src/SUMMARY.md, remove the appropriate line. It looks like this:- [Chapter 1](./chapter_1.md) -
Stage the file to be committed.
git add src/SUMMARY.md -
Use "
git rm" to remove the file.git rm src/chapter_1.md -
Commit and push the change.
$ git status
On branch main
Changes to be committed:
  (use "git restore --staged <file>..." to unstage)
    modified:   src/SUMMARY.md
    deleted:    src/chapter_1.md

$ git commit -m 'Remvoed chapter_1.md'
$ git push
Changelog
2024-06-19 jms1
- moved page to new
jms1.infosite, updated header
2022-09-10 jms1
- This file happened to be on the screen while I was getting ready to move the
jms1.infosite from Apache to Keybase Sites and a typo caught my eye, so I gave it a quick once-over. - Mentioned Keybase as a way to host the git repo.
- Added info about mdbook-template repo.
- Other minor tweaks.
2022-03-08 jms1
- Initial version
Adding git commit/date info to mdbook "books"
2022-03-08
One of the limitations I ran into with mdbook is that it doesn't easily offer a way to automatically embed a version number or date into the generated pages. This makes it difficult for the reader to be sure that the documentation they're reading is the latest version, or that it matches a specific version of the "thing" the documentation is describing. This is something I normally use with any kind of automated documentation system, so I took the time to figure out how to do it.
This will add a section at the bottom of the navigation menu with the git commit and its timestamp, plus the timestamp when the HTML was generated.
This comment had most of the details, however what you see below is different enough to justify making my own write-up instead of just linking to the page.
Pre-requisite
Install jq.
-
macOS
brew install jq -
Others - TODO
Template
The first step is to modify the template used for every page, with updated HTML to position and format the information, as well as tokens where the dynamic information (the git commit and timestamps) will be substituted.
Note that the generated pages are all self-contained, there is no "frameset" with different HTML files shown on the left and right sides of the browser window.)
-
In a new directory, run
mdbook init --themeto create a dummy book, but with atheme/directory.Note: we're not going to keep this book, we just need somewhere to copy a couple of the default theme's files from.
-
Copy
theme/index.hbsfrom the dummy book, totheme/index-template.hbsin your book.This is the template we'll be modifying. Our copy will be used as a template for that template. (Very "meta", I know.) It will need to use a different filename, and a script will be triggered (below) to generate the values we need and substitute them into the contents of this file, to produce the actual
index.hbsfile thatmdbookwill use. -
Edit our new
theme/index-template.hbsand add the version placeholders and other formatting within the existing<nav>element, as shown:<nav id="sidebar" class="sidebar" aria-label="Table of contents"> <div class="sidebar-scrollbox"> {{#toc}}{{/toc}} <!-- start new content --> <hr/><div class="part-title">Version</div> <div id="commit" class="version"> <tt>VERSION_COMMIT_HASH</tt><br/> <tt>VERSION_COMMIT_TIME</tt> </div> <div class="part-title">Generated</div> <div id="generated" class="version"> <tt>VERSION_NOW</tt> </div> <!-- end new content --> </div> <div id="sidebar-resize-handle" class="sidebar-resize-handle"></div> </nav> -
Add
/theme/index.hbsto your.gitignorefile. This file will be generated on the fly every time the book is processed.
Stylesheets
The next step is to create a stylesheet, which will format the text added by our template modifications above.
In the root of the repo, create a version-commit.css file with the following contents:
.version {
  font-size: 0.7em;
}
Now we need to tell mdbook to include that stylesheet in the generated pages.
-
Edit your
book.tomlfile. -
If it doesn't already have one, add an
[output.html]section. -
If this section doesn't already have an
additional-csskey, add one. -
Add
"version-commit.css"to that list.
The resulting section of the file will look like one of these:
-
If this is the only custom CSS file...
[output.html] additional-css = [ "version-commit.css" ] -
If there are other custom CSS files...
[output.html]
additional-css = [ "custom.css" , "version-commit.css" ]
The original web page also showed how to not include the version info in any printed output. I'm guessing this is because the "printed output" consists of one big long document containing the entire generated site, as opposed to just the one page you're looking at in the browser, and having the version info in between every page would get redundant.
I'm adding the version info to the "navigation bar" on the left, which already isn't included in printed output, so in my case this isn't necessary. However, if you're doing something different and find that you need this...
-
Create
theme/css/print.csswith the following contents:.version { display: none ; }
Add the preprocessor script
The version-commit script reads the template we copied earlier and substitutes the commit hash, commit time, and current time where the appropriate tokens exist in the template.
I wrote this first as a Perl script, and then tried to re-write it as a shell script. The script itself is a UNIX "filter" (i.e. it reads from STDIN and writes to STDOUT), so it seemed like it should be simple to just calculate the three values, then run a sed command to substitute the values ... but when I tried it, all of the generated output files ended up as zero bytes.
It was already working as a Perl script and I didn't have a lot of time to dig into it, so I left it alone and stuck with that. Maybe in the future if I get curious I'll have another go at making it into a shell script.
-
Copy
version-committo the root of the repo. -
Set its permissions to allow execution (i.e.
chmod 0755etc.). Make sure you do this before yougit committhe file.
Once the script is in the repo, add the following to book.toml:
[preprocessor.generate-version]
renderers       = [ "html" ]
command         = """sh -c 'jq ".[1]"; ./version-commit theme/index-template.hbs > theme/index.hbs'"""
I'm not 100% sure whether the triple-quotes are a TOML thing, or a side effect of whatever code within mdbook parses the file, but this is working.
You will also note, it requires that jq be installed on the machine.
When mdbook runs a preprocessor, it sends a JSON array to the preprocessor's STDIN. This array contains two dictionaries, one being the "context" with information about the job itself, and the other being a JSON structure of the book's sections, chapters, and text. The preprocessor is expected to send a potentially modified version of this "book" JSON structure to its STDOUT.
The jq ".[1]" command simply copies the "book" JSON structure as-is, without making any modifications. In this case, we don't really need to modify anything in the content, we're just using the "preprocessor" to trigger the conversion of the template for the index.hba file, which is then used as the template for rendering the individual pages within the site.
This is why the string used as the command here, runs the jq command first, and then runs the ./version-commit script to process the template and produce the index.hbs file.
Test
I normally leave mdbook serve running while I work on documents, so I can preview my changes immediately in a browser window. I find that this encourages me to "save early, save often", as opposed to something like MacDown which shows a live preview while I'm typing and therefore doesn't force me to save as often.
I tested this by making minor edits to one of the files that mdbook serve is watching - specifically, I added or removed extra empty lines at the end of the src/SUMMARY.md file, and then saved the change.
-
Watch the output that
mdbook servewrites while it's running. If there are problems with any of this, that's where any error messages will appear. -
Obviously, check the browser window where you're previewing the content, to see if the changes you're expecting, appear there.
If you don't use mdbook serve, you can run mdbook build by hand and check the results in a browser window.
Changelog
2024-06-19 jms1
- moved page to new
jms1.infosite, updated header
2024-06-19 jms1
- moved page to new
jms1.infosite, updated header - formtting changes due to Jekyll/mdbook differences
2022-03-08 jms1
- Initial version
Testing CSS Attributes
This page lists the values of the CSS variables involved in the theme. I use this when testing values for a new theme. I do this by changing the values in the variables.css file, then reloading the browser window, to make sure the colours look the way I want them to.
The page contains an embedded Javascript function which reads the variables' values and inserts them into <span> tags in the tables below. If you change the theme you're using in your browser, you'll need to click one of the buttons (or reload the page) to update the values.
Notes:
- This is NOT a complete list of the CSS variables used in the pages that mdbook generates. These are only the ones I have found useful when creating different coloured themes.
- The buttons only run the Javascript function to update the values in the tables. They do not reload the entire page.
- The list of variables can change between different mdbook versions. The list below is accurate for mdbook v0.5.2, which is the latest version as of the time I'm writing this (2026-03-16).
Examples
Core Background & Text Colours
| Variable | Value | Example |
|---|---|---|
--color-scheme | ||
--bg | ||
--fg | testing | |
--inline-code-color | testing | |
--links | testing | |
--icons | ||
--icons-hover |
This is regular text, with some inline text.
This is a block of pre-formatted text.
Sidebar
| Variable | Value |
|---|---|
--sidebar-active | |
--sidebar-bg | |
--sidebar-fg | |
--sidebar-header-border-color | |
--sidebar-non-existant | |
--sidebar-spacer |
Blockquotes
| Variable | Value |
|---|---|
--quote-bg | |
--quote-border |
This is a blockquote.
Tables
| Variable | Value |
|---|---|
--table-alternate-bg | |
--table-border-color | |
--table-header-bg | |
| Extra rows to give the | |
| table enough rows so you | |
| can see the alternate | |
| background colours |
Code Highlighting
| Variable | Value |
|---|---|
--code-bg | |
--code-fg |
#!/usr/bin/env perl

require 5.005 ;
use strict ;
use warnings ;      # since 'env' won't let us add the '-w' option on the #! line

my $x = 0 ;
while ( $x <= 5 )
{
    $x ++ ;
    print "$x\n" ;
}
Interactive Elements
| Variable | Value |
|---|---|
--scrollbar | |
--searchbar-border-color | |
--searchbar-bg | |
--searchbar-fg | |
--searchbar-shadow-color | |
--searchresults-header-fg | |
--searchresults-border-color | |
--searchresults-li-bg | |
--search-mark-bg | |
--theme-popup-bg | |
--theme-popup-border | |
--theme-hover |
Embedded in this page
If you look at this page's Markdown source, you'll see that it contains some HTML fragments. I don't normally include HTML when writing Markdown, however I wanted this page to show not only the effects of the different colour values I'm trying, but the actual values as well.
You will also notice (in the Markdown source) that the values in the tables are enclosed with <tt>...</tt> rather than with backticks. This is because part of how mdbook handles backticks involves converting any < and > characters in the monospaced text to < and >, which makes the browser show the <span> tags instead of the values.
To save you the hassle of viewing the source in your browser and digging through that to see how I did this, I'm including visible copies of these HTML fragments here.
Javascript - Show CSS Variable Values
This is a Javascript function which walks through every element on the rendered page which has class='show-value', and sets the element's contents to the value of the CSS variable whose name is in the element's data-var= attribute.
<!-- Update every `<span/>` with `class='show-value'` to have the value of
     the CSS variable named in the `data-var=` attribute, as its content. -->
<script>
function update_values() {
    var elements = document.querySelectorAll( '.show-value' ) ;
    elements.forEach( e => {
        e.innerHTML = getComputedStyle( e ).getPropertyValue( e.dataset.var ) ;
    } )
}
update_values()
</script>
Stylesheet - Do Not Center Tables
The default stylesheets that come with mdbook make tables centered on the page. I don't particularly like this, I think the pages look better with tables aligned to the left (which is HTML's default behaviour), so I'm adding this little block of CSS to override the margin: auto in mdbook's default stylesheet.
<!-- Do not center tables. -->
<style>
table {
    margin : 0 ;
}
</style>
Obsidian
Obsidian is a note-taking app. Individual notes are stored (and written) as Markdown files, stored in a directory tree that it calls a "vault". The files in the vault appear as a "tree view" pane within the app, and clicking on a file there will open that file in an editor pane.
It also tracks links between documents within the vault, and can produce a "graph view" with the documents as nodes and lines connecting them to other documents. I don't use this functionality much, since it requires you to add the links between documents, and my mind doesn't really work that way - to me it makes more sense to organize my documents in a directory structure.
Obsidian is available for macOS and Linux. It's also apparently available for ms-windows as well, if you're into that sort of thing. I don't use ms-windows unless something at $DAYJOB requires it, and that hasn't happened in over a year now.
Obsidian has an API which allows people to write their own plugins to extend or modify how Obsidian works. These plugins can be uploaded to Obsidian's servers, and other users can download and use them from there. It also allows users to make their own themes, which control the visual appearance of the notes you're editing or viewing.
I use a small set of plugins on a regular basis:
-
obsidian-git makes Obsidian automatically commit and push changes to a git repo, as edits are made to the files in a vault. I track own vaults (both personal and for
$DAYJOB) using Keybase git repos. -
Minimal Theme provides more options to customize the appearance of an editing pane, separately from a preview pane. This was the only way I could find to use different fonts for editing and previews.
The author also provides a plugin to configure its settings.
Similar or Related Programs
Quiver
Quiver (macOS App Store link) is a "notebook built for programmers". Its documents are stored as a series of blocks, each of which can be plain text, code, Markdown, or LaTeX. (99% of my documents had a single Markdown block.)
I stopped using Quiver for a few reasons.
-
It has bugs. Nothing serious, I never lost any data - for me it was a tagging feature that was working for a long time, but is no longer working in the most recent release.
-
The last release was 2019-09-29 (over 4½ years now). The only change I've seen since then is that its web site changed from
happenapps.commtoyliansoft.com- the site's content appears to be the same. -
The only avenue for support I could find was an email address. The one time I tried to email the developer about tags not working, I never got any response.
Basically, I'm left with the conclusion that the app itself has been abandoned. Which is sad, because it was almost perfect for my needs.
Logseq
At first glance, Logseq seems to be very similar to Obsidian, however I ended up not going with it for a few reasons:
-
Logseq's documents are structured more as outlines than as free-form Markdown documents. Outlines have their uses, but I've been very happy with OmniOutliner for many years now. If I ever feel the need to use something other than OmniOutliner, Logseq will be on the list.
The problem I was trying to solve was a way to organize and edit Markdown files, many of which already existed. For this problem, Obsidian was a better fit for me.
-
Logseq's user interface seems to be a lot more heavily centered on the graph view. It's cool, but I found myself constantly thinking about adding links between documents, then checking the graph to make sure I wasn't missing any, then going back into the documents and figuring out how to work links into them.
In other words, I was spending more time thinking about Logseq than about the contents of the documents I was writing.
mdbook
mdbook is a program which converts a directory tree full of Markdown files, into a web site containing static HTML files. If you're reading this on the jms1.info site, you're looking at mdbook's output.
mdbook is not really an alternative to Obsidian, however until I found Obsidian, I was thinking seriously about using it as part of a workflow to try and provide the things I was using Quiver for.
I am using mdbook to maintain half a dozen internal documentation web sites for $DAYJOB, and I'm starting to use it for my own personal web sites (both public and private) as well.
There is an mdbook section in the menu on the left, where you will find more information about mdbook.
ReText
ReText is an open-source (GPL2) editor for Markdown and reStructuredText. I had never heard of it until I installed Debian 12 on a laptop and ran apt search markdown to see what was available.
From what I've seen it works well enough - it works with individual files rather than having a "vault" mechanism (i.e. no built-in file selector), however I couldn't find an already-packaged version for macOS. It's written in Python and the source code is available on Github, so if I hadn't found Obsidian, I was thinking about maybe packaging it for macOS so I could use it there.
obsidian-git
2024-06-30
obsidian-git is a plugin for Obsidian which automatically tracks changes to a vault in a git repo. If the repo is linked to a "remote" (like Github, Keybase, etc.) the plugin can also push the changes to that remote as they happen.
For me, this serves a few purposes:
-
The git repo, by itself, provides a way to go back and see previous versions of notes which change over time.
-
The git remote serves as a built-in backup mechanism. For non-public vaults I use Keybase git, so it's a cryptographically secure backup - even Keybase themselves can't decrypt what's in the repo.
-
Using a git remote also provides a way to use the same vaults on multiple computers.
I ran into some issues when I started using obsidian-git, because some of the documentation out there wasn't written in a way that "clicked" for me. I went through several iterations of creating dummy vaults, adding the plugin to them, and figuring out how it works. I kept my own notes while I was doing this, and I almost feel like I understand it now.
I'm adding my notes on this site in case somebody else might find them useful. You know, because there isn't enough documentation about it already.

Adding obsidian-git to an Existing Vault
2024-06-30
This page covers how to add obsidian-git to a vault. It covers both newly created vaults and existing vaults, as long as no git repository exists for them yet. If you already have a git repository for a vault and just need to link a new computer to it, see the "Clone an Existing Vault" page instead.
Note that this page started out as two separate notes - one about creating a new vault with obsidian-git, and one about adding obsidian-git to an existing vault. When I added these notes to the
jms1.infosite, I noticed that a lot of the content was the same, so I'm combining them into a single page. Depending on when you see this, you might notice some duplicated content.
Creating a New Vault
If you don't already have a vault that you plan on using obsidian-git with, the obvious first step would be to create one. Use Obsidian's standard process of creating a new vault, nothing special.
Assuming Obsidian is already running ...
-
Click the
 icon in the ribbon on the left.
 -
In the dialog that appears, next to "Create new vault", click "Create".
-
Next to "Vault name", enter a name for the new vault.
-
Next to "Location", click "Browse".
-
In the file browser dialog, navigate to the parent directory of the new vault. For example, on macOS I navigate to the
$HOME/Documents/Obsidian/directory. Then click "Open" at the bottom. -
Back in Obsidian, click "Create".
For the purposes of this document, I created a vault called "sample" in the
$HOME/Documents/Obsidian/directory.
Set up the git repo
This will set up a git repository within the vault. This is all you'll need in order to start tracking changes over time.
Once this is done, you can sync the repo with another location (such as Github, Keybase, or a directory on a shared drive),. This will be covered below - but either way, you need to create the repository within the vault first.
Create the repo itself
In a command line ...
cd ~/Documents/Obsidian/sample/
git init -b main
Create a .gitignore file
This file contains a list of filename patterns that git should not add to, or update in, the repo.
Use a text editor to create a file with the name .gitignore, in the root of the repo (aka the Vault directory - technically, whatever directory you were in when you ran the git init command). I normally use nano or BBEdit for this, others may use editors like vi, vim, or Sublime Text.
The contents of the file will depend on what you do and don't want stored in the git repo. The file I use looks like this:
.DS_Store
._*

.obsidian/*
!.obsidian/app.json
!.obsidian/appearance.json
!.obsidian/config
!.obsidian/community-plugins.json
!.obsidian/core-plugins.json
!.obsidian/graph.json
!.obsidian/hotkeys.json
!.obsidian/plugins
!.obsidian/snippets
!.obsidian/themes
-
The first two entries,
.DS_Storeand._*, are files that macOS creates on filesystems which don't support Apple's "resource fork" mechanism.I include these two entries in the
.gitignorefiles for every repo I create. -
The
.obsidian/*entry tellsgitto ignore all files within the vault's.obsidian/directory. -
The
!.obsidian/xxxentries tellgitto NOT ignore those particular files. This means that those files will be tracked over time and possibly sync'ed between computers.
Create the first commit
A git "commit" records a set of changes to the files in the working directory.
git add .
This command will "stage" every file in the current directory (and its children) to be included in the next commit. This will not include any files listed in the .gitignore file, although in this case it will include the .gitignore file itself.
If you're curious, you can run git status to see which files have been staged.
git commit -m 'initial commit'
This command will create a commit, containing the files you just added. Each commit has a message explaining what the changes in the commit are doing, the -m 'initial commit' is supplying that message. Feel free to use a different message if you like.
Note that commit messages are required. If you don't include a -m option, git will open your text editor and ask you to enter a message. If you don't enter one, it will not create a commit.
Set up a remote
If you plan to sync the git repo with any remotes, now is the best time to set that up.
If you're using Github
Using the web interface
If you're using the Github web interface, create a new repo. DO NOT use any of their options to create "starter" files (such as README or .gitignore) automatically, the repo you create needs to be 100% empty.
Using the gh command line tool
If you're using the gh command line tool, the command will look like this:
gh repo create USERNAME/REPONAME --private --disable-issues --disable-wiki
-
You must include either
--privateor--public. You could also use--internalif the repo is owned by an organization, to make it accessible to members of the organization but not to the entire world. -
The
--disable-issuesand--disable-wikioptions will turn those features off when the repo is created. Other options may be available,gh repo create -hwill show them to you.
Get the new repo's URL
However you created the repo, the output should give you a git remote add command line, or at least a URL which can be used in that command. The URL will look like one of these:
- For HTTPS:
https://github.com/USERNAME/REPONAME - For SSH:
git@github.com:USERNAME/REPONAME
Github repos can be accessed using HTTPS or SSH. Both of them work, but they handle authentication differently. Using HTTPS involves either having to enter your password for every git operation, or using an "authentication helper" program which may store the password in plain text on the system. (The macOS authentication helper stores it in the system's keychain, which is encrypted.)
ℹ️ Personally I prefer to use SSH, since it uses my SSH keys to authenticate. This means that the SSH agent handles authentication requests automatically. If your SSH secret keys are stored on the computer, you'll have to enter the SSH key's passphrase the first time you use it, but after that the SSH agent will remember the key and not need to ask for the passphrase again.
In my case, the SSH agent passes the requests along to the Yubikey which has my SSH secret key on it. I have to enter the Yubikey's PIN once to unlock it, and it stays unlocked until I remove the Yubikey from the computer. This means I don't have to store my Github password or my SSH secret key on the computer.
If all you have is the URL, you can build the command line. This will be explained in the "Add the remote" section below.
Keybase
Keybase git repos can be owned by an individual user, or by a team. In the case of a user, only that user will have access to the repo. For a team, all members of the team will have access to the repo, and people can gain or lose access to the repo by being added to or removed from the team. In addition, team members with reader access will have read-only access to the repo (i.e. they can clone and fetch commits, but they won't be able to push.)
Note that Keybase's git repos do not offer features like pull requests - just cryptographically secure hosting of the git repos themselves.
Private repo
$ keybase git create obsidian-git-sample
Repo created! You can clone it with:
  git clone keybase://private/USERNAME/obsidian-git-sample
Or add it as a remote to an existing repo with:
  git remote add origin keybase://private/USERNAME/obsidian-git-sample
As you can see, this shows you the git remote add command you'll need below.
Team repo
$ keybase git create --team TEAMNAME obsidian-git-sample
Repo created! You can clone it with:
  git clone keybase://team/TEAMNAME/obsidian-git-sample
Or add it as a remote to an existing repo with:
  git remote add origin keybase://team/TEAMNAME/obsidian-git-sample
As you can see, this shows you the git remote add command you'll need below.
Add the remote to the repo
The next step is to tell the local git repo (the files in the .git/ directory) that the remote exists, and how to find it. This is done using the git remote add command.
When you created the repo, it should have given you either a URL or an actual git remote add command. If you just have a "remote string", you can put git remote add origin in front of it. (The word origin is traditionally the name of the remote, for repos which only have a single remote.)
Examples:
git remote add origin git@github.com:USERNAME/obsidian-git-sample(using SSH)git remote add origin https://github.com/USERNAME/obsidian-git-sample(using HTTPS)git remote add origin keybase://private/USERNAME/obsidian-git-sample
Push the commits
After adding the remote, the next step is to push whaetver commits (and tags) are currently in the repo, "up" to the remote.
The first time you do this, you also need to link the local main branch to the main branch you'll be creating when you push the commits.
git push -u origin main
After this, you'll be able to use git push by itself. Because the local main branch is linked to the remote main branch, git push will know which branches to push where automatically.
git push
Keybase: fix the repo on the server
Keybase's git server has a bug where it assumes that every git repo has a branch called master. If the repo doesn't have a branch with this name, then git clone won't be able to clone new copies of the repo without explicitly naming the branch they want to check out at the end of the cloning operation.
Historically, the name "master" was used as the default branch name for newly created repos. The git init command still uses this as the default, but the documentation has a note saying that this will change in the future.
Some people consider the word "master" to be offensive (because it refers to slavery) so many people (myself included) now use main as the name of a git repo's primary branch.
Keybase doesn't provide a command to change the name of a repo's primary branch, however they do provide a mechanism to manually access the files on their "git server", and if you're careful, you can change it by hand.
-
For a private repo
echo 'ref: refs/heads/main' \ > /keybase/private/USERNAME/.kbfs_git/obsidian-git-sample/HEAD -
For a team repo
echo 'ref: refs/heads/main' \
    > /keybase/team/TEAMNAME/.kbfs_git/obsidian-git-sample/HEAD
If you're using Keybase git, you should do this before anybody else (including yourself) tries to git clone the repo.
ℹ️ If you don't do this, you can specify the correct branch when cloning the repo, like so:
git clone -b main keybase://team/TEAMNAME/REPONAME
Add the obsidian-git plugin
Run Obsidian, and open the vault you want to use the obsidian-git plugin with.
-
Click
 on the ribbon on the left. (On macOS you can press "⌘," for this.)
 -
Select "Community plugins" on the left.
-
Next to "Community plugins", click the "Browse" button.
-
Enter "git" in the search box at the top of the window. Look for the "Git" plugin.

-
Click on the plugin.
-
Click on the "Install" button.
-
After installing it, click the "Enable" button.
-
Close the settings window (the X at the top right)
Configure the plugin
Feel free to use whatever settings you like. These are the settings I'm using.
Note that the list of settings may be different from one version to the next. The list below is from 2.24.3.
Obsidian Settings ( or ⌘, )
-
Under "Community plugins" at the bottom, "git"
Automatic
- Split automatic commit and push: NO
- Vault commit interval (minutes): 5
- Auto Backup after stopping file edits: YES
- Auto pull interval (minutes): 0
- Specify custom commit message on auto backup: NO
- Commit message on auto backup/commit:
auto backup: {{date}} from {{hostname}}
Commit message
- Commit message on manual backup/commit:
manual backup {{date}} from {{hostname}} {{date}}placeholder format:YYYY-MM-DD HH:mm:ss{{hostname}}placeholder replacement: whatever hostname you use for the current machine- This is specific to each machine, not sync'ed to the git repo.
- Preview commit message
- List filenames affected by commit in the commit body: YES
Backup
- Sync Method: Merge
- Pull updates on startup: YES
- Push on backup: YES
- Pull changes before push: YES
Line author information
- Show commit authoring information next to each line: NO
History View
- Show Author: Hide
- Show Date: YES
Source Control View
- Automatically refresh Source Control View on file changes: YES
- Source Control View refresh interval: 7000 (default)
Miscellaneous
- Disable notifications: NO
- Hide notifications for no changes: YES
- Show status bar: YES
- Show statge/unstage button in file menu: YES
- Show branch status bar: YES
- Show the count of modified files in the status bar: YES
Commit Author
- Author name for commit: (empty, I configure this using
git config(details) - Author email for commit: (empty, I configure this using
git config(details)
Advanced:
- Update submodules: NO
- Custom Git binary path: (empty)
- Additional environment variables: (empty)
- Additional PATH environment variable paths
/usr/local/bin /opt/homebrew/bin /opt/keybase/bin - Reload with new environment variables: (click this if any changes were made to environment variables)
- Custom base path (Git repository path): (empty)
- Custom Git directory path (Instead of '.git'): (empty)
- Disable on this device: NO
- Donate: up to you, the link goes here
Clone an Existing Vault which uses obsidian-git
2024-06-30
Get URL of existing vault
git@github.com:USERNAME/REPONAMEkeybase://private/USERNAME/REPONAMEkeybase://team/TEAMNAME/REPONAME- etc.
Clone the repo
mkdir -p ~/Documents/Obsidian
cd ~/Documents/Obsidian
git clone keybase://team/TEAMNAME/REPONAME VAULTNAME
Open vault
- File → Open Vault...
- Open folder as vault - click "Open"
- Navigate to
~/Documents/Obsidian/VAULTNAME, click "Open" - When asked about trusting plugins, say yes
Configure plugin
- Settings - (⌘,) or (Obsidian → Settings)
- On the left, under "Community Plugins" (bottom), select "Git"
- Under "Commit message"
- {{hostname}} placeholder replacement → identifier for this machine (not sync'ed in git repo)
- Under "Advanced"
- Additional PATH environment variable paths (especially if you see popups about commands not being recognized, such as
gpgorkeybase-remote)/usr/local/bin /opt/homebrew/bin /opt/keybase/bin - Reload with new environment variables → Reload
- Additional PATH environment variable paths (especially if you see popups about commands not being recognized, such as
Copy Obsidian Daily Note
2024-07-14
I use Obsidian's "Daily Notes" feature to keep a daily list of what I want to get done, and what I did get done, at work each day.
Much of my job involves working on things that nobody else can do - or at least, not as well as I can do it. (I'm not trying to brag, I've just been doing this a lot longer than most of my cow-orkers.) Tasks that would take me a few hours might take most other people a few days. Because of this, I tend to manage my own day-to-day tasks. Every morning I use email, chat, and an internal ticketing system to figure out what needs to get done. When it's not obvious, management helps me figure out which tasks need to be prioritized. And once I've got a clear picture of the day, I start working on whatever things need my attention the most, in that order.
Once or twice a week somebody will ask me what I'm working on and what's on my list for the day. This has happened a few times in the last week, and rather than stopping what I was working on to explain it to them, I just copied the current day's "Daily Note" Markdown file to a shared directory on Keybase and told them to look at that. I'm assuming this was enough for whatever they needed, because they didn't ask any more questions at the time.
Since then, when people have asked about it, I just copied the file to the same location - which saves time, but it's still an interruption to have to copy the file when people ask for it. I edit the file in Obsidian while I'm in my morning "planning" phase, and then during the day I'll add notes to the tasks, or if I'm lucky, move items to a "Done" section at the bottom of the page.
In order to avoid the interruptions (and to make sure I don't forget to copy the file after making changes), I automated the process of copying "today's" Daily Notes file to a specific filename on a shared drive. And then I found a different way to do it, that I like better, although both versions work.
Option 1: cron job
Most unix-type systems, including macOS, use a program called cron to run programs in the background on a regular basis. The programs that it runs automatically are referred to as "cron jobs". The cron "engine" program which runs the jobs, uses text files called "crontabs" to configure which commands to run at what times.
I wrote a script which copies "today's" Daily Notes file to a specific filename on a shared drive, and set up a cron job on my macOS workstation to run the script every five minutes. The script also adds a header at the top of the file which tells when the file was copied, so people can tell how up-to-date the file is.
Download the script
Save the script somewhere in your PATH. (I normally have $HOME/bin in my PATH, so I save the script there.)
Wherever you save it, make sure that the file has executable permissions.
chmod +x cron.copy.today
The crontab entry which runs the script is fairly simple. It looks like this.
1/5 * * * * /Users/jms1/bin/cron.copy.daily
This file makes the machine run the script every five minutes, at 1, 6, 11, etc. minutes after the hour. (Obviously adjust the filename to point to wherever you
TAB characters in crontab files
Back in the day, UNIX systems required that crontab files use a TAB character between the time spec (here 1/5 * * * *) and the command itself. More recent systems allow them, but will work with spaces as well. I'm pretty sure macOS falls in the "more recent systems" category, but I've been in the habit of using TAB characters in crontab files for the past 30+ years, so I do it anyway.
You may want to check your own system's documentation to be sure. If you're going to use TABs, you should also make sure you understand how to make your text editor use TAB characters when you need them.
Option 2: Shell commands plugin
One problem with using a cron job to copy the file is that the copy can only happen at the scheduled time. When the file is updated, it may be up to five minutes before it gets copied. It's possible to change the schedule so the script runs once every minute, but cron itself can't schedule jobs any more often than that.
As it turns out, there's an Obsidian plugin called Shell commands which, as the name suggests, runs shell commands. One of the things it can be configured to do is to run commands when files are saved or updated in a vault.
I wrote a script called copy-daily-note, designed to be called from this plugin with two pieces of information: the name of the file that was updated, and the name of a file that the current day's Daily note should be copied to. When it runs, it does the following:
-
Calculate the filename of the current Daily note.
By default this will be
YYYY-MM-DD.md(for the current date, obviously) in the root directory of the vault, although both the filename and the directory are configurable. Personally, I have a "Daily Notes" folder inside the vault, and my filenames look like2024-07-14 Sun.mdbecause I find it helpful to have the day of the week in the filename. (The "Date format" value I use for this isYYYY-MM-DD ddd.) -
If the filename that was updated is not the same as the one we just calculated, exit.
-
If a "checksum file" exists, and contains information about the correct file, and the checksum in that file matches the current Daily note file, exit.
-
Create an output file containing a header with the current Daily note's filename and a line telling when the file was copied, followed by the contents of the file that was updated (which we now know is today's Daily note).
-
Write a checksum file containing the checksum of the file that was updated, so the next time the script runs, it can tell if the file has changed since this time.
After being configured below, the Shell commands plugin will run this script automatically every time a file in the vault changes.
Download the script
You can save the script wherever you like, just be sure it has executable permissions.
chmod +x copy-daily-note
In the vault where I'm using this, I saved it within the vault itself, in a directory called .bin. This lets it "stay with" the vault, plus because I'm also using the obsidian-git plugin with that vault, any updates I make to the script are automatically sync'ed with the rest of the vault's contents.
The examples below will assume you're doing the same thing. If not, you'll need to adjust the path to run the script below.
cd ~/Documents/Obsidian/vaultname/
mkdir -p .bin
cp ~/Downloads/copy-daily-note .bin/
chmod 0755 .bin/copy-daily-note
Options
The script contains a few command line options which can be used to control how the script works. You may or may not need them.
-
-c ___= Specify a checksum program. (Defaultsha256sum)The script only writes an output file if the input file has changed since the last time the output file was written. The output file is not an exact copy of the input file (it will have an extra header added to it, to tell the reader when the file was copied), so it can't directly compare the two files. Instead, the script writes a second output file containing a checksum of the original input file, and uses that checksum to tell if the input file changed or not.
This option sets what program is used to generate and verify the checksum files. By default it uses
sha256sum, but it can also usesha512sum,sha1sum, ormd5sum, depending on what's available on the machines where the script will run.The program you specify here needs to support the same
-coption thatsha256sumhas. -
-d ___= Specify a custom date format.The Daily notes plugin allows the user to configure the filename it builds for each day's note, as well as the directory within the vault where it stores the daily notes. This script needs to build the same filename, in the same directory. It does this by reading the "Daily notes" plugin's configuration and converting the "Date format" setting to a string which can be used with the 'date' command to build the name of "today's" Daily note.
The library used by the Daily notes plugin uses different "tags" to format the date, than what the
datecommand (used by this script) uses. For example, the plugin's default isYYYY-MM-DD, but thedatecommand would use%Y-%m-%dto format a date the same way. The script has a function to convert the commonly used tags from the plugin's format to thedatecommand's format, but it doesn't cover every possible tag - only the ones that seemed like they would be useful, and for which thedatecommand has corresponding tags for.If you're using a custom date format, and the automatic conversion function doesn't work, you can use the
-doption to specify the format by hand.Documentation
- moment.js library, used by the "Daily notes" plugin
strftime(), used by thedatecommand (and many other programs over the past 40 years)
Examples
Daily notes plugin -doptionNotes YYYY-MM-DD%Y-%m-%dDefault format YYYY-MM-DD ddd%Y-%m-%d %aThe format I use in my vaults To test a string, to make sure it looks right:
$ date '+%Y-%m-%d %a' 2024-07-14 Sun -
-i= Log ignored files.If the script is called with a file that isn't the current daily note, it will exit without doing anything. If this option is given, the script will log (or notify you) that this happened.
-
-l ___= Specify a log file. (The option is a lowercase "L", not a digit "one".)This option will make the script log what it does, every time it runs.
If the vault is sync'ed to multiple computers (using a plugin like obsidian-git, or by storing it on a sync'ed or shared drive), you should make sure that the filename you use for this option will "work" on every machine. It may be helpful to use a value like
$HOME/copy-daily-note.logso the log files on each machine are created in your home directory on that machine.The log file should probably NOT be stored within the vault, especially if the vault is sync'ed.
-
-n= Do not include a link to this page when building output files.The script normally makes the "Copied from Obsidian" text in the header (before the timestamp) a link to this page, so others can read about how the file was created. If you use this option, that text will be normal text which doesn't link to anything.
Make a note of any options you'd like to use, you will need them below.
Install the Plugin
Run Obsidian, and open the vault you want to use the Shell commands plugin with.
-
Click
 on the ribbon on the left. (On macOS you can press "⌘," for this.)
 -
Select "Community plugins" on the left.
-
Next to "Community plugins", click the "Browse" button.
-
Enter "shell" in the search box at the top of the window. Look for the "Git" plugin.
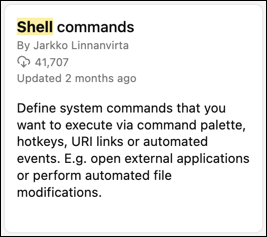
-
Click on the plugin.
-
Click on the "Install" button.
-
After installing it, click the "Enable" button.
-
Close the settings window (the X at the top right)
Configure the Plugin
-
Click
on the ribbon on the left. (On macOS you can press "⌘," for this.) -
Select "Shell commands" on the left. (It will be near the bottom of the list, under the "Community Plugins" section.)
-
On the right, along the top, make sure the "Shell commands" tab is selected.
-
Click the "New shell command" button. A new row should appear above the button.
-
In the text entry box, enter the following:
{{vault_path}}/.bin/copy-daily-note {{event_file_path:absolute}} /output/file/name.mdAny additional options should be added after
copy-daily-noteand before{{event_file_path:absolute}}. -
Above the text entry box, click the
 button. On the menu which appears ...
Debouncing (experimental)
- Execute before cooldown: NO
- Execute after cooldown: YES
- Cooldown duration (seconds): 3
- This is how long the plugin waits before running the script, after you stop typing.
- Prolong cooldown: YES
Execute this shell command automatically when:
- File content modified: YES
-
Close the settings windows (the X at the top right, twice)
Changelog
2024-07-14
- updated to include and explain both scripts
- moved scripts to be downloads rather than inline on the page
- added symlinks with
.txtin the name, to allow web browsers to view the scripts without downloading them
2024-06-26
- created this page
Obsidian - Live Preview Pane
2024-06-29
Problem
The first issue I found when I tried Obsidian was the fact that it doesn't have a "live preview" pane. Other Markdown editors I've used all had two panes, with an editor on the left (usually) and a live preview on the right, so that as you're typing in the editor, you see the rendered output on the right, while you're typing.
I couldn't find an option to enable this, so I asked about it on the Obsidian forum. (I am jms1 there, if that isn't obvious).
The responses contained several pieces of information that I found useful, especially the images showing what the various UI elements are called, i.e. "tab groups". However, I finally found the answer to the question on this page in Obsidian's documentation.
Solution
-
When you're looking at a document, at the top right will be an icon, either a pencil or a book, to control whether that tab is an "editing view" or a "reading view".
-
If you hold down ⌘ (or CTRL for Linux) while clicking this icon, it will open a new tab, in a different tab group (so it's visible next to the current tab), showing the same document. The new tab will be "linked" with the old tab, so if you scroll up or down in one tab, the other will scroll itself to keep them "in sync" with each other.
I also found that with the tabs linked, if I select a different document in one tab, the other tab changes itself to show the same document.
It seems pretty simple once you know how Obsidian's UI works, but it took me a few days to figure out because it isn't really obvious, and nobody reads all of the documentation up front.
Other
One "weird" thing I later noticed is that, if I create a new document, it opens a new tab for the new document, but the "live preview" in the other tab group doesn't "follow" it. This is because the new document has its own tab, and is not open in the existing "linked" tab.
My "solution" for this is to close the new tab, then when the existing "linked" tab is active again, click the new note in the file selector to open it.
PGP and GnuPG
The pages in this section have to do with PGP.
I've been using PGP since 1993.
Authentication Subkeys
2019-02-01
This document explains what authentication keys are, and how to add one to an existing GPG key pair which doesn't already have one.
Background
Subkeys and usage flags
A PGP key consists of a primary key, and usually one or more subkeys. Each key has one or more flags to tell what that key's intended uses are. The possible flags are:
-
"
E" = Encryption. The public key is shared with the world, so that other people can send you secret messages. The secret key is used to decrypt messages that you receive from others. -
"
S" = Signing. The secret key is used to generate "digital signatures", which can be used to prove that you created a given message. The public key is shared with the world, so they can verify your signatures. -
"
A" = Authentication. This key pair is used to prove your identity when accessing certain types of services, such as SSH. This document talks about creating and using a subkey with this flag. -
"
C" = Certification. This key pair is used for two purposes:-
Signing other peoples' PGP keys. This is how the "web of trust" works - if somebody "trusts" your key, and you've signed some other key, they would "trust" that other key as well, based on your signature.
-
Issuing new subkeys. All subkeys "under" a given primary key, are signed (certified) by that primary key.
Only a PGP key's primary key can be flagged for Certification.
-
The "gpg --list-keys" command will show you which flags are on each of the keys.
$ gpg --list-keys jms1
...
pub   rsa4096/0x6B2EDC90B5C6DC30 2017-05-27 [SC]
      6353320118E1DEA2F38EAE806B2EDC90B5C6DC30
uid                   [ultimate] John M. Simpson <jms1@voalte.com>
uid                   [ultimate] John M. Simpson <jms1@jms1.net>
sub   rsa4096/0x297E5961AB566594 2017-05-27 [E]
...
In this case, the primary key (fingerprint ending with DC30) is flagged with "SC" (signing and certifying), and the subkey (fingerprint ending with 6594) is flagged with "E" (encryption).
Having a separate encryption key like this is a good idea, because if you suspect that the encryption key has been compromised, you can issue a new encryption key without having to create an entire new key pair and get your friends "trust" the new one.
An even more secure way to handle this is to create a separate signing subkey, so that the primary key is only used for certification. If you need to use your "secret key" from more than one machine, you can copy the secret parts of just the subkeys, without copying the secret part of the primary key, and still be able to do most day-to-day PGP tasks, without worrying about your primary key being compromised, even if somebody manges to totally take over the computer.
As an example, this is the key I currently use on a regular basis. The secret halves of the three subkeys are stored in the YubiKey I keep on my keyring, while the secret half of the primary key is only stored on an encrypted USB stick that I only access using Tails on an air-gapped laptop.
$ gpg --list-keys jms1
...
pub   rsa4096 2019-03-21 [SC] [expires: 2022-01-01]
      E3F7F5F76640299C5507FBAA49B9FD3BB4422EBB
uid           [ unknown] John Simpson <jms1@jms1.net>
uid           [ unknown] John Simpson <kg4zow@mac.com>
uid           [ unknown] John Simpson <kg4zow@kg4zow.us>
sub   rsa4096 2019-03-21 [E] [expires: 2022-01-01]
sub   rsa4096 2019-03-21 [S] [expires: 2022-01-01]
sub   rsa4096 2019-03-21 [A] [expires: 2022-01-01]
...
Yubikey
A YubiKey's OpenPGP app has three key storage locations: one for encryption, one for signing, and one for authentication. The only things stored on a Yubikey are the numeric secret key values. It doesn't use, and isn't even aware of, any names, expiration dates, usage flags, or whether a key is a primary or secondary.
When I generate a PGP key that I plan to use on a YubiKey, I specifically generate it with subkeys for encryption, signing, and authentication, all separate from the primary key, and I store the three subkeys on the YubiKey. This allows me to use the YubiKey to do everything except certification operations, without needing the primary secret key at all.
TODO
- write another page explaining how to generate a new key in this manner
Procedure
Identify the key
In order to modify a key, you need to give the gpg command enough information to uniquely identify the key. If you're like me and have multiple keys with the same "User ID" (name and email), you will need to use the key's fingerprint to identify which key you want to update.
Because of this, I've more or less trained myself to always use fingerprints to identify keys.
Find the fingerprint of the primary key that you want to add the authentication subkey to.
$ gpg --list-keys jms1
...
pub   rsa4096/0x6B2EDC90B5C6DC30 2017-05-27 [SC]
      6353320118E1DEA2F38EAE806B2EDC90B5C6DC30
uid                   [ultimate] John M. Simpson <jms1@voalte.com>
uid                   [ultimate] John M. Simpson <jms1@jms1.net>
sub   rsa4096/0x297E5961AB566594 2017-05-27 [E]
...
This command actually returned four different keys, I'm only showing the one I'm working with below.
For this key, any of the following values can be used as a Key ID. Fingerprints can be specified either with or without "0x" at the beginning:
B5C6DC30(low 32 bits)6B2EDC90B5C6DC30(low 64 bits)6353320118E1DEA2F38EAE806B2EDC90B5C6DC30(full 160 bits)- "
jms1", "jms1@jms1.net", "john", or "simpson", if your keyring only contains one key contains that string in the User ID.
Notes
-
The idea is to find something which identifies exactly one key.
-
The fingerprint values shown above are the same, the shorter values are just the "low bits" from the full fingerprint. I normally use the full 160-bit fingerprint, since there are ways for a determined attacker to create a key with the same fingerprint as an existing key that they wish to impersonate.
Generate the authentication subkey
There are two ways to generate subkeys: the quick way, and the normal way. I'm going to show the normal way first. If you're already comfortable with gpg, feel free to skip ahead.
Primary secret key
This process MUST be done on a computer where the secret half of the primary key is available. In my case, this means booting up Tails on the air-gapped laptop, mounting the encrypted USB stick, and importing the backed-up copies of the secret keys I need to work on.
$ gpg --import-secret-key /media/keystore/6B2EDC90B5C6DC30.sec.asc
$ gpg --list-secret-keys jms1
sec   rsa4096/0x6B2EDC90B5C6DC30 2017-05-27 [SC]
      6353320118E1DEA2F38EAE806B2EDC90B5C6DC30
uid                   [ultimate] John M. Simpson <jms1@voalte.com>
uid                   [ultimate] John M. Simpson <jms1@jms1.net>
ssb   rsa4096/0x297E5961AB566594 2017-05-27 [E]
The prefix on the primary key will be one of the following:
-
secmeans that the secret key is present in the keyring file(s). -
sec>means that the secret key is present on a smart card (or YubiKey). -
sec#means that the secret key is not available.
You will also see the same kinds of suffixes on the subkeys, i.e. "ssb", "ssb>", or "ssb#".
Make sure the secret key is available. You should see "sec" or "sec>".
The normal way
This example walks through how to create a subkey with the "A" flag.
Note that many of the commands and their output look almost identical, so be careful when you follow along with this process.
$ gpg --expert --edit-key 6353320118E1DEA2F38EAE806B2EDC90B5C6DC30
gpg (GnuPG/MacGPG2) 2.2.0; Copyright (C) 2017 Free Software Foundation, Inc.
This is free software: you are free to change and redistribute it.
There is NO WARRANTY, to the extent permitted by law.

Secret key is available.

sec  rsa4096/0x6B2EDC90B5C6DC30
     created: 2017-05-27  expires: never       usage: SC
     trust: ultimate      validity: ultimate
ssb  rsa4096/0x297E5961AB566594
     created: 2017-05-27  expires: never       usage: E
[ultimate] (1). John M. Simpson <jms1@voalte.com>
[ultimate] (2)  John M. Simpson <jms1@jms1.net>
It starts off by showing you the current state of the key you're working on. The primary key is marked for both signing and certification, and the one subkey is flagged for encryption.
Start by adding a new RSA subkey, using the option allowing you to set your own capabilities.
gpg> addkey
Please select what kind of key you want:
   (3) DSA (sign only)
   (4) RSA (sign only)
   (5) Elgamal (encrypt only)
   (6) RSA (encrypt only)
   (7) DSA (set your own capabilities)
   (8) RSA (set your own capabilities)
  (10) ECC (sign only)
  (11) ECC (set your own capabilities)
  (12) ECC (encrypt only)
  (13) Existing key
Your selection? 8
You will be asked which flags the new key should have. The "Current allowed actions:" line will show you which flags will be enabled, and entering S, E, or A will toggle that flag.
Turn the flags on and off as needed so that only "Authenticate" is selected, then select "Finished".
Possible actions for a RSA key: Sign Encrypt Authenticate
Current allowed actions: Sign Encrypt

   (S) Toggle the sign capability
   (E) Toggle the encrypt capability
   (A) Toggle the authenticate capability
   (Q) Finished

Your selection? s

Possible actions for a RSA key: Sign Encrypt Authenticate
Current allowed actions: Encrypt

   (S) Toggle the sign capability
   (E) Toggle the encrypt capability
   (A) Toggle the authenticate capability
   (Q) Finished

Your selection? e

Possible actions for a RSA key: Sign Encrypt Authenticate
Current allowed actions:

   (S) Toggle the sign capability
   (E) Toggle the encrypt capability
   (A) Toggle the authenticate capability
   (Q) Finished

Your selection? a

Possible actions for a RSA key: Sign Encrypt Authenticate
Current allowed actions: Authenticate

   (S) Toggle the sign capability
   (E) Toggle the encrypt capability
   (A) Toggle the authenticate capability
   (Q) Finished

Your selection? q
Next you will need to select the key length. The gpg software on your computer itself is able to work with keys with a range of sizes, however the YubiKey is only able to work with keys whose length is exactly 1024, 2048, or 4096, so I normally choose 4096.
RSA keys may be between 1024 and 4096 bits long.
What keysize do you want? (2048) 4096
Requested keysize is 4096 bits
Next you will be asked how long the key should be valid. For this example I chose "key does not expire", however I normally set expiration dates on all of my keys, so that if I later need to revoke a key and not everybody gets the revocation certificate, it will "stop working" after a reasonable length of time. (I normally renew or re-generate new keys every year.)
Please specify how long the key should be valid.
         0 = key does not expire
      <n>  = key expires in n days
      <n>w = key expires in n weeks
      <n>m = key expires in n months
      <n>y = key expires in n years
Key is valid for? (0) 0
Key does not expire at all
Is this correct? (y/N) y
At this point, gpg has the information it needs to create the new key. It will ask for confirmation one last time, and then gen
Really create? (y/N) y
We need to generate a lot of random bytes. It is a good idea to perform
some other action (type on the keyboard, move the mouse, utilize the
disks) during the prime generation; this gives the random number
generator a better chance to gain enough entropy.

sec  rsa4096/0x6B2EDC90B5C6DC30
     created: 2017-05-27  expires: never       usage: SC
     trust: ultimate      validity: ultimate
ssb  rsa4096/0x297E5961AB566594
     created: 2017-05-27  expires: never       usage: E
ssb  rsa4096/0xBA6C2A169C6C0F60
     created: 2017-11-10  expires: never       usage: A
[ultimate] (1). John M. Simpson <jms1@voalte.com>
[ultimate] (2)  John M. Simpson <jms1@jms1.net>
As you can see, there is now a second subkey, with the "A" flag.
The last remaining step is to save the new key out to disk.
gpg> save
The quick way
This one-line command does everything described above.
$ gpg --quick-add-key 6353320118E1DEA2F38EAE806B2EDC90B5C6DC30 rsa4096 auth 2021-12-31
This command will generate a new 4096-bit RSA key and add it to that existing key, with the "A" flag, and a signature expiring on 2021-12-31. You will be prompted for the passphrase of the primary key to which you are adding the subkey.
Notes
-
Subkeys have their own expiration dates, which can be different from the expiration date of the primary key to which they are attached.
-
The "normal" process only allows you to specify an expiration date as "now plus X", while the "quick" process also allows you to specify an exact date/time for the key to expire.
Convert the new key to SSH public key format
In order to use the new key as an SSH key, you need to export the public half of this new key, convert it into the format that SSH needs, and store it in the $HOME/.ssh/authorized_keys file of each machine where you want to be able to SSH in using the key.
Luckily, the gpg --export-ssh-key option does this exact thing.
$ gpg --export-ssh-key 0xBA6C2A169C6C0F60 > sshkey.pub
$ cat sshkey.pub
ssh-rsa AAAAB3NzaC1yc2EAAAADAQABAAACAQC1hMmBJQ+PPYkuFuWxHiv4eV1BDXW4ZxvXkCIeZeKf
LlOc7V2MOMggV4OzHIApEvO4XzSbyuFjiTkrvOHdSrb+J1JhFnpCeYawxRz5UQiZdcN/HJNlIZK6AMvO
hiUuuUKULMhIywL3UQwZknDvUwYrWwjdnjwOZqlyEFu1jUnfVvhGgI4qAcXqd2HBx6juXen6Z2kuP7T5
4N/ZGyB5dEq07iJmXpyQ6cUJdHOY156MG5nb8J2KdY/xn+oWSRyAunDMCNtL7RtjDaaI/4u+UtG5rzGZ
UO/2TeqIubWLDyCgqF1rEhIDqMFl2XkXLoa7fMNNc+njtrwtq5yHy8nzL1NJ0PzW0wTW4h9IICVFKucZ
Yw+2jnBnT+PP7SvNe2uEYxvozb1sJ5A5MwOs7r13X50SWit5n3/Hdg3GPC/GkHWu4plkH+0wRjZLMbOQ
r4opFD/aUZdjpPVodBImfgKZwoVy4DdzZRNJRkOmR/i2iER8L6XOKB3Y7xLHlnTQj48uxaS0mxuagjDu
SrYWY2zOHsjSP78jU2i9cV1yRNa3Jz0Y4sVD5NX+qnQ6yxNOkyBA8IVfig/SnHvfStptkMdsBT4cDGYC
/me2w+OIqFvM5pRhDR1ULW5Mqef0TlALv+clnxDqhdszU7/j4F8yFeaoSD4bz7s/Rfxu5o9toFRmxejr
bw== openpgp:0x9C6C0F60
Note that this output is one big huge long line of text, I've just added line-wrapping so it looks okay in a normal web browser.
This SSH public key should be added to $HOME/.ssh/authorized_keys on each server where you want to be able to log in using the key, just like you would do with any other SSH public key.
Notes:
-
The "
gpg --export-ssh-key" command needs the same kind of unique identifier that the "gpg" commands above needed, i.e. a unique portion of a User ID or a segment of the key's fingerprint. -
In the "
gpg --export-ssh-key" command, you can use either the main key ID or the authentication subkey ID, they will both produce the same output. The only time you would need to explicitly list the new authentication subkey ID is if your key pair has multiple subkeys with the "A" flag for some reason. -
Feel free to change the comment (the "
openpgp:0x9C6C0F60" in the example above). I normally change it to something like "jms1@jms1.net 2017-11-10", which tells people later on (usually myself) whose key it is, and when the key was generated.However, because the comments can be changed, if you ever find yourself in the position of investigating an unknown SSH public key, you should not trust any comments which may be attached to the key, and should only rely on the key itself (that long string starting with "
AAAA").
Changelog
2024-06-19 jms1
- moved page to new
jms1.infosite, updated header
2020-12-22 jms1
- Changed the title to "Authentication Subkeys"
- Updated much of the "Background" section at the top.
2020-12-20 jms1
- Moved to
jms1.info. - Minor formatting changes.
- Added the "Quick" section with the "
gpg --quick-add-key" command. - Wrote/updated descriptions for each step in the "Detailed" section.
2019-02-01 jms1
- Initial content
Make SSH use gpg-agent
2018-04-01
This document covers how to "trick" SSH commands into using gpg-agent instead of ssh-agent, which makes it possible to hold your SSH secret keys on a YubiKey.
Quick setup - CentOS 7
If you're standing at the console of a CentOS 7 machine and need to use your YubiKey to authenticate outbound SSH connections...
sudo yum install gnupg2-smime pcsc-lite
sudo systemctl start pcscd
eval $( gpg-agent --daemon --enable-ssh-support )
export SSH_AUTH_SOCK="$( gpgconf --list-dirs agent-ssh-socket )"
Now you should be good to go.
Pre-requisites
The two obvious dependencies are an SSH client, and gnupg. One or both of these are usually installed on most Linux and macOS machines.
Linux
Most Linux distros come with openssh already installed, however some distros may split the client and server bits into separate packages. Some distros may install gnupg as well - if not, you should be able to use yum, apt-get, or a similar command, to install the necessary packages. Search
CentOS, Fedora, RedHat, etc.
yum install openssh-clients gnupg2 gnupg2-smime
Debian, Ubuntu, etc.
I used to use Xubuntu 18.04 on a few workstations at home, I'm using Debian 12 now. The commands which install the software are the same.
The commands I use to configure SSH to use gpg-agent on these machines are...
sudo apt install scdaemon gpg-agent

mkdir -p ~/.gnupg
echo use-agent >> ~/.gnupg/gpg.conf
echo enable-ssh-support >> ~/.gnupg/gpg-agent.conf
In addition, I had to tell XFCE not to start ssh-agent when setting up the desktop session when I log in. Those commands were:
xfconf-query -c xfce4-session -p /compat/LaunchGNOME -n -t bool -s false
xfconf-query -c xfce4-session -p /startup/ssh-agent/enabled -n -t bool -s false
If you're curious, this document (from 2020) was my checklist for setting up Xubuntu. The document is still useful, although some of it may no longer be relevant to me. At some point I plan to update the info for Debian and include it on this site.
Unfortunately Keybase Sites doesn't render Markdown to HTML, but Markdown is pretty easy to read on its own.
Other Linux distros
I don't have the exact commands for every other distro out there. For gnupg you should search for packages with names like gnupg, gpg2, or maybe just gpg.
macOS - GPGTools
Note: I don't use GPGTools anymore, but I'm leaving this info here. See "macOS - Homebrew" below for more information.
For macOS, the openssh client is installed as a basic part of the OS, however gnupg is not. There are two ways to install the gnupg tools:
-
Visit
https://gpgtools.org/and install the current version of GPG Suite.Not only will this give you the
gpgcommand line tools, but it also includes a System Preferences widget to control some aspects of howgpgandgpg-agentwork, along with a Mail.app plugin to support signing and encrypting email. -
brew install --cask gpg-suitewill install the same package, using Homebrew.Note: you can also use
brew install --cask gpg-suite-no-mailif you don't need the Mail.app plugin.
Note that both methods end up installing the same software, I just find it easier to use the command line, so I use Homebrew on my macOS machines.
Also note that the Mail.app plugin is not free. It's not horribly expensive, and it's not a "subscription" (it's a one-time purchase for each "major version" of the GPG Suite package), however they only allow five "activations", and the "Paddle" framework wants to connect to api.paddle.com on a regular basis.
I don't like the whole "limited number of activations" thing, and I hate any kind of system which contstantly "phones home" like like this, so ... while I do believe in supporting the authors of the software I use, I figure the donation I sent them a few back covers my use of the command line tools and the Preferences widget, and I use Thunderbird with Enigmail instead of their Mail.app plugin.
macOS - Homebrew
I was working on another page today (2022-01-22) and noticed that the machine (a MacBook Air M1) appeared to have three different versions of gpg installed, from a combination of "MacGPG2", "GPGTools", and Homebrew. In the interest of "cleaning up", I decided to remove all but one - and the Homebrew version is what I decided to keep, since it's a dependency of a few other Homebrew packages I use, and because it's quicker and easier to install. (I'm familiar enough with gpg and key management that I don't really need the key management GUI and System Preferences widget.)
After downloading and running the GPGTools Uninstaller (direct download link) I discovered that the "MacGPG2" version was also gone, and the Homebrew version was the only thing left on the machine. (Apparently "GPG Suite", "GPG Tools", and "MacGPG2" are all the same thing.) I ran into some issues after removing GPGTools ... long story short, GPG uses a program called pinentry to ask the user for a PIN code when a "card" requires one. The pinentry program from GPGTools was the only one on the machine, so the error was because gpg-agent wanted to ask for a PIN but had no way to do so.
The fix was to install a "pinentry" program using Homebrew. Running "brew search pinentry" command showed that there's a "pinentry-mac" package, and "brew info pinentry-mac" confirmed that it is what it sounds like, and after installing it, I'm able to ssh just like I did before removing GPGTools.
TL;DR This command will install the necessary packages from Homebrew.
brew install gnupg pinentry-mac
I also had to configure gpg-agent. Details are below, but here's the short version:
mkdir -p $HOME/.gnupg
cat > $HOME/.gnupg/gpg-agent.conf <<EOF
enable-ssh-support
pinentry-program    /opt/homebrew/bin/pinentry-mac
EOF
gpg-connect-agent killagent /bye
gpg-connect-agent /bye
After restarting gpg-agent, everything is working again.
Setup - Linux
To make the current shell use gpg-agent (and therefore the YubiKey) instead of the normal ssh-agent ...
Manual process
-
Make sure the
GPG_TTYvariable is set.export GPG_TTY=$(tty) -
Make sure that the
SSH_AUTH_SOCKvariable points to theS.gpg-agent.sshsocket.unset SSH_AGENT_PID export SSH_AUTH_SOCK="$( gpgconf --list-dirs agent-ssh-socket )"
Any commands executed in this shell will use gpg-agent as the SSH agent.
Automatic process (shell, per-user)
To make sure that your shell always sets the GPG_TTY and SSH_AUTH_SOCK variables correctly, add the following to your .bash_profile (or the appropriate file, if your login shell is not bash)
########################################
# Set things up for using gpg-agent

export GPG_TTY=$(tty)

function use-gpg-agent-for-ssh {
    SOCK="$( gpgconf --list-dirs agent-ssh-socket )"
    if [[ -n "${SOCK:-}" ]]
    then
        unset SSH_AGENT_PID
        export SSH_AUTH_SOCK="$SOCK"
    fi
}

use-gpg-agent-for-ssh
Note that this creates a function to "do the work", and then calls that function. This way if you decide you don't want this all the time, you can comment out just the function call (the last line), and then you can type use-gpg-agent-for-ssh in any shell to easily "activate" the change within that shell.
Once you have added this, every new interactive shell will use the changes. A quick way to test it is to open a new terminal window, which will contain a new shell. Once you have verified that it's working, you can either close the shell you're working in and open a new window, or you can run "source ~/.bash_profile" to read the updated profile into the current shell.
Note that setting the variables in this way will only affect shells and any processes started from those shells. In particular, it will NOT affect processes started by something other than your shell, such as cron jobs.
Automatic process (all users)
The process is the same as the "shell, per-user" process above, except that instead of editing your ~/.bash_profile file...
-
You will edit
/etc/profile, so that all users will use it. -
On some systems (such as CentOS 6 or 7, and probably 8 although I haven't tried it yet) you may be able to create an
/etc/profile.d/use-gpg-agent-for-ssh.shfile instead.
If your system has multiple users, and some of them may wants to use the normal ssh-agent, you may want to not include calling the function (i.e. the final use-gpg-agent-for-ssh line) in what you add to the system-wide profile. In this case, users who do want to use gpg-agent by default can add a user-gpg-agent-for-ssh line to their ~/.bash_profile, and anybody on the system can manually type that command to use gpg-agent within that shell.
Setup - macOS
In macOS, LaunchAgents are configurations which starts a process or runs a command automatically. macOS comes with a LaunchAgent which does the following, every time a user logs in:
-
Creates a UNIX socket with a dynamic name, and sets things up so that
ssh-agentis automatically started, listening on on that socket, the first time a process connects to the socket. (If multiple users are logged in, each user will have their own socket and their ownssh-agentprocess.) -
Exports an
SSH_AUTH_SOCKenvironment variable whose value is the path to that dynamically generated socket.
We need to change things around so that the SSH_AUTH_SOCK variable points to the name of a socket where gpg-agent is listening.
My first thought was to change the value of the SSH_AUTH_SOCK variable itself, and I did figure out how to do this automatically when the user logs in, by disabling the built-in LaunchAgent which runs ssh-agent. However...
-
OS X 10.11 "El Capitan" added a security feature called System Integrity Protection (or "SIP"). This made things more difficult, in that you had to disable SIP (which requires rebooting into "recovery mode") before you could disable the LaunchAgent, and then reboot to re-enable SIP again afterward (because SIP itself is actually a good idea, I just don't think that the automatic
ssh-agentstartup should have been included within its scope.) -
macOS 10.15 "Catalina" added another feature where the root filesystem is mounted "read only", which added another set of hoops that had to be jumped through.
-
macOS 11.0 "Big Sur" took it a step further by digitally signing the contents of the root filesystem. I haven't actually tried it, but it sounds like if you were to delete or change the LaunchAgent file, the signatures won't match and the OS would refuse to boot at all.
While I was hunting for information about how to disable this LaunchAgent in Catalina, I found this article which explained a different way to solve the problem. Instead of disabling the macOS LaunchAgent, we can add our own LaunchAgent which runs after theirs, which replaces the UNIX socket created by the built-in LaunchAgent, with a symbolic link to the UNIX socket where gpg-agent is listening for SSH agent requrests. By doing this, any client which uses the $SSH_AUTH_SOCK value to connect to an SSH agent, still uses the randomly generated filename which was pointing to ssh-agent, however now points to to gpg-agent, and that's what the SSH client ends up talking to.
The only part of this I'm not clear about is how to ensure that our LaunchAgent runs after Apple's LaunchAgent. It's probably something as simple as "launchd processes the system LaunchAgents before any user LaunchAgents", but I haven't seen any official documentation which says that, so ... while I've never seen it happen, I'm not totally convinced that the two LaunchAgents wont accidentally run in the wrong order at some point.
Quick version
-
Install the GPG software, using one of the following methods:
-
Install GPG Tools, with or without the GPG Mail support. (I haven't used "GPG Mail" since they started charging for it, and I don't use "GPG Tools" at all anymore.)
-
Homebrew.
brew install gnupg pinentry-macQuick configuration:
mkdir -p $HOME/.gnupg
cat > $HOME/.gnupg/gpg-agent.conf <<EOF
enable-ssh-support
pinentry-program    /opt/homebrew/bin/pinentry-mac
EOF
gpg-connect-agent killagent /bye
gpg-connect-agent /bye
-
-
Install the two LaunchAgent files.
cd ~/Library/LaunchAgents curl -O https://jms1.net/yubikey/net.jms1.gpg-agent.plist curl -O https://jms1.net/yubikey/net.jms1.gpg-agent-symlink.plist -
Either log out and log back in, or reboot the machine.
-
When you log back in, verify that the
SSH_AUTH_SOCKenvironment variable points to a temp file which is a symlink to your$HOME/.gnupg/S.gpg-agent.sshfile (or technically a named pipe).% ls -l $SSH_AUTH_SOCK lrwxr-xr-x 1 jms1 wheel 34 Dec 6 10:44 /private/tmp/com.apple.launchd.gR4WHD21R5/Listeners -> /Users/jms1/.gnupg/S.gpg-agent.ssh -
If you already have a YubiKey with an SSH key loaded, verify that you're able to see the key.
With the YubiKey NOT inserted:
% ssh-add -l
The agent has no identities.
With the YubiKey inserted:
% ssh-add -l
4096 SHA256:xxxxxxxxxxxxxxxxxxxxxxxxxxxxxxxxxxxxxxxxxxx cardno:nnnnnnnnnnnn (RSA)
In both commands. "
-l" is a lowercase "L", not the digit "one".Also note that the SSH public key doesn't have the same "comment" that you might normally have after a key. Remember that the YubiKey only really stores the secret key, from which the public key is derived. It doesn't store any kind of metadata about the key. The comment it shows is the serial number of the YubiKey.
Download links for the LaunchAgent files
net.jms1.gpg-agent.plist- startsgpg-agentnet.jms1.gpg-agent-symlink.plist- replaces the UNIX socket with a symlink
Details
Configure gpg-agent
To configure gpg-agent to support SSH, add this line to $HOME/.gnupg/gpg-agent.conf:
enable-ssh-support
To configure gpg-agent to find its "pinentry" program...
-
Find the full path to the
pinentryprogram. I did this by typing "pinent" and then hitting TAB, which showed the following output:pinentry pinentry-curses pinentry-mac pinentry-ttyFrom these, it seemed obvious to me that "
pinentry-mac" was the one I wanted, so I found the full path to that...$ which -a pinentry-mac /opt/homebrew/bin/pinentry-mac -
Once you have the path, add this line to
$HOME/.gnupg/gpg-agent.conf:pinentry-program /opt/homebrew/bin/pinentry-mac
If you changed the gpg-agent.conf file for any reason, you should restart the running gpg-agent process:
gpg-connect-agent killagent /bye
gpg-connect-agent /bye
Make gpg-agent start automatically
Create $HOME/Library/LaunchAgents/net.jms1.gpg-agent.plist with the following contents: (adjust the path to gpg-connect-agent as needed)
<?xml version="1.0" encoding="UTF-8"?>
<!DOCTYPE plist PUBLIC "-//Apple//DTD PLIST 1.0//EN"
  "http://www.apple.com/DTDs/PropertyList-1.0.dtd">
<plist version="1.0">
  <dict>
    <key>Label</key>
    <string>net.jms1.gpg-agent</string>
    <key>RunAtLoad</key>
    <true/>
    <key>KeepAlive</key>
    <false/>
    <key>ProgramArguments</key>
    <array>
      <string>/usr/local/MacGPG2/bin/gpg-connect-agent</string>
      <string>/bye</string>
    </array>
  </dict>
</plist>
Tell launchd to use it.
launchctl load net.jms1.gpg-agent.plist
Replace the socket with a symlink
Create $HOME/Library/LaunchAgents/net.jms1.gpg-agent-symlink.plist with the following contents: (adjust the path to the socket file as needed)
<?xml version="1.0" encoding="UTF-8"?>
<!DOCTYPE plist PUBLIC "-//Apple//DTD PLIST 1.0//EN" "http://www.apple.com/DTDs/ProperyList-1.0/dtd">
<plist version="1.0">
  <dict>
    <key>Label</key>
    <string>net.jms1.gpg-agent-symlink</string>
    <key>ProgramArguments</key>
    <array>
      <string>/bin/sh</string>
      <string>-c</string>
      <string>/bin/ln -sf $HOME/.gnupg/S.gpg-agent.ssh $SSH_AUTH_SOCK</string>
    </array>
    <key>RunAtLoad</key>
    <true/>
  </dict>
</plist>
Tell launchd to use it.
launchctl load net.jms1.gpg-agent-symlink.plist
Restart
You will need to either reboot, or log out and log back in, in order to activate these changes.
Make sure it worked
After rebooting or logging back in, make sure it worked.
-
Make sure the variable exists, pointing to a random name.
$ env | grep SSH
SSH_AUTH_SOCK=/private/tmp/com.apple.launchd.CaehyEWKPw/Listeners
The "
CaehyEWKPw" portion of the name will be different every time you log into the machine. This is normal. -
Make sure that name is a symlink, pointing to the
gpg-agentSSH socket.$ ls -l $SSH_AUTH_SOCK lrwxr-xr-x 1 jms1 wheel 34 Feb 18 00:55 /private/tmp/com.apple.launchd.CaehyEWKPw/Listeners -> /Users/jms1/.gnupg/S.gpg-agent.sshNote: the command has a "lowercase L" option.
-
Make sure the agent is reachable.
$ gpg-connect-agent -v /bye
gpg-connect-agent: closing connection to agent
You should just see the message shown above.
-
Make sure the YubiKey is connected.
-
Make sure
gpgis able to talk to your YubiKey.$ gpg --card-status Reader ...........: Yubico YubiKey OTP FIDO CCID Application ID ...: D276000124010304xxxxxx ... -
Make sure the agent is able to talk to the YubiKey.
$ ssh-add -l
4096 SHA256:l7CsDA23ENutkRsZ5jhlqJfl2syaiJfHni7b95e8dQ4 cardno:0006xxxxxxxx (RSA)
Usage
If you've gone through the setup process above, and the SSH_AUTH_SOCK variable points to the S.gpg-agent.ssh socket, you don't really need to do anything differently - just use ssh, scp, sftp, or whatever, the same way you already do. As long as your SSH client works with an agent, and your YubiKey is physically plugged into the computer, it should all "just work".
If you haven't gone through the steps above ... do so.
authorized_keys
To get the public key line needed for authorized_keys files...
-
Insert the YubiKey and wait a few seconds.
-
Run "
ssh-add -L".$ ssh-add -L ssh-rsa AAAAB3NzaC1yc...9toFRmxejrbw== cardno:0006xxxxxxxx
The "cardno:xxxxx" at the end of the line is a comment. When using the value in an authorized_keys file I normally replace this with something more useful than the serial number...
$ cat .ssh/authorized_keys
ssh-rsa AAAAB3NzaC1yc...9toFRmxejrbw== jms1@jms1.net 2019-03-21 hardware token
Notes
The gpg-agent automatically "contains" the Authentication Keys stored on the YubiKeys (or other OpenPGP cards) present on the system. When gpg-agent receives an authentication request, it passes it along to the YubiKey, which does the work of signing the request without sending the secret key anywhere.
Other keys can be added to the agent using ssh-add. When you do this, a copy of the secret key will be written to a file in the ~/.gnupg/private-keys-v1.d/ directory, named after the "key grip" (another kind of fingerprint, which includes the options rather than just the public key).
However, there are a few things to be aware of.
These files are stored separately, and may be encrypted using a different passphrase than the SSH secret key file.
-
When you add a key, you will be prompted first for the existing passphrase (to read the secret key), and then for a new passphrase (to encrypt the secret key in this new file).
-
Later, when you're prompted for a passphrase in order to use the key, you will need to enter the "new passphrase" rather than the original one.
The "ssh-add -d" (or -D) command will not remove these keys.
-
gpg-agentadds the key grips (similar to a Key ID) to a file called "~/.gnupg/sshcontrol". -
Removing the key grip from this file makes the key no loger appear in the "
ssh-add -l" output, and no longer be available for SSH authentication. -
Removing the
~/.gnupg/sshcontrolfile itself will make ALL keys no longer appear in the "ssh-add -l" output, or be available for SSH authentication. (This does not include keys stored on YubiKeys or other cards.) -
Editing or removing this file will not remove the files under the
~/.gnupg/private-keys-v1.d/directory. You will need to remove those files by hand.
Changelog
2024-12-23 jms1
- found/fixed links to old
keybase.pubsite - tweaked info about Debian (I no longer use Xubuntu)
2024-06-19 jms1
- moved page to new
jms1.infosite, updated header
2022-01-22 jms1
- Updated with more info about "GPG from Homebrew" and less about GPGTools, since I don't use GPGTools anymore.
- Also added more details about what a "pinentry" program does.
2021-01-07 jms1
- changed "
brew cask install" to "brew install --cask"
2020-12-20 jms1
- Moved to
jms1.info, moved this Changelog to the end of the file - Added macOS versions where security changes were added
- Other minor formatting updates
2020-12-06 jms1
-
Verified that the macOS setup process described below (i.e. installing the two LaunchAgent files and log out/in) DOES work with macOS 11.0 "Big Sur", on both Intel and Apple Silicon processors.
This is a LOT easier to set up, so this is what I'm doing with my own machines as I upgrade them to Catalina. I've updated this page with information about that process.
2020-02-23 jms1
- A few weeks ago I updated this page with information about how to set this up on Catalina. While I was thinking about it I happened across this article which accomplishes the same overall goal, but instead of disabling the macOS
com.openssh.ssh-agentLaunchAgent, it creates a symlink with whatever name$SSH_AUTH_SOCKcontains, pointing to$HOME/.gnupg/S.gpg-agent.ssh.
2019-09-01 jms1
- last version updated on Keybase (corrected link)
Older jms1
- I wasn't keeping any kind of changelog before this, so I can't really include more details here, other than the fact that the very first version of this page was written some time in 2018.
Puppet
I've been using Puppet to build and manage servers at work since 2013.
Puppet - ensure_packages()
2022-02-24
I've been using Puppet to manage systems at work for about nine years now. We use Puppet to install pretty much everything on the servers we sell to our customers, as well as managing our internal infrastructure systems.
Our servers have several scripts on them, written in Perl and Python. Most of these scripts require external libraries to run. For the most part, these libraries can be installed using OS packages. such as .rpm or .deb files, depending on the OS.
One problem I've been running into for years is, how to manage installing these packages along with the scripts which need them. Note that installing the packages is actually pretty simple, it's just a normal package declaration:
  package { 'perl-Digest-SHA' :
    ensure => present ,
  }
Puppet only allows each package to be declared once, across all of the classes which are used to build the machine's catalog. Each script needs its own set of libraries, and each machine may need a different collection of scripts. Ultimately I need to make sure that each machine has the right collection of libraries for the scripts which that machine uses.
History
(Feel free to skip this section if you like.)
When I started, I just declared the library packages with the scripts. At the time all of the scripts were declared in the same class, so it was fairly simple - until we started needing to build a different type of server which used some of the scripts but not all of them (and in fact, needed to not contain some of the others for security reasons).
Try #1: Libraries Class
My first "solution" was to move all of the library package declarations to a single libraries class, which is used on every type of machine we manage. The resulting machines work, however ...
-
Any time a script is added, and it has a new dependency, that dependency ends up being installed on every machine we manage, whether that package is needed on the machine or not.
Our production machines run in environments that I will only describe as "highly regulated". Whenever Puppet installs or updates software on a server, it shows up in that system's logs, and the facilities' IT security people ask questions. There have been a few times times when I've been given a list of every package installed on a machine and told to provide an explanation of why each package is needed. Trying to explain to a client that a package was installed on their servers, because some other client's servers needed it ... not the most pleasant conversation.
-
Any time a script is added, or an existing script is updated and has a new list of required libraries, I have to look in two placess to update things - the class which installs the script, and the
librariesclass which installs all of the library packages. -
When a script is removed, I have to do one of two things:
-
Figure out which library packages the script was using, and then figure out if any other scripts needed that particular package, in order to tell if it's safe to delete that particular package declaration from the Puppet code.
I tried to leave comments in the Puppet code in both classes, to help me figure this out later, but when other people are writing the scripts and don't tell you that an update added a dependency, because it happened to have been one which was already being installed by the
librariesclass, I never get to update the comments for that library package to show that the "xyz script" now also needs that particular package. -
Leave the package declaration in the "libraries" class forever, even if nothing really needs it anymore. This is what I eventually ended up doing, however it has resulted in a lot of unnecessary packages on the servers. Luckily the packages are not huge, and the systems involved have enough storage so it isn't a problem.
-
As you can see, it's a lot of manual management that I've always thought, shouldn't be needed.
Try #2: Manually check before declaring
Another thing I tried was having the Puppet code explicitly check whether the package had already been included in the catalog, before declaring it. The package declarations ended up looking like this:
  if ( ! defined( Package['perl-Digest-SHA'] ) ) {
    package { 'perl-Digest-SHA' :
      ensure => present ,
    }
  }
This works, and can be used to "declare if needed" each package, in the same class where the script itself is declared. However, converting to this scheme would involve adding these blocks for every package, for every script, across all of the classes, and then removing the libraries package. This is possible, but it would be tedious and time-consuming, and I'm the only person doing Puppet programming. Unless it's something that makes an improvement that our clients can see, I can't justify spending the time on doing it.
The ensure_packages() function
Earlier today I asked about this (without so much detail) in the "Puppet Community" slack server, and some kind person pointed me to the ensure_packages() function in the puppetlabs/stdlib module. I vaguely remember being aware of this function several years ago, but the description at the time didn't really explain much, and I was looking for something else, so it didn't really "click" - and as a result, I didn't realize how useful it could be. (The current description looks to be identical to the one I saw years ago, i.e. "still not great", which is part of why I'm wrting this page.)
⚠️ Removed
It looks like the
ensure_packages()function has been removed from thepuppetlabs/stdlibmodule, some time after version 8.1.0.
The function is actually a wrapper around another function called ensure_resources(), which does more or less what the "Manually check before declaring" code shown above does - it checks the catalog-in-process and, if the given resource hasn't already been declared, it adds it to the catalog, just as if it had been declared in the Puppet code.
It's probably easier to see with an example, so ... let's assume that we're going to install two scripts, "/usr/local/bin/abc" and "/usr/local/bin/xyz". They're written in Perl. One contains the following "use" lines at the top, which "link in" the libraries when the script starts ...
# from /usr/local/bin/abc

use Digest::SHA qw ( hmac_sha256_hex ) ;
use IO::Socket::SSL ;
use JSON ;
use LWP ;
use Sys::Hostname ;
The other script contains these "use" lines:
# from /usr/local/bin/xyz

use IO::Socket::SSL ;
use JSON ;
use LWP ;
use Sys::Hostname ;
In order for these script to run, the libraries need to be installed. We don't have to worry about Sys::Hostname since it's a "core" library, installed as part of the perl package, however the other libraries do need to be installed.
Ideally, we'd like to be able to have something in the same Puppet class which installs the script itself, and we'd like to be able to list all of the packages each script needs, even if multiple scripts happen to need the same packages.
We could do something like this, i.e. "Manually check before declaring" ...
  ########################################
  # Install the abc script and its dependencies

  $pkg_abc = [ 'perl-Digest-SHA' , 'perl-IO-Socket-SSL' , 'perl-JSON' , 'perl-libwww-perl' ]

  $pkg_abc.each |$x| {
    if ( ! defined( Package[$x] ) ) {
      package { $x :
        ensure => present ,
      }
    }
  }

  file { '/usr/local/bin/abc' :
    ensure => file ,
    owner  => 'root' ,
    mode   => '0744' ,
    source => 'puppet:///modules/${module_name}/usr/local/bin/abc' ,
  }

  ########################################
  # Install the xyz script and its dependencies

  $pkg_xyz = [ 'perl-IO-Socket-SSL' , 'perl-JSON' , 'perl-libwww-perl' ]

  $pkg_xyz.each |$x| {
    if ( ! defined( Package[$x] ) ) {
      package { $x :
        ensure => present ,
      }
    }
  }

  file { '/usr/local/bin/xyz' :
    ensure => file ,
    owner  => 'root' ,
    mode   => '0744' ,
    source => 'puppet:///modules/${module_name}/usr/local/bin/xyz' ,
  }
While this works, having those each constructs above every single script gets kind of tedious, and if you're not careful it makes it really easy to make mistakes (ask me how I know).
Instead, we can do this ...
  ########################################
  # Install the abc script and its dependencies

  ensure_packages( 'perl-Digest-SHA' )
  ensure_packages( 'perl-IO-Socket-SSL' )
  ensure_packages( 'perl-JSON' )
  ensure_packages( 'perl-libwww-perl' )

  file { '/usr/local/bin/abc' :
    ensure => file ,
    owner  => 'root' ,
    mode   => '0744' ,
    source => 'puppet:///modules/${module_name}/usr/local/bin/abc' ,
  }

  ########################################
  # Install the xyz script and its dependencies

  ensure_packages( 'perl-IO-Socket-SSL' )
  ensure_packages( 'perl-JSON' )
  ensure_packages( 'perl-libwww-perl' )

  file { '/usr/local/bin/xyz' :
    ensure => file ,
    owner  => 'root' ,
    mode   => '0744' ,
    source => 'puppet:///modules/${module_name}/usr/local/bin/xyz' ,
  }
This is easier to see, it's easier to understand, and it's easier for a junior person (or a "programmer but not a Puppet programmer") to maintain without having to constantly worry about typos.
Changelog
2024-06-19 jms1
- moved page to new
jms1.infosite, updated header - added note about ensure_packages() no longer existing
2022-02-24 jms1
- Initial version
Random
Upside-Down Characters
2020-12-24
A friend saw some "upside down writing" on a social networking site and wanted to know how to do the same thing.
˙ʇxǝʇ uʍop-ǝpᴉsdn ɟo ǝldɯɐxǝ uɐ sᴉ sᴉɥ┴
I've seen this kind of thing before, it's just substituting characters which "look" upside down (like "Y" and "⅄"). The trick is knowing what the upside-down version of each character is to begin with.
I pointed my friend to an online converter (I think it was http://www.upsidedowntext.com but there are several out there), but at the same time I decided that I wanted a list of them for myself as well, in case I want to embed them into a web page or something... hence this page.
If it isn't obvious, all codes below are hexadecimal.
| Orig | Char | UpsideDn | Code Hex | Code Dec | Normal |
|---|---|---|---|---|---|
21 | ! | ¡ | ¡ | ¡ | |
22 | " | , | ,, | ,, | ,, |
23 | # | # | # | # | # |
24 | $ | $ | $ | $ | $ |
25 | % | % | % | % | % |
26 | & | ⅈ | ⅈ | ⅈ | |
27 | ' | , | , | , | , |
28 | ( | ) | ) | ) | ) |
29 | ) | ( | ( | ( | ( |
2A | * | * | * | * | * |
2B | + | + | + | + | + |
2C | , | ' | ' | ' | ' |
2D | - | - | - | - | - |
2E | . | ˙ | ˙ | ˙ | |
2F | / | / | / | / | / |
30 | 0 | 0 | 0 | 0 | 0 |
31 | 1 | Ɩ | Ɩ | Ɩ | |
32 | 2 | ᄅ | ᄅ | ᄅ | |
33 | 3 | Ɛ | Ɛ | Ɛ | |
34 | 4 | ㄣ | ㄣ | ㄣ | |
35 | 5 | ϛ | ϛ | ϛ | |
36 | 6 | 9 | 9 | 9 | 9 |
37 | 7 | ㄥ | ㄥ | ㄥ | |
38 | 8 | 8 | 8 | 8 | 8 |
39 | 9 | 6 | 6 | 6 | 6 |
3A | : | : | : | : | : |
3B | ; | ; | ; | ; | ; |
3C | < | > | > | > | > |
3D | = | = | = | = | = |
3E | > | < | < | < | < |
3F | ? | ¿ | ¿ | ¿ | |
40 | @ | @ | @ | @ | @ |
41 | A | ∀ | ∀ | ∀ | |
42 | B | q | q | q | q |
43 | C | Ɔ | Ɔ | Ɔ | |
44 | D | p | p | p | p |
45 | E | Ǝ | Ǝ | Ǝ | |
46 | F | Ⅎ | Ⅎ | Ⅎ | |
47 | G | פ | פ | פ | |
48 | H | H | H | H | H |
49 | I | I | I | I | I |
4A | J | ſ | ſ | ſ | |
4B | K | ʞ | ʞ | ʞ | |
4C | L | ˥ | ˥ | ˥ | |
4D | M | W | W | W | W |
4E | N | N | N | N | N |
4F | O | O | O | O | O |
50 | P | Ԁ | Ԁ | Ԁ | |
51 | Q | Q | Q | Q | Q |
52 | R | ɹ | ɹ | ɹ | |
53 | S | S | S | S | S |
54 | T | ┴ | ┴ | ┴ | |
55 | U | ∩ | ∩ | ∩ | |
56 | V | Λ | Λ | Λ | |
57 | W | M | M | M | M |
58 | X | X | X | X | X |
59 | Y | ⅄ | ⅄ | ⅄ | |
5A | Z | Z | Z | Z | Z |
5B | [ | ] | ] | ] | ] |
5C | \ | \ | \ | \ | \ |
5D | ] | [ | [ | [ | [ |
5E | ^ | ^ | ^ | ^ | ^ |
5F | _ | ‾ | ‾ | ‾ | |
60 | ``` | , | , | , | , |
61 | a | ɐ | ɐ | ɐ | |
62 | b | q | q | q | q |
63 | c | ɔ | ɔ | ɔ | |
64 | d | p | p | p | p |
65 | e | ǝ | ǝ | ǝ | |
66 | f | ɟ | ɟ | ɟ | |
67 | g | ƃ | ƃ | ƃ | |
68 | h | ɥ | ɥ | ɥ | |
69 | i | ᴉ | ᴉ | ᴉ | |
6A | j | ɾ | ɾ | ɾ | |
6B | k | ʞ | ʞ | ʞ | |
6C | l | l | l | l | l |
6D | m | ɯ | ɯ | ɯ | |
6E | n | u | u | u | u |
6F | o | o | o | o | o |
70 | p | d | d | d | d |
71 | q | b | b | b | b |
72 | r | ɹ | ɹ | ɹ | |
73 | s | s | s | s | s |
74 | t | ʇ | ʇ | ʇ | |
75 | u | n | n | n | n |
76 | v | ʌ | ʌ | ʌ | |
77 | w | ʍ | ʍ | ʍ | |
78 | x | x | x | x | x |
79 | y | ʎ | ʎ | ʎ | |
7A | z | z | z | z | z |
7B | { | } | } | } | } |
7C | ` | ` | | | | | | |
7D | } | { | { | { | { |
7E | ~ | ~ | ~ | ~ | ~ |
Changelog
2024-06-19 jms1
- moved page to new
jms1.infosite, updated header
2021-01-02 jms1
- wrote a script to generate the table (saved a LOT of copy/pasting)
- added decimal codes
- moved "normal" upside down characters to their own column
2020-12-26 jms1
- added "normal" characters where possible
2020-12-24 jms1
- initial version
Shell Scripting
I've been writing shell scripts since the early 1990's. Over the years I've built up a collection of useful scripts, functions and one-liners, that others might find useful.
My Shell Setup
I use bash on all of my machines, mostly because I've been using it for the past 20+ years and it's what I'm used to. I also find it useful to be able to be able to type the same commands I use in my scripts, and know that the shell I'm typing them into will do exactly what the shell that executes the script will do.
My .bashrc file is fairly small, however it includes this:
for F in "$HOME"/.bashrc.d/*
do
    if [[ -f "$F" ]]
    then
        source "$F"
    fi
done
This lets me add files to my $HOME/.bashrc.d/ directory, where they will be included while the $HOME/.bashrc file is being processed. The filenames within the directory are automatically sorted by name when the shell expands the * into a list of filenames, so the filenames control what order the files are processed.
cheat
My memory isn't perfect, I'm finding I have to look up the documentation for commands I use all the time, just to remember what the command line options are or what they do. Just as an example, the rsync command has half a dozen different "delete" options, based on whether you want to delete files on the source or on the destination, and to do the deleting before or after copying the file.
I found a program called cheat which lets you create "cheat sheets" with quick reminders of just the details you need for the commands you need them for, and it has become a real time-saver for me.
They also have a collection of cheatsheets, maintained by the community, with information that others find useful.
The program was designed to hold information about command line options that people might forget, however it can be used for just about anything that can be stored as plain text. As an example, you could use it to store a list of peoples' email addresses, phone numbers, social media names, or other contact information.
Example
As a more concrete example ... I store my shell scripting template as a cheatsheet file. When I need to start a new shell script, I run something like this:
cheat template > new-script
This creates the "skeleton" of a shell script, with most of the functions I end up using in 95% of my scripts, arleady in place. This lets me concentrate on making the script do what I need it to do, and then once it's working, I remove the bits I ended up not needeing.
My Cheatsheets
I've started a small collection of cheatsheets. In addition to recording command line options, I'm also using it to store functions that I use when writing shell and Perl scripts.
In particular, my template cheatsheet is what I use to start a new shell script, it already contains most of the functions I end up using for shell scripts. Whatever I end up not needing for the script I'm writing, I normally remove when the script is finished.
I don't know that they'll be useful to anybody else, but if you're curious, there's a copy of them on Github.
My Configuration
The cheat program itself can be configured with multiple collections of cheatsheets, and each one can be flagged as "read-only" or "read-write". I find it useful to use both the community cheatsheets and a collection of my own cheatsheets. I set this up on my workstations using ...
########################################
# clone community cheatsheets

mkdir -p ~/git/cheat
git clone https://github.com/cheat/cheatsheets ~/git/cheat/cheatsheets

########################################
# clone my own cheatsheets and set up github additional target

git clone foks://(redacted)/cheatsheets ~/git/jms1-cheatsheets
cd ~/git/jms1-cheatsheets/
git remote set-url --add origin git@github.com:kg4zow/jms1-cheatsheets
Once the repos are cloned, I set up the config file for cheat using the following:
cheatpaths:
  - name     : community
    path     : /Users/jms1/git/cheat/cheatsheets
    tags     : [ community ]
    readonly : true

  - name     : jms1
    path     : /Users/jms1/git/jms1-cheatsheets
    tags     : [ jms1 ]
    readonly : false
With this configuration ...
-
When I type
cheat xxx, it looks for a cheatsheet calledxxxin both collections.- If it only exists in one collection, it shows the contents of that file.
- If it exists in both collections, it shows the contents of the file from my personal collection.
I couldn't find any documentation which explicitly says this, but it looks like it uses the last matching file.
-
When I type
cheat -e xxx(to edit a cheatsheet file) ...- If the file exists in my personal collection, it runs my editor (normally BBEdit) against that file.
- If the file exists in the community collection, it copies that file to my personal collection and opens my copy for editing.
- If the file doesn't exist in either, it opens the editor with the filename where the file belongs in my personal collection. When the editor saves the file, that creates it in my collection.
Other Notes
-
When I edit cheatsheets, I need to remember to commit and push the changes in my git repos, and then run
git pullon my other workstations.Part of this could be automated using a cron job that runs
git pull, however committing and pushing has to be a manual process, since I don't want to commit/push until I know the changes are correct. (I make typos just like everybody else.) -
On my work machines, there is a third cheatsheet collection, shared with members of the team I work with.
cheathas a-poption to specify which collection to use, especially when creating or editing cheatsheet files.You can use
cheat -hto see all of its options. Or runcheat cheat, if the community cheatsheets repo is part of your configuration. 😎
My Cheatsheets
The "master copy" of my cheatsheets are stored in an encrypted FOKS git repo, with a Github repo as an additional push target, so that whenever I push changes to FOKS, Github is updated at the same time.
$ cd ~/git/jms1-cheatsheets
$ git remote -v
origin  foks://(redacted)/cheatsheets (fetch)
origin  foks://(redacted)/cheatsheets (push)
origin  git@github.com:kg4zow/jms1-cheatsheets (push)
If you're curious, you're welcome to look at the Github repo.
Coloured line functions
This is a collection of shell functions which print coloured lines of text.
Coloured lines can make it easy to tell where a piece of text starts or ends.


ANSI Control Sequences
These functions assume that your terminal handles ANSI control sequences, also known as ANSI esecape codes. These are explained in more detail on the Colors page.
Functions
These could be stand-alone scripts, however I found it easier to write them as functions and source them into my shell when it starts.
The first function, coloured_line, does the heavy lifting. It requires one parameter, and may have more.
-
The first parameter specifies the colour. This is a set of numbers and
;characters which are inserted into the ANSI command sequence which sets the colour. -
If there are more parameters, they are essentially joined into a single string with newlines between them, and then that is split into lines. Each line is printed with the appropriate control sequences before and after the text of that line.
-
If there are no more parameters, the function reads lines from STDIN and prints each one with the appropriate control sequences before and after the text of that line.
Joining the parameters and splitting the lines allows the caller to provide multiple lines, either as multiple parameters or as multi-line strings.
function coloured_line {
    local COL P IFS LINE LINES

    COL="${1:?no colour code specified}"
    shift

    if [[ -n "$1" ]]
    then
        ########################################
        # each parameter is a line

        for P in "$@"
        do
            IFS=$'\n' read -a LINES -d '' -r <<< "$P" || true
            for LINE in "${LINES[@]}"
            do
                printf "\e[%sm%s\e[0K\e[0m\n" "$COL" "$LINE"
            done
        done
    else
        ########################################
        # STDIN will contain one or more lines of text

        while IFS='' read -r LINE
        do
            printf "\e[%sm%s\e[0K\e[0m\n" "$COL" "$LINE"
        done
    fi
}
The other functions are wrappers around the coloured_line function. These specify the appropriate colour code and pass their input parameters (if any) along without modification. Note that the colour codes all start with 0;, which resets the colour to the defaults. This ensures that the output won't "inherit" any attributes from whatever may have been active before.
function redline {
    coloured_line '0;1;37;41' "$@"
}

function yellowline {
    coloured_line '0;30;43' "$@"
}

function blueline {
    coloured_line '0;1;37;44' "$@"
}

function greenline {
    coloured_line '0;1;37;42' "$@"
}

function cyanline {
    coloured_line '0;1;37;46' "$@"
}

function purpleline {
    coloured_line '0;1;37;45' "$@"
}

function whiteline {
    coloured_line '0;1;37;47' "$@"
}
Examples
Variations
These are different versions of the same functions. Depending on your needs, you may find these more useful.
Simpler verions
These functions are simpler, but they may not handle multi-line strings correctly.
function redline {
    printf "\e[0;1;37;41m%s\e[0K\e[0m\n" "$*"
}
(not showing all colours)
Handle output when STDOUT is not a terminal
One thing to note is that the functions, as written above, will always print the codes to generate coloured lines. You can change them so that they only print the "colour codes" when run in a terminal, and print some kind of plain-text version, without the colour codes. As an example ...
function redline {
    if [[ -t 1 ]]
    then
        printf "\e[0;1;37;41m%s\e[0K\e[0m\n" "$*"
    else
        echo "***** $* *****"
    fi
}
fail Function
In many of my scripts, when an error occurs I want to draw the user's eye to it. I do this using the fail function, which is pretty simple - it uses redline to print the message it received in a red line, then exits from the script.
This function is useful within scripts, but you probably don't want to include it in your .bashrc file. If you were to type fail in a shell, it would print the message and then immediately exit from the shell.
function fail {
    redline "$@"
    exit 1
}
Colors
This is a script I threw together as a quick way to see what different ANSI colour combinations look like on whatever terminal I'm using at the moment.
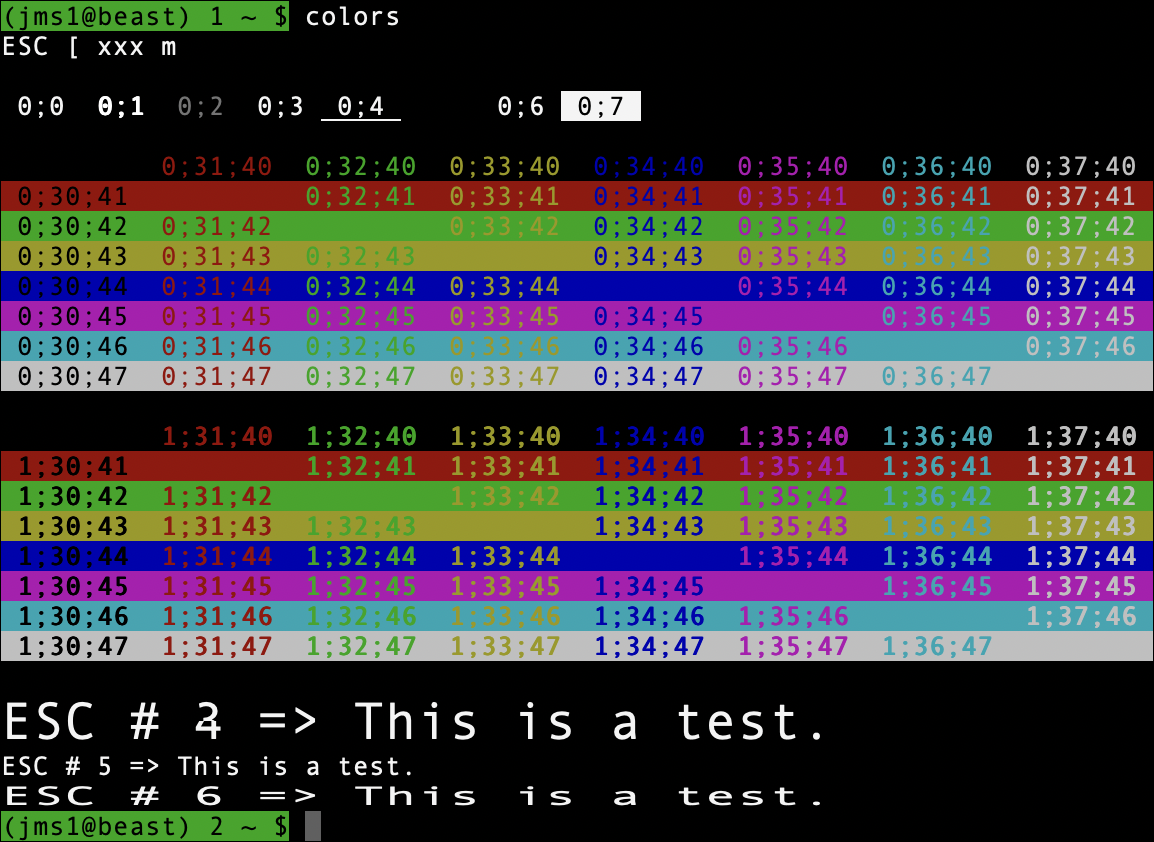 (Screenshot from Apple
 Terminal.app under macOS 26.0.1)
Download
⇒ colors
Control Sequences
Most of the values you're seeing above are used as part of an ANSI Control Sequence (these are also known as ANSI escape codes). These are sequences of control characters which, when "printed" to a terminal, control the terminal's behaviour. In the case of the colors script, they control the colour used to draw the characters sent after the control sequence.
These control sequences were originally used by the DEC VT-100 terminal (which I used in high school. The computer lab had several different kinds of terminals, but I preferred the VT-100's because of how the keyboard "felt" under my fingers.
This is the first time I remember thinking about how keyboards feel, and was the beginning of what made me prefer mechanical keyboards to this day.
A "control sequence" is just a specific set of characters, sent to the terminal, by the "host" it's connected to. In most cases (these days), the terminal is a window on your desktop, and the host is either the computer in front of you, or a computer that you may be connected to remotely (via SSH, for example).
These characters are ...
-
ESCis the ANSI "ESC" control character, ASCII 27 or0x1B.The C
printf()function uses the notation\eto represent this character. Many other languages and utilities (includingecho -e) use the same notation. I'll be using the same notation below. -
The sequence
\e[(i.e.ESCfollowed by[) tells the terminal that an ANSI control sequence is starting. Some documentation will refer to this sequence asCSI, which means "command sequence initiator". -
There may or may not be a sequence of numbers, separated by
;. -
After the numbers will be a character that tells the terminal which command is being sent.
Setting Text Attributes
The \e[...m command tells the terminal that any characters printed after the sequence, should be drawn using certain colours or other visual attributes. The numbers between [ and m control what they should look like.
The numbers used to draw the first line are ...
0means to reset the text back to "standard" colours, typically white text on a black background.1means to make the foreground colour "bold".2means to make the foreground colour "faint".3means to draw the text in italics.4means to draw the text with an underline.5means to make the text blink slowly.6means to make the text blink quickly.7means to draw the text in "reverse video", i.e. with the foreground and background colours reversed.8means to "conceal" the text. (What this actually means will depend on the terminal software.)9means to draw the text "crossed out", i.e. with a horizontal line through it.
Note that not all terminal programs support all of these codes. As an example, none of the terminal programs I use know how to make text blink. For the most part, terminal programs will ignore codes they don't understand. This is actually why I wrote the colors script, so I could quickly tell how different terminal programs handle different visual attributes.
Setting Colours
Setting text colours uses the same \e[...m command shown above, but uses a different set of numbers to specify the colours.
30-37set the foreground colour.40-47set the background colour.
Setting Text Height and Width
The original VT-100 and later VT-series terminals were able to draw characters twice as high and/or twice as wide as normal. Not all terminals were (or are) able to do this, so the control sequences to show text this way are not part of the ANSI X3.41 standard. They are proprietary to DEC (Digital Equipment Corporation, who made the VT-series terminals), however some terminal emulation software also supports them.
Instead of starting with ESC [, these control sequences start with ESC #. In these sequences, the character after the # controls the sizes of all characters on that line rather than any individual characters on the line, which means you can't mix different character sizes within the same line.
In addition, double-height characters need to be drawn on two lines - one line containing the top half of each character, and the next line containing the bottom half.
The control sequences for this are ...
ESC#3means that the characters on the current line should be drawn as the top half of double-height, double-width versions of those characters.ESC#4means that the characters on the current line should be drawn as the bottom half of double-height, double-width versions of those characters.ESC#5means that the characters on the current line should be drawn as "normal height, normal width" characters (i.e. the way they would normally be drawn anyway).ESC#6means that the characters on the current line should be drawn as double-width, but normal height, versions of those characters.
This is easier to understand when you can see it, so these screenshots show the difference between a terminal which does support these sequences (Apple Terminal.app), and a terminal which does not support them (iTerm2), both using "Andale Mono 13 Regular" as the font.
 (Screenshot from Apple
 Terminal.app v2.15(464) under macOS 26.0.1)
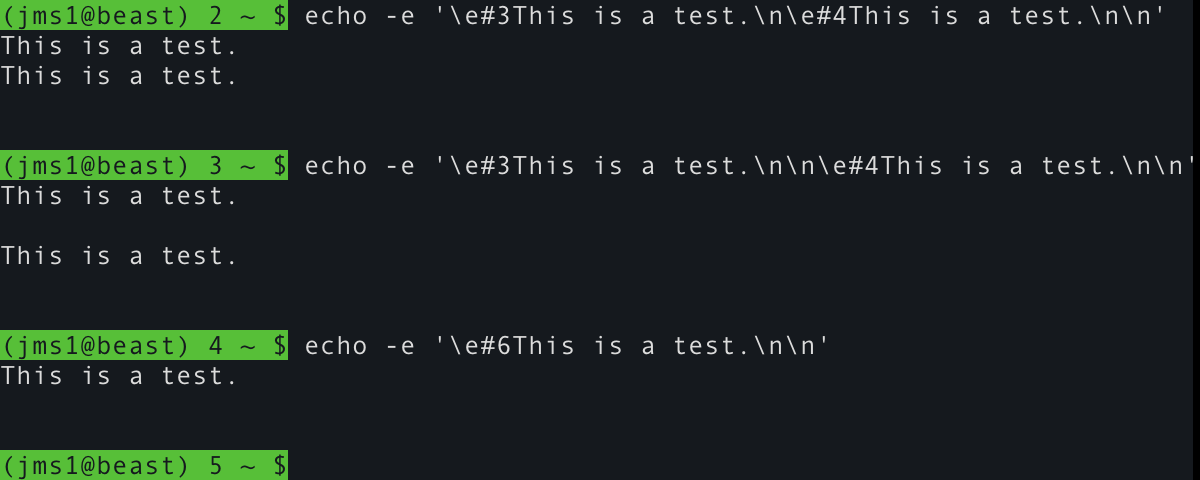 (Screenshot from iTerm2 v3.6.5 under macOS 26.0.1)
set_x and show_x functions
These functions simulate what set -x does, but only for specific commands.
Functions
set_x
The set_x function simulates set -x for just the one command. I use this in a lot of the scripts I write.
###############################################################################
#
# Maybe print a command before executing it

SET_X="${SET_X:-false}"

function set_x {
    if [[ "${SET_X:-false}" == "true" ]]
    then
        local IFS=$' '
        echo "$PS4$*" 1>&2
    fi
    "$@"
}
A one-liner to accomplish the same thing looks like this:
set -x ; COMMAND ; { set +x ; } 2>/dev/null
ℹ️ Colouring Output
I've started standardizing how I write my scripts, by starting new scripts with a common template which contains the colored line functions and the
set_xandshow_xfunctions, and then deleting the functions I end up not needing for that script. As part of this, I'm using thecyanlinefunction to print the output generated byset_xandshow_x.function set_x { if [[ "${SET_X:-false}" == "true" ]] then local IFS=$' ' cyanline "$PS4$*" 1>&2 fi "$@" }If you write a lot of scripts, you may want to do the same.
show_x
This shows the same output that set_x shows, but doesn't actually run the command.
###############################################################################
#
# Show the same output that set_x would show,
# but don't actually run the command

function show_x {
    if [[ "${SET_X:-false}" == "true" ]]
    then
        local IFS=$' '
        echo "$PS4$*" 1>&2
    fi
}
As you can see, it's identical to set_x other than the "$@" at the end.
Example
#!/bin/bash

###############################################################################
#
# Usage message. Every good script should have one.

function usage {
    MSG="${1:-}"

    cat <<EOF
$0 [options]

Example program.

-x      Show commands being executed.

-h      Show this help message.

EOF

    if [[ -n "$MSG" ]]
    then
        echo "$MSG"
        exit 1
    fi

    exit 0
}

###############################################################################
#
# Maybe print a command before executing it

SET_X="${SET_X:-false}"

function set_x {
    if [[ "${SET_X:-false}" == "true" ]]
    then
        local IFS=$' '
        echo "$PS4$*" 1>&2
    fi
    "$@"
}

###############################################################################
###############################################################################
###############################################################################

SET_X=false

while getopts ':hx' OPT
do
    case $OPT in
        h)  usage
            ;;
        x)  SET_X=true
            ;;
        *)  echo "ERROR: unknown option '$OPTARG'"
            exit 1
    esac
done
shift $(( OPTIND - 1 ))

########################################
# Examples

set_x echo hello

ID="$( set_x gh pr list ... )"
Template
For many years I've kept a collection of pieces of shell code that I end up using when I start a new script. At one point I had to create about ten scripts in the same day, and realized that for each script I was copying a basic getopts loop, then copying the set_x function, then copying the coloured line functions, and realized that it would be easier if I had a "template" with these things already in place, so I started a template.txt file in my home directory.
A few months later I discovered the cheat program, and stored the template as a cheatsheet. When I start a new script, I type something like this:
cheat template > new-script
... and then edit the new-script file from there.
Download
My cheatsheet collection is backed up to Github. You can download the template cheatsheet from this link.
Yubikey
A Yubikey is a physical USB security key. These are commonly used as a "second factor" for authentication (2FA). The Yubikey 5 series supports several protocols, including FIDO2, U2F, and OpenPGP.
Load PGP keys into a YubiKey
2017-12-13
This document covers how to load PGP keys into a YubiKey.
Background
The YubiKey is actually a tiny computer, powered by the USB port (or via NFC). It contains several tiny "apps" which provide the functionality of the YubiKey. In this case, we're going to be talking about the OpenPGP app.
Most smartcards, including the Yubikey, require some kind of authentication before they will agree to do anything. When you first plug the YubiKey into a USB slot, the OpenPGP app will be in a "locked" state, and the user needs to enter a PIN number to unlock the YubiKey before the app can be used.
The YubiKey has three different codes which can be entered, which allow different types of operations to be performed.
-
The Personal Identification Number, or "PIN", is used to allow operations which involve using the secrets stored within the YubiKey. This includes decrypting data, creating digital signatures, and (with the right kind of key) performing SSH authentication.
If the wrong PIN is entered three times, the YubiKey will "lock" itself and not allow itself to be unlocked at all, even if the correct PIN is entered.
-
The Personal Unblocking Key, or "PUK", is used to "unlock" the YubiKey after the wrong PIN has been entered three times.
If the wrong PUK is entered too many times, the PUK function will also be locked.
-
The Admin PIN is the "master key" for the OpenPGP app. It is used to load new secret keys, set or change PINs, and "unlock" the OpenPGP app after the wrong PIN (or PUK) has been entered too many times.
I think the Admin PIN will also unlock normal key-use functions like the regular PIN does. However, you shouldn't use the Admin PIN on an everyday basis like this, for a few reasons:
-
If somebody happens to see you entering the PIN, and then "borrows" the YubiKey (with or without your knowledge), they would be able to change any/all of the PINs and/or load new keys without your knowledge.
-
If you forget the Admin PIN and lock the card, you won't have a way to unlock it, other than totally resetting it and loading new keys.
If the Admin PIN is entered incorrectly three times, the OpenPGP app will permanently lock itself. The only way to recover from this is to totally reset the OpenPGP app, which deletes any secret keys which were prevously stored in the YubiKey.
-
Note that there is no way to download the secret keys from the YubiKey, even if you have all three PIN codes.
PIN Requirements
PIN codes are generally a string of digits, however...
-
YubiKeys do not require that PINs can only be digits.
However, most smartcards require PINs to be digits, because they may need to be used with a card reader with an integrated PIN pad, and entering letters or other characters using a ten-key keypad can be a bit of a pain. And because of this, some computers' PGPCard implementations may assume that only digits are allowed, and only allow digits to be entered.
Unless you are 100% sure that every system where you will ever use the YubiKey will support non-digits in the PIN codes, I recommend that you stick with digits.
-
The YubiKey OpenPGP app has a lower limit of 6 characters. This is different from the smartcards embedded in most credit/debit cards, which only require 4 characters (and which may not allow more than 4 characters).
-
The YubiKey OpenPGP app has an uppper limit of 127 characters. However, some computers may limit how many characters the user can enter, which means that if your PIN is ten digits but the computer only allows you to enter eight, you won't be able to use it at all.
My own PINs have more than eight characters, and I haven't had any problems using them with macOS, Linux, or one time with Windows (it was a work thing, and I have changed the PIN since this happened - I don't know if the corporate IT overlords were recording keystrokes at the time or not.)
Default PIN codes
When a Yubikey arrives from the factory, or if its OpenPGP app has been reset, the default PIN codes are:
- PIN:
123456 - PUK: (none, which means that the Admin PIN must be used to unlock the PIN)
- Admin PIN:
12345678
Set Yubikey OpenPGP PINs
If you have not already done so, you should set your own PIN and Admin PIN codes.
While you're setting the PINs, you may also want to set the cardholder name, language preference, public key URL, and login data. These are all optional, however I normally do this with my YubiKeys, so you will see these steps below.
$ gpg --card-edit

Reader ...........: Yubico Yubikey 4 OTP U2F CCID
Application ID ...: D2760001240102010006069404470000
Version ..........: 2.1
Manufacturer .....: Yubico
Serial number ....: 06940447
Name of cardholder: [not set]
Language prefs ...: [not set]
Sex ..............: unspecified
URL of public key : [not set]
Login data .......: [not set]
Signature PIN ....: not forced
Key attributes ...: rsa4096 rsa4096 rsa4096
Max. PIN lengths .: 127 127 127
PIN retry counter : 3 0 3
Signature counter : 0
Signature key ....: [none]
Encryption key....: [none]
Authentication key: [none]
General key info..: [none]

gpg/card> admin
Admin commands are allowed

gpg/card> passwd
gpg: OpenPGP card no. D2760001240102010006069404470000 detected

1 - change PIN
2 - unblock PIN
3 - change Admin PIN
4 - set the Reset Code
Q - quit

Your selection? 3
At this point your workstation will ask for the following, usually as separate prompts:
- The current Admin PIN (it will probably just say "the Admin PIN"). Again, the default for a new (or newly reset) YubiKey is "
12345678". - The new Admin PIN
- The new Admin PIN again, to verify that you typed it correctly
PIN changed.
Next, set the PIN you'll use on a regular basis in order to generate signatures, decrypt messages, or perform SSH authentication.
1 - change PIN
2 - unblock PIN
3 - change Admin PIN
4 - set the Reset Code
Q - quit

Your selection? 1
- Enter the current PIN. (Again, the default is "
123456".) - Enter the new PIN.
- Enter the new PIN again.
Note that if the current PIN was wrong, this command will fail and you will receive a "Error changing the PIN: Bad PIN" error.
PIN changed.
Once the PIN is set, if you want to set a separate PUK you can use the "unblock PIN" setting. Personally I don't have one, but if I were managing YubiKeys for a company and might need to help a user who locked their YubiKey by entering the wrong PIN too many times, and they weren't able to physically bring the YubiKey to me, I would definitely want to be able to give them a code which unlocks the PIN without giving them full access to change everything on the card.
1 - change PIN
2 - unblock PIN
3 - change Admin PIN
4 - set the Reset Code
Q - quit

Your selection? 2
- Enter the Admin PIN (which you just set above)
- Enter the new PUK
- Enter the new PUK again
PIN changed.
When you're finished setting the PIN codes, use "q" to leave that menu and go back to the "gpg/card>" prompt.
1 - change PIN
2 - unblock PIN
3 - change Admin PIN
4 - set the Reset Code
Q - quit

Your selection? q

gpg/card>
Next, enter some basic info about the "owner" of the card, along with their preferred language. This information is stored on the YubiKey, and will be visible to anybody who runs "gpg --card-info" or "gpg --card-edit" while the YubiKey is plugged in.
gpg/card> name
Cardholder's surname: Simpson
Cardholder's given name: John

gpg/card> login
Login data (account name): jms1@jms1.net

gpg/card> lang
Language preferences: en
You can also enter a URL where the corresponding public key can be downloaded. Doing this allows you to use the "gpg --edit-card" command's "fetch" sub-command to load your public keys into a new computer's keyring. PGPCards only hold secret keys - they don't hold public keys, user IDs, signatures, or expiration dates.
This is not required. If you don't have, or don't want, a copy of your public key saved on a web site somewhere, feel free to skip this step.
gpg/card> url
URL to retrieve public key: https://jms1.net/6B2EDC90B5C6DC30.pub.asc
You can also set a flag which tells the YubiKey to require the PIN to be entered, every time a signature is generated. Without this, you will be asked for the PIN the first time you generate one, and the YubiKey will "stay unlocked" and generate more signatures as requested, until it is unplugged from the computer.
gpg/card> forcesig
To see the updated state of the card, just hit RETURN at the "gpg/card>" prompt.
gpg/card>

Reader ...........: Yubico Yubikey 4 OTP U2F CCID
Application ID ...: D2760001240102010006069404470000
Version ..........: 2.1
Manufacturer .....: Yubico
Serial number ....: 06940447
Name of cardholder: John Simpson
Language prefs ...: en
Sex ..............: unspecified
URL of public key : https://jms1.net/6B2EDC90B5C6DC30.pub.asc
Login data .......: jms1@jms1.net
Signature PIN ....: forced
Key attributes ...: rsa4096 rsa4096 rsa4096
Max. PIN lengths .: 127 127 127
PIN retry counter : 3 0 3
Signature counter : 0
Signature key ....: [none]
Encryption key....: [none]
Authentication key: [none]
General key info..: [none]
When you're happy with the settings, use "q" to exit the "gpg --card-edit" command. Note that this isn't "saving" anything, the changes you made were saved to the YubiKey immediately.
gpg/card> q
Remove and re-insert the Yubikey.
From this point forward, you will need to enter the PIN in order to make use of any keys, and you will need to enter the Admin PIN in order to load keys or change settings.
Notes
- The "URL of public key" is used by the "
fetch" command (under "gpg --card-edit") to retrieve the public key when using the YubiKey on a machine which doesn't already have the public key in its keyring.
Load keys on Yubikey
$ gpg --edit-key 6353320118E1DEA2F38EAE806B2EDC90B5C6DC30
gpg (GnuPG/MacGPG2) 2.2.0; Copyright (C) 2017 Free Software Foundation, Inc.
This is free software: you are free to change and redistribute it.
There is NO WARRANTY, to the extent permitted by law.

Secret key is available.

sec  rsa4096/0x6B2EDC90B5C6DC30
     created: 2017-05-27  expires: never       usage: SC
     trust: ultimate      validity: ultimate
ssb  rsa4096/0x297E5961AB566594
     created: 2017-05-27  expires: never       usage: E
ssb  rsa4096/0xBA6C2A169C6C0F60
     created: 2017-11-10  expires: never       usage: A
[ultimate] (1). John M. Simpson <jms1@voalte.com>
[ultimate] (2)  John M. Simpson <jms1@jms1.net>
Select the Authentication sub-key.
-
Each "
ssb" line is a sub-key. They are numbered in the order shown here (even though the program doesn't show the numbers.) -
You will see an asterisk appear next to a sub-key when it is selected.
-
It is possible to select more than one key. The same
keycommand which selects a key will also de-select a key. (You will see this below.)
Make sure the Authentication sub-key is the only one selected.
gpg> key 2

sec  rsa4096/0x6B2EDC90B5C6DC30
     created: 2017-05-27  expires: never       usage: SC
     trust: ultimate      validity: ultimate
ssb  rsa4096/0x297E5961AB566594
     created: 2017-05-27  expires: never       usage: E
ssb* rsa4096/0xBA6C2A169C6C0F60
     created: 2017-11-10  expires: never       usage: A
[ultimate] (1). John M. Simpson <jms1@voalte.com>
[ultimate] (2)  John M. Simpson <jms1@jms1.net>
Send the selected sub-key to the Authentication slot on the Yubikey (or the "card", as gpg calls it.)
gpg> keytocard
Please select where to store the key:
   (3) Authentication key
Your selection? 3

sec  rsa4096/0x6B2EDC90B5C6DC30
     created: 2017-05-27  expires: never       usage: SC
     trust: ultimate      validity: ultimate
ssb  rsa4096/0x297E5961AB566594
     created: 2017-05-27  expires: never       usage: E
ssb* rsa4096/0xBA6C2A169C6C0F60
     created: 2017-11-10  expires: never       usage: A
[ultimate] (1). John M. Simpson <jms1@voalte.com>
[ultimate] (2)  John M. Simpson <jms1@jms1.net>
Now select the Encryption sub-key, and un-select the Authentication sub-key.
gpg> key 1

sec  rsa4096/0x6B2EDC90B5C6DC30
     created: 2017-05-27  expires: never       usage: SC
     trust: ultimate      validity: ultimate
ssb* rsa4096/0x297E5961AB566594
     created: 2017-05-27  expires: never       usage: E
ssb* rsa4096/0xBA6C2A169C6C0F60
     created: 2017-11-10  expires: never       usage: A
[ultimate] (1). John M. Simpson <jms1@voalte.com>
[ultimate] (2)  John M. Simpson <jms1@jms1.net>

gpg> key 2

sec  rsa4096/0x6B2EDC90B5C6DC30
     created: 2017-05-27  expires: never       usage: SC
     trust: ultimate      validity: ultimate
ssb* rsa4096/0x297E5961AB566594
     created: 2017-05-27  expires: never       usage: E
ssb  rsa4096/0xBA6C2A169C6C0F60
     created: 2017-11-10  expires: never       usage: A
[ultimate] (1). John M. Simpson <jms1@voalte.com>
[ultimate] (2)  John M. Simpson <jms1@jms1.net>
Send the selected sub-key to the Encryption slot on the Yubikey.
gpg> keytocard
Please select where to store the key:
   (2) Encryption key
Your selection? 2

sec  rsa4096/0x6B2EDC90B5C6DC30
     created: 2017-05-27  expires: never       usage: SC
     trust: ultimate      validity: ultimate
ssb* rsa4096/0x297E5961AB566594
     created: 2017-05-27  expires: never       usage: E
ssb  rsa4096/0xBA6C2A169C6C0F60
     created: 2017-11-10  expires: never       usage: A
[ultimate] (1). John M. Simpson <jms1@voalte.com>
[ultimate] (2)  John M. Simpson <jms1@jms1.net>
Now un-select all sub-keys, which results in the main key being selected.
gpg> key 1

sec  rsa4096/0x6B2EDC90B5C6DC30
     created: 2017-05-27  expires: never       usage: SC
     trust: ultimate      validity: ultimate
ssb  rsa4096/0x297E5961AB566594
     created: 2017-05-27  expires: never       usage: E
ssb  rsa4096/0xBA6C2A169C6C0F60
     created: 2017-11-10  expires: never       usage: A
[ultimate] (1). John M. Simpson <jms1@voalte.com>
[ultimate] (2)  John M. Simpson <jms1@jms1.net>
Send the main key to the Signature slot on the Yubikey.
gpg> keytocard
Really move the primary key? (y/N) y
Please select where to store the key:
   (1) Signature key
   (3) Authentication key
Your selection? 1

sec  rsa4096/0x6B2EDC90B5C6DC30
     created: 2017-05-27  expires: never       usage: SC
     trust: ultimate      validity: ultimate
ssb  rsa4096/0x297E5961AB566594
     created: 2017-05-27  expires: never       usage: E
ssb  rsa4096/0xBA6C2A169C6C0F60
     created: 2017-11-10  expires: never       usage: A
[ultimate] (1). John M. Simpson <jms1@voalte.com>
[ultimate] (2)  John M. Simpson <jms1@jms1.net>
We're done here, BUT ... we need to be careful. The next command will quit out of the "gpg --card-edit" command, and it will ask if you want to save changes. IF YOU SAY YES, the secret keys you just installed on the YubiKey will be REMOVED from the secret keyring file on the computer.
Unless you are 100% sure that's what you want to do (i.e. if you have a known-good backup of the secret keys), BE SURE TO SAY NO.
gpg> q
Save changes? (y/N) n
Quit without saving? (y/N) y
Now if you query the card, you will see the keys in the three slots.
$ gpg --card-status

Reader ...........: Yubico Yubikey 4 OTP U2F CCID
Application ID ...: D2760001240102010006069404470000
Version ..........: 2.1
Manufacturer .....: Yubico
Serial number ....: 06940447
Name of cardholder: John Simpson
Language prefs ...: en
Sex ..............: unspecified
URL of public key : https://jms1.net/6B2EDC90B5C6DC30.pub.asc
Login data .......: jms1@jms1.net
Signature PIN ....: not forced
Key attributes ...: rsa4096 rsa4096 rsa4096
Max. PIN lengths .: 127 127 127
PIN retry counter : 3 0 3
Signature counter : 0
Signature key ....: 6353 3201 18E1 DEA2 F38E  AE80 6B2E DC90 B5C6 DC30
      created ....: 2017-05-27 22:28:31
Encryption key....: 0660 766F 2768 F41F D4B9  1DB7 297E 5961 AB56 6594
      created ....: 2017-05-27 22:28:31
Authentication key: BBA5 C6BB 23D2 B53B 0D0F  6C0B BA6C 2A16 9C6C 0F60
      created ....: 2017-11-10 23:29:14
General key info..: pub  rsa4096/0x6B2EDC90B5C6DC30 2017-05-27 John M. Simpson <jms1@voalte.com>
sec   rsa4096/0x6B2EDC90B5C6DC30  created: 2017-05-27  expires: never
ssb   rsa4096/0x297E5961AB566594  created: 2017-05-27  expires: never
ssb   rsa4096/0xBA6C2A169C6C0F60  created: 2017-11-10  expires: never
Notes
-
The output you see from the commands above may differ slightly based on the version of the
gpgsoftware and how it's configured. -
The Yubikey does not store public keys, it only stores private keys. Private keys are just numbers, they don't have attributes like names or expire dates. Everything after the fingerprints, such as the name and email, and the
created:andexpires:dates, all came from the keyring on the machine. If you query the card from a machine which doesn't have the public keys available, all you will see is the fingerprints.
As an example, this is a different version of gpg, looking at a different Yubikey, with different key loaded, and for this example I manually changed the GNUPGHOME variable to point to an empty directory so the command won't recognize the key...
$ gpg --card-status
Reader ...........: Yubico YubiKey OTP FIDO CCID
Application ID ...: D2760001240102010006063013830000
Version ..........: 2.1
Manufacturer .....: Yubico
Serial number ....: 06301383
Name of cardholder: John Simpson
Language prefs ...: en
Sex ..............: unspecified
URL of public key : https://jms1.net/A7EC1FBAB3B50007.pub.asc
Login data .......: jms1@jms1.net
Signature PIN ....: forced
Key attributes ...: rsa4096 rsa4096 rsa4096
Max. PIN lengths .: 127 127 127
PIN retry counter : 3 0 3
Signature counter : 74
Signature key ....: AF6C 0A45 953A 0881 06A7  D254 CE57 35E1 E04C 1374
      created ....: 2017-11-27 00:53:45
Encryption key....: BF37 34CD 9834 B3B4 7A8E  D70E 2A9E B3A6 20A1 C087
      created ....: 2017-11-27 00:36:27
Authentication key: 5761 1969 0CC7 57A4 7300  57C3 A634 470E CECC 41E0
      created ....: 2017-11-27 01:00:17
General key info..: [none]
Changelog
2024-06-19 jms1
- moved page to new
jms1.infosite, updated header
2021-01-22 jms1
- added more detail about setting the user data (name, email, etc.)
- added more detail about setting PINs, including PUK
2020-12-24 jms1
- added note about not saving changes when quitting out of
gpg --card-edit
2020-12-20 jms1
- moved to
jms1.info - added the "Background" section at the top, moved "Changelog" to the end
- tweaked formatting
2018-03-06 jms1
- tweaked the formatting
- last version on
jms1.netsite
2017-12-13 jms1
- first version
Reset the YubiKey OpenPGP App
2017-12-13
How to reset the OpenPGP app on a YubiKey Neo
Yubico's official procedure
Yubico now has an officially documented procedure for resetting the OpenPGP applet on a YubiKey device.
The procedure documented below seems to have worked for me with a YubiKey Neo in the past, however I don't know if it will also work with other YubiKey hardware, and to be honest I'm not 100% sure exactly what it's doing. I just combined information from a few different web sites until I found something that worked for me at the time.
Please use Yubico's officially documented procedure instead of using the procedure below.
Old content
$ gpg-connect-agent <<EOF
/hex
scd serialno
scd apdu 00 20 00 81 08 40 40 40 40 40 40 40 40
scd apdu 00 20 00 81 08 40 40 40 40 40 40 40 40
scd apdu 00 20 00 81 08 40 40 40 40 40 40 40 40
scd apdu 00 20 00 81 08 40 40 40 40 40 40 40 40
scd apdu 00 20 00 83 08 40 40 40 40 40 40 40 40
scd apdu 00 20 00 83 08 40 40 40 40 40 40 40 40
scd apdu 00 20 00 83 08 40 40 40 40 40 40 40 40
scd apdu 00 20 00 83 08 40 40 40 40 40 40 40 40
scd apdu 00 44 00 00
scd apdu 00 e6 00 00
/bye
EOF
Remove and insert YubiKey.
$ gpg --card-status
gpg: selecting openpgp failed: Operation not supported by device
gpg: OpenPGP card not available: Operation not supported by device
$ gpg-connect-agent <<EOF
/hex
scd serialno undefined
scd apdu 00 a4 04 00 06 d2 76 00 01 24 01
scd apdu 00 44 00 00
scd apdu 00 e6 00 00
/bye
EOF
$ gpg --card-status
gpg: selecting openpgp failed: Conflicting use
gpg: OpenPGP card not available: Conflicting use
Remove and insert YubiKey.
$ gpg --card-status
Reader ...........: Yubico Yubikey 4 OTP U2F CCID
Application ID ...: D2760001240102010006069404470000
Version ..........: 2.1
Manufacturer .....: Yubico
Serial number ....: 06940447
Name of cardholder: [not set]
Language prefs ...: [not set]
Sex ..............: unspecified
URL of public key : [not set]
Login data .......: [not set]
Signature PIN ....: not forced
Key attributes ...: rsa2048 rsa2048 rsa2048
Max. PIN lengths .: 127 127 127
PIN retry counter : 3 0 3
Signature counter : 0
Signature key ....: [none]
Encryption key....: [none]
Authentication key: [none]
General key info..: [none]
The OpenPGP app is now "empty" - no keys, PINs reset to default values, etc.
Changelog
2024-06-19 jms1
- moved page to new
jms1.infosite, updated header
2020-12-20 jms1
- moved to
jms1.info, moved Changelog to end of file - minor formatting updates
2019-03-23 jms1
- added info about Yubico's supported process for resetting the OpenPGP applet
- last version on
jms1.net
2017-12-13 jms1
- initial version
Using a Yubikey for SSH keys
2024-06-30
This page will cover how I'm storing my SSH (and PGP) keys on a Yubikey. It will combine information from other notes that I've written over the years.
It will also contain links to other pages on this site, where parts of this process are already explained.
Finally, note that I haven't "finished" this page yet. It has enough information for me to know what's going on, but there are parts that I just haven't had time to "flesh out" yet. I don't plan to leave it this way forever, but I at least wanted to get this page mostly done and on the site, because at least two different people are waiting for it.
Background
In order to understand how this works, you'll need to have a basic understanding of a few other things first. If you already have a basic understanding of these things, or if you're impatient and don't want to have to read through them, feel free to skip over them.
ℹ️ These explanations are deliberately leaving out a lot of detail. I promise, I'm not trying to make this page any longer than it needs to be.
Public-Key Encryption
Traditional encryption systems (or "cryptosystems") use the same key to encrypt and decrypt each message. If you encrypt a message using one key, the recipient needs the same key to decrypt it - and anybody else who manages to get a copy of that key will also be able to decrypt it. These are known as "shared-key" or "symmetric-key" systems, because the same key is used for both operations.
In a public-key encryption system, each party has a pair of keys. These keys are used with algorithms where a message encrypted using one of those keys, can only be decrypted using the other key in the same pair. Each user generates a key pair, shares one key with the world (known as a "public key"), and keeps the other key to themself (known as a "private key" or "secret key").
Public-key algorithms use a LOT more resources (CPU, RAM, and time) than symmetric-key algorithms. Because of this, most cryptosystems (including PGP and SSH) will generate and use a random key (or "ephemeral" key) with a symmetric-key algorithm to encrypt the message itself, and then use a public-key algorithm to encrypt that ephemeral key. The recipient uses their secret key to decrypt the portion containing the ephemeral key, then uses the ephemeral key to decrypt the actual message. This way the "more expensive" operations are used at the beginning, but the "less expensive" operations are used for the bulk of the message. This is especially useful for larger messages.
PGP and GnuPG
PGP, or "Pretty Good Privacy", is an encryption system written by Phil Zimmermann in the early 1990's. The source code was available online, although it didn't quite have what we know today as an "open source" license.
At the time he wrote it, the US had restrictions on exporting cryptographic software, and he was subjected to a three-year criminal investigation. (Those export restrictions were later removed when Daniel J. Bernstein filed, and won, a series of lawsuits against the United States.)
Zimmermann later started a company called PGP, Inc. to try and commercialize the pgp software. It had some success, and was later sold to Network Associates, who then sold it to Symantec, who still owns the name and the "intellectual property" but doesn't appear to be doing anything with it.
PGP's message format was standardized as the "OpenPGP Message Format" in RFC 4880. Several programs implement this standard.
GnuPG is the most common implementation of PGP. This is an open-source software package which is available for pretty much every operating system out there, including macOS and Linux. (There is a related project called gpg4win for ms-windows.)
PGP Keys and Subkeys
When a user generates a PGP key, they are actually generating a set of key pairs. Each key pair has flags describing which operations that key is meant to be used for. One of the keys is designated as the "primary" key, and most "PGP keys" have one or more "subkeys". Each individual key or subkey is flagged to be used for specific operations.
The default configuration of a "PGP key" has ...
-
A primary key, flagged with
[C]for certifying (signing other PGP keys), and usually[S]for signing messages. You normally see these combined as[SC]. -
A subkey, flagged with
[E]for encrypting messages.
It is possible, and in some cases can be useful, to create a primary key with only the [C] flag. This can be useful if you need a key that will never be used to sign messages, and should only be used by others to encrypt message to you.
There is a fourth capability, [A] for authenticating. Most PGP users aren't even aware that it exists, but we're going to use it below.
SSH Key-based Authentication
For SSH, each user has a key pair. These are commonly stored in files with matched filenames, such as id_rsa for a secret key, and id_rsa.pub for the corresponding public key. However, if you're able to store the secret key somewhere else (like in a Yubikey), there's no need for the secret key to exist on the computer at all - which makes it very hard for an attacker to steal the secret key. (They can't steal what isn't there in the first place.)
SSH key-based authentication works like this:
-
On each server that a user might need to log into, they store copies of their SSH public key(s) in their
$HOME/.ssh/authorized_keysfile. -
When the user wants to log into the server, the server sends the client a challenge containing a block of random data (also known as a "nonce").
-
The client answers the challenge by "signing" the nonce (encrypting it using the SSH secret key) and sending the result back to the server.
-
The server tries to decrypt the client's response using the public keys in the user's
authorized_keysfile. If one of them successfully decrypts the response, authentication succeeds and the incoming connection is logged in as that user. -
Otherwise, authentication fails and the client is not allowed to log in.
Most systems use an "SSH agent" to perform the nonce-signing. This is a process which holds secret keys in memory, and offers an interface which allows clients to ask for nonces to be signed. This interface is implemented using a "unix socket", which is only accessible from processes on the same machine.
OpenSSH is the standard SSH implementation for macOS and Linux. It uses a program called ssh-agent to perform the agent function, however any program which offers the same interface can do the same thing.
GnuPG comes with a program called gpg-agent which serves a similar function for PGP secret keys, and can be configured to "speak" the SSH agent protocol. Part of the solution we'll be building below will involve configuring your SSH clients to talk to a pgp-agent process.
Yubikey
A Yubikey is a small USB device that fits on your keychain. It can be used as a "second factor" for authentication, and is available with USB-A, USB-C, or "Lightning" (used on many Apple devices) connectors, as well as NFC (short-range wireless) connectivity.
Yubikey devices are miniature computers. They run their own "apps", which are loaded by Yubico during manufacturing, and which for security reasons, cannot be upgraded, deleted, or modified. Each Yubikey has a "secure element" which stores encryption keys in a way that they cannot be extracted, even by an attacker who physically disassembles the Yubikey and attaches wires directly to the right chips on the board.
The Yubikey Neo, 4, and 5 series have an OpenPGP app. This app implements the OpenPGP Card standard, which allows it to work with GnuPG's smart card support. The OpenPGP app can store three secret keys in the Yubikey's secure element, and can use those keys to perform OpenPGP functions which require them (signing and decrypting messages).
The app does not have a way to export the secret keys, so once a secret key is loaded into (or generated on) a Yubikey, it cannot be extracted.
Tails
Tails is a Linux system designed around privacy.
-
It boots from a USB memory stick and runs from a RAM disk. Any data saved to the RAM disk is deleted when Tails shuts down.
-
Almost all network traffic is routed through Tor.
-
The software we're going to need, including GnuPG, is already installed.
Tails can set up an encrypted Persistent Storage partition on the USB stick, where files can be saved permanently. We will be using this functionality to hold the only copy of your secret keys.
Recap
This is what we're actually going to do:
-
Under Tails with Persistent Storage
- Generate a new PGP key (or import an existing key).
- Add a subkey with the authentication flag.
- Generate the corresponding SSH public key for this new subkey.
- Load that subkey into a Yubikey.
-
On each machine you want to be able to SSH into (i.e. the servers you need to SSH into)
- Add the generated SSH public key, to your
$HOME/.ssh/authorized_keysfile.
- Add the generated SSH public key, to your
-
On each machine where you want this to work (i.e. workstations)
- Configure
pgp-agentto support the SSH agent protocol. - Make your SSH clients talk to
pgp-agentas the SSH agent.
- Configure
If anything on this list doesn't make sense to you at all, please go back up and re-read the information above. If it still doesn't make any sense, there's a chance that I'm forgetting something. Please let me know if this is the case, so I can update this page.
Boot into Tails with Persistent Storage
Most of the procedures below will take place in a running Tails system.
Rather than try and explain Tails here, I'm going to point you to the documentation on their web site.
- Installing Tails
- You will need a USB stick which is 16 GB or larger, as well as a computer which is capable of booting from a USB stick. (The USB stick on my keychain is 128 GB, I store more than just PGP keys on it.)
- About Persistent Storage
- Create a Persistent Storage Partition
- Configure the Persistent Storage ... the following categories should be enabled:
- Persistent Folder
- GnuPG
- Additional Software
- Dotfiles
Make sure you boot into Tails, with Persistent Storage unlocked, and the listed categories enabled, BEFORE you continue.
These directions will involve using the command line. In Tails, you can access the command line using:
- Applications → Utilities → Terminal
Create or Import a PGP Key
The goal of this section is to have a PGP key pair, with an authentication subkey, in the GnuPG keyring in your Tails Persistent Storage. This will include both the public and secret keys.
The idea is that this Tails stick, with Persistent Storage unlocked, will be the only place you'll be able to use the PGP key without a Yubikey.
Create a PGP Key
If you don't already have a PGP key, you'll need to create one.
gpg --gen-keygpg --quick-generate-key 'Name <email>' rsa4096 default 20250101T000000
Because some older PGP software may not be able to handle ed25519 keys, I use rsa4096 for my primary key. You can do this and still have an ed25519 authentication subkey for SSH (and actually, the PGP key I use for $DAYJOB has two authentication subkeys - one rsa4096 and one ed25519.)
Import a PGP Key
If you already have a PGP key, you'll need to import both the public and secret keys into the GnuPG keyring within Tails.
Export from your current PGP software
The mechanics of exporting keys will depend on your current PGP software. If you're using GnuPG, you'll want to create an encrypted USB stick (using LUKS or VeraCrypt, so Tails will be able to mount it) and store the exported files there. DO NOT store your exported secret key where anybody else will be able to access it.
The process will look something like this:
cd /mnt/encrypted
gpg -a --export KEYID > KEYID.pub
gpg -a --export-secret-keys KEYID > KEYID.sec
Import into GnuPG
This process will look something like this:
gpg --import KEYID.pub
gpg --import KEYID.sec
You will probably want to set the key's "trust" to "ultimate" as well.
$ gpg --edit-key KEYID
...
gpg> trust
...
Please decide how far you trust this user to correctly verify other users' keys
(by looking at passports, checking fingerprints from different sources, etc.)

  1 = I don't know or won't say
  2 = I do NOT trust
  3 = I trust marginally
  4 = I trust full
  5 = I trust ultimately
  m = back to the main menu

Your decision? 5
Do you really want to set this key to ultimate trust? (y/N) y
...
Please note that the shown key validity is not necessarily correct
until you restart the program.

gpg> q
⚠️ Do not use the "ultimate" trust level for any keys other than your own.
Add an Authentication Subkey
- couldn't find a way to import existing SSH secret key as an authentication subkey
- "monkeysphere" sounds like it might be able to do it, but it looks like it's been abandoned (web site appears to have been taken over by a domain squatter)
Export SSH public key
Use the Key ID of the authentication subkey for this. If your PGP key only has one authentication subkey, you can also use the Key ID of the primary key for this. The software will find and use the authentication subkey automatically.
In this example, I'm using my primary Key ID.
$ gpg --export-ssh-key E3F7F5F76640299C5507FBAA49B9FD3BB4422EBB > id_rsa_yubikey.pub
$ cat id_rsa_yubikey.pub
ssh-rsa AAAAB3Nz...AkjIPw== openpgp:0xF8D09EB7
Edit the comment as needed. I normally use my name, email, the date the subkey was generated, and which Yubikey(s) will contain that key. This way when they appear in a file with other keys, it's easy to recognize which key is which.
$ cat id_rsa_yubikey.pub
ssh-rsa AAAAB3Nz...AkjIPw== John Simpson <jms1@jms1.net> 2019-03-21 Yubikey Blue
I have different coloured stickers on my Yubikeys, so I can tell which Yubikeys have which PGP/SSH keys on them. My personal PGP/SSH keys are on Yubikeys with the plain blue stickers.
Send the key to an "outside" system.
Load Keys into the Yubikey
Add SSH key to authorized_keys files
- standard process, just like adding any other key
- can be done with
ssh-copy-id
Set up Workstation
- manual process
- Tails?
Changelog
2024-07-07 jms1
- published what I have so far to
jms1.info - included a note explaining that I'll add more human-readable info when I have time
2024-06-30 jms1
- started this page, pulling in info from several other pages
2026-05-06 19:26:29 +0000
